
Orange Scones
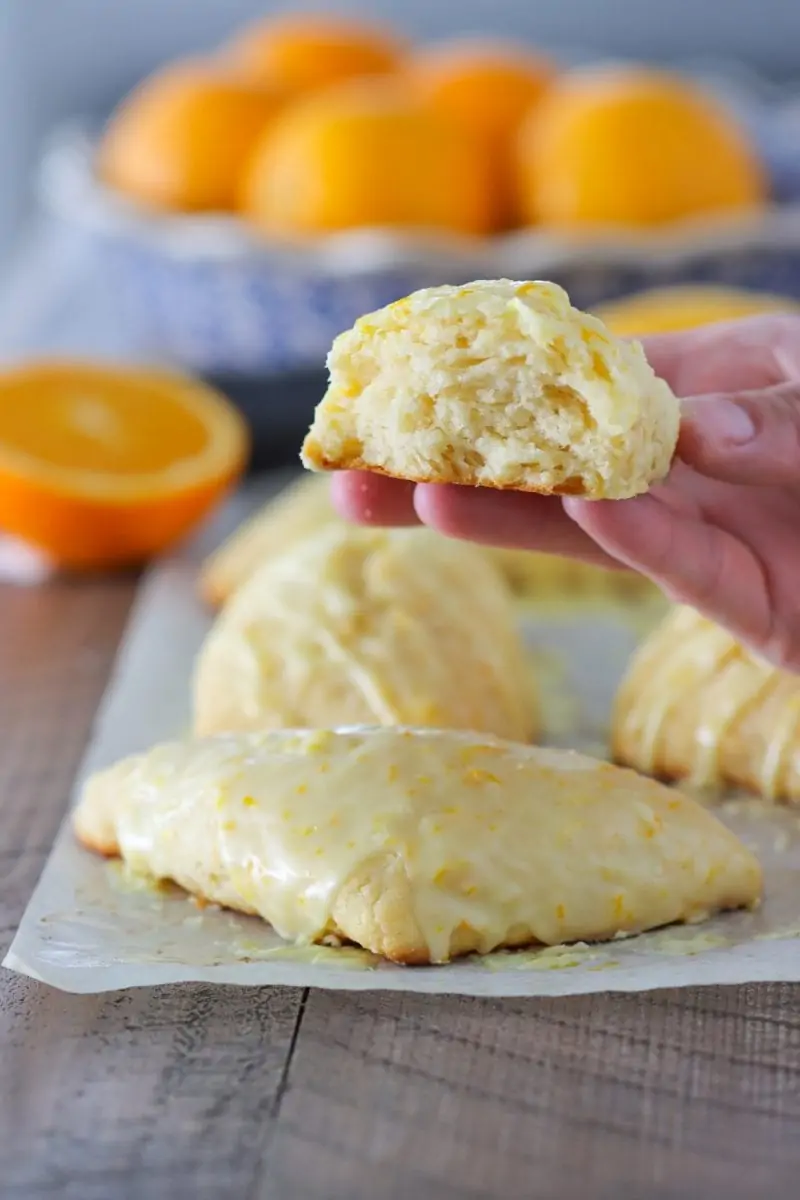
Orange scones are the ultimate pastry perfection and can easily be made at home. They are tender, with buttery, flaky layers and so much orange flavor in the pastries and the glaze. Such a wonderful treat for kids and adults.

Orange scones are a marriage of two of my favorite things – scones and citrus. If I’m attending a potluck, chances are that I’ll arrive holding a plate of scones in my hands. Scones are also my go-to dessert to prepare if I’m having guests over for coffee or tea. They are just so wonderful, not too sweet, golden and crunchy on the outside and the pastry itself is incredibly tender, flaky and buttery. There is so much orange flavor in every bite, from inside the scone and on the outside glaze too.
You can typically find orange scones in most bakeries and coffee shops, but I promise these homemade scones are on a whole different level of amazingness. You can definitely master making these pastries if you follow a few simple but important tips that I will walk you through, step by step so you get it just right.
Scones are great for meal prepping and they freeze well too. Since you don’t need any special tools, not even a mixer, you can make it anytime and anywhere. I’ve made these on vacations and at other people’s houses. It’s such a treat for the whole family or friend group to enjoy. What could be more cozier than biting into some slightly warm pastries? It will make your companionship all that much better when you have some scones to enjoy with your coffee and conversation. When you’ve tasted these Orange Scones, you might want to try Lemon Blueberry Scones too.
Watch the Video Tutorial of Orange Scones
Ingredients For Orange Scones:
- orange – zest and juice
- butter – frozen and a few Tablespoons melted
- whole milk + sour cream – you can also use buttermilk, but most buttermilk in stores in reduced fat. I use whole milk and whole milk sour cream, so I think it makes a difference in contributing to making the scones extra tender.
- vanilla extract
- all purpose flour – I have not tried using any other flour or gluten free flour options
- granulated sugar
- baking powder, baking soda, salt
- powdered sugar – for the glaze
How to Make Orange Scones
It’s very important that all the ingredients are very cold. Place your butter in the freezer a few hours or even the day before you make the scones.
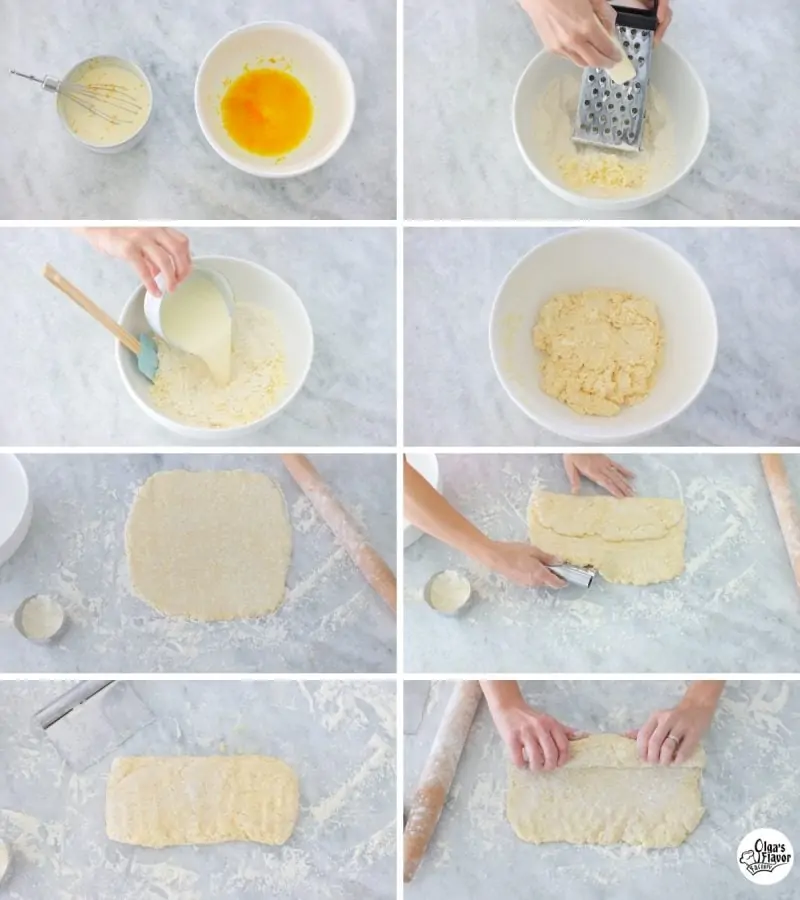
- Chill the liquid ingredients. In a liquid measuring cup, whisk the milk and sour cream until smooth. Add half the orange zest and 2 Tablespoons of orange juice and vanilla extract. Mix to combine. Place in the refrigerator while you mix the dry ingredients and butter.
- Combine the dry ingredients. In a large bowl, combine the flour, sugar, baking powder, baking soda and salt until evenly mixed.
- Grate the butter. Take the frozen butter and grate it on a box grater right into the dry ingredients. Mix until the butter is coated in the flour.
- Mix the dough. Pour the liquid ingredients into the dry ingredients and mix just until it comes together. Don’t overwork it.
- Roll out the dough, fold and chill. On a well floured surface, place the scone dough and sprinkle with flour on top too. Gently roll out the dough on a 12 inch square. If it starts to to stick to the counter, add more flour. Fold the dough into thirds, like a business letter. Place the dough on a plate and chill in the freezer for 5 minutes.
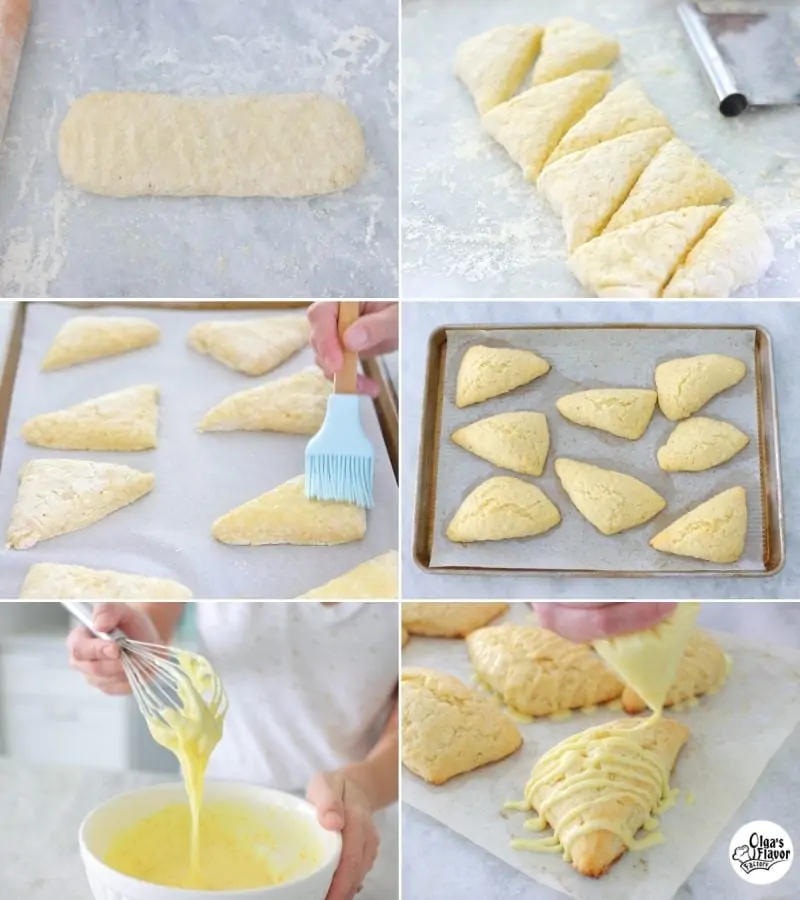
- Roll out the dough again and shape into scones. When the dough is cold, roll it out again into a 12 inch square. Roll it up tightly, then flatten and shape it with your hands into a 12 X 4 inch rectangular log. Cut it in half, then each piece in half again. Lastly, cut each piece on the diagonal so that you have 8 triangles.
- Bake. Place the scones on a parchment sheet lined baking sheet. Brush on top with melted butter. Bake for 15-22 minutes in the preheated 425 degrees Fahrenheit oven. Set aside for 5 minutes, then transfer to a rack to cool.
- Make the orange glaze. Combine the powdered sugar, orange zest, orange juice and milk in a medium bowl. Whisk until smooth. If the glaze is too thick, thin out with a bit more milk or orange juice.
- Drizzle glaze on scones. The scones should be barely warm or cool when you apply the glaze. Drizzle the glaze on the scones. You can use the whisk, a spoon, a pastry brush, or pour it inside a ziplock bag, cut off a tiny corner and drizzle that way.
Helpful Tips For the Best Scones
Keep the Ingredients and the Dough COLD
If you keep this in mind with every step of the scone making process, you’ll do great.
- Freeze the butter. This will really help to keep it cold longer, so it won’t start melting right after it’s added to the flour and then when you mix the dough.
- Chill the liquid ingredients. I even put it in the freezer while mixing the dry ingredients an grating the butter.
- Work quickly when mixing the dough so the butter doesn’t melt.
- When rolling out the dough, also work quickly. As an extra step, you can place the scones into the refrigerator or freezer before baking them.
How to Prevent Scones From Spreading in the Oven:
Again, keeping everything cold is the key. Secondly, don’t overwork the dough when mixing it and also when you are rolling it out.
How to Make Scones as tender and flaky as possible:
This is where the seemingly extra steps of rolling out the dough, folding it into thirds, chilling it in freezer, then repeating comes in. When you have the frozen flakes of butter in the dough, they will melt in the oven creating pockets of air. That’s the first part of creating buttery layers. Also, the process of rolling out, folding, chilling and repeating creates multiple layers in the dough too. Don’t skip these steps. If you will, the scones will be more dense and flatter.
Infusing Lots of Orange Flavor Into Scones
Using an orange is the secret here. The orange zest is where all the flavor is. If you decide not to bother with a fresh orange and just use orange juice, the scones will be fine. However, the orange flavor will be very mild and barely decipherable.
Watch the Oven Temperature
425 degrees Fahrenheit is fairly high, but scones need that blast of heat to give you the flaky tender scones. If you bake them at a lower temperature, they will also be more dense, they won’t have that golden color and crunchiness on the outside (which is phenomenal; I love it). However, ovens are often not as accurate and with a higher oven temperature, you don’t have as much leeway. Start checking your scones around 12 minutes, because they may already be done, or you may need to bake them for 18-20 minutes, if your oven doesn’t get as hot.
Storing and Freezing Scones
Store the scones at room temperature, lightly covered, for 3-5 days.
Scones can be frozen for up to 3 months. Store in an airtight container or freezer ziplock bag. Simply defrost the baked scones, and then reheat in the oven at 350-400 degrees for about 10-15 minutes, if you want to warm them up. Or just thaw and eat.
Orange Scones

Orange scones are the ultimate pastry perfection and can easily be made at home. They are tender, with buttery layers and so much orange flavor in the pastries and the glaze. Such a perfect treat for kids and adults.
- Prep Time: 20 mins
- Cook Time: 20 mins
- Total Time: 40 mins
- Yield: 8 scones 1x
Ingredients
Scones:
- 8 Tablespoons butter, frozen, plus 2 more Tablespoons melted
- 1/2 cup whole milk
- 1/2 cup sour cream
- 2 Tablespoons orange juice
- zest of 1/2 – 3/4 of an orange
- 1 teaspoon vanilla extract
- 2 cups all-purpose flour, plus additional for work surface
- 1/2 cup granulated sugar, plus 1-2 Tablespoons for sprinkling
- 2 teaspoons baking powder
- 1/4 teaspoon baking soda
- 1/2 teaspoon table salt
Glaze:
- 1 1/2 cups powdered sugar
- 1 Tablespoon buttermilk or milk
- 2–4 Tablespoons orange juice
- zest of 1/2 – 1/4 of an orange
Instructions
Scones:
- It’s very important that all the ingredients are very cold. Place your butter in the freezer for a few hours or even the day before you make the scones.
- Preheat the oven to 425 degrees. Line a rimmed baking sheet with parchment paper.
- Mix the milk, sour cream, orange zest, orange juice and vanilla together in a medium bowl. Set this mixture aside in the refrigerator to chill.
- Mix the dry ingredients – the flour, sugar, baking powder, baking soda and salt in a large bowl until evenly combined.
- Grate the frozen butter on a box grater into the bowl of dry ingredients, mixing the grated butter in the flour as you grate it. Work fast so that the butter doesn’t start to melt. You should have separate curls of butter coated in flour.
- Add the liquid ingredients to the dry ingredients. Mix with a rubber spatula quickly to combine, just until the dough comes together.
- On a well floured surface, place the dough and sprinkle it with flour on top too.
- Gently roll it out into a 12 inch square. Fold it like a business letter, into thirds, using a bench scraper to help you pick up the dough. If the dough starts to stick to the counter or the rolling pin, add more flour.
- Place it on a floured plate and chill in the freezer for 5 minutes.
- On the same well floured surface, roll it out into a 12 inch square again.
- Using a bench scraper to help you, roll up the dough into a log. Press it into a 12 x 4 inch log.
- Cut the log in half, then each piece in half again, using the bench scraper or a sharp knife. Then cut the 4 pieces in half diagonally into 4 triangles, to make 8 scones total.
- Place the scones on the prepared baking sheet and brush the scones with the melted butter.
- Bake for 15-22 minutes, until the scones are golden brown on the top and bottom.
Making the Glaze and Finishing the Scones:
- While the scones are baking, make the glaze.
- Whisk the powdered sugar, buttermilk, orange zest and orange juice in a medium bowl. You can add a bit more orange juice if you want the glaze to be thinner.
- Apply the glaze to the top of the scones when they are at least partially cooled. You can drizzle the glaze, brush it on with a pastry brush or even smooth it on with a small spoon or butter knife.
Notes
Scones can be frozen for up to 3 months. Simply defrost the baked scones, and then reheat in the oven at 350-400 degrees for about 10-15 minutes. You can also make them a day ahead of time and reheat them also so they are warm and taste just as fresh.
This is an updated version of the Orange Scones recipe that was published originally on June 28, 2014. The recipe is the same; I updated the photos and clarified the instructions.
Tatyana
Olga! All I can say is thank you !
olgak7
You’re welcome! I hope you enjoy the scones, Tatyana.
Yana D
Olya, thank you for the recipe. I did make them yesterday and they were delicious. My hubby and kids loved them.
olgak7
Thank you so much for taking the time to let me know, Yana! It makes my day to know that others are enjoying my recipes.
Natalya
Made yestorday, didnt have orange, used grapefruit, made two baches, they turn SOOOOO YAMMMY.
Thanks a lot for this yammy scones
olgak7
Grapefruit! Yum! Good thinking, Natalya. The best cooks adjust their recipes to make do with what they have:).
Olga
Just made them! Absolutely love !!!
Had lots of homemade buttermilk left (after making some butter )so used it instead of sour cream /milk… Yammers!
Thnx a lot Olga! Will be making them soon again (for the freezer 🙂 )
BLESSINGS to you and your family!
Alina
Seriously these are the best!!! When I made them and doubled the recipe, we still ended up eating them all in one day. It hasn’t been a week yet and my husband is asking me to make some more. Great recipe. Thank you Olga!
olgak7
Thank you so much for writing to tell me, Alina. That’s great!
Tatyana
Simply delicious! My in-laws that’s stopped by for tea were both smitten with them!
olgak7
That’s wonderful, Tatyana:).
Emma
Thank you Olga, I followed the recipe exactly and these were divine! This is the perfect scone base, next time I’m going to try it with chocolate chips : )
Lizzy Bizzy
These are by far my favorite scone recipe!!! They are sooo delicious and quick to make for a last min dessert to have with tea! Thank you so much for sharing?
Quick question, could I make them and freeze them before baking? Or is it best to bake the same day?
olgak7
Hi Lizzy,
First of all, thank you so much for taking the time to write. I’m so glad that you enjoy this recipe for scones.
You can definitely freeze the shaped scones and then just pop them in the oven. You can also freeze the baked scones – they freeze beautifully.
Lyubov Kulinich
I just did mine, and since we live in Hawaii, I used Lilikoi fruit instead. Inside the dough and on glaze. It turned out AMAZING!!!!! I wish I could add picture. Thank you so much!
Therese
These scones are delicious and the recipe was easy to follow. This was my first attempt at making scones and I will be making many more with this recipe!
Inessa
Hi Olga! These scones are delicious! Thank you for the recipe. I was wondering can you freeze the dough before baking or can you only freeze scones after they were baked?
olgak7
Hi Inessa,
I’ve actually never frozen the dough before, but I think it should be ok to do that. I’ve frozen lots of other cookie doughs and pie doughs and it usually works out great.