
Vertical Roasted Chicken
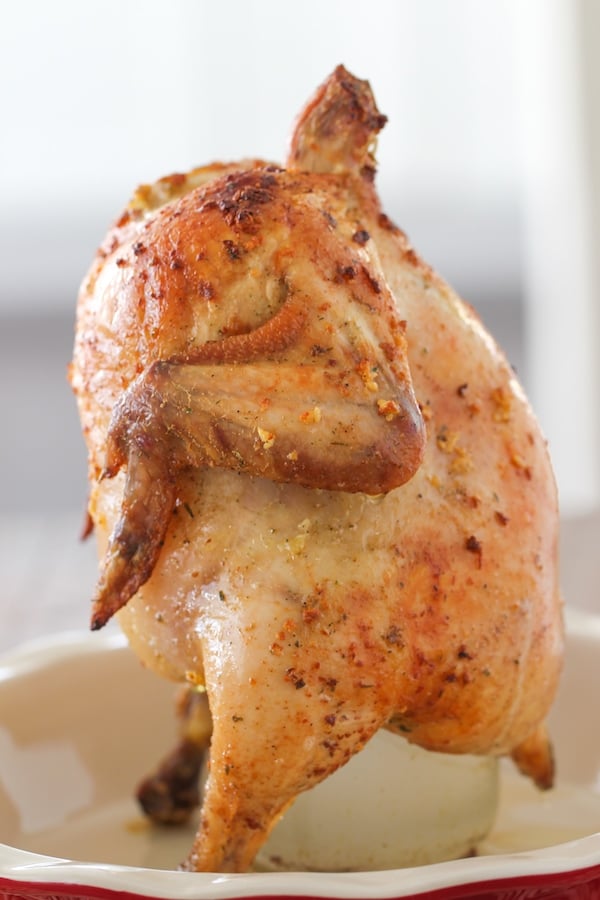
Vertical roasted chicken is able to cook evenly on all sides, the skin gets golden brown and crisp all around while the meat on the inside stays perfectly juicy. The delicious garlic spread all over the chicken during the last few minutes of roasting make it extra tasty.
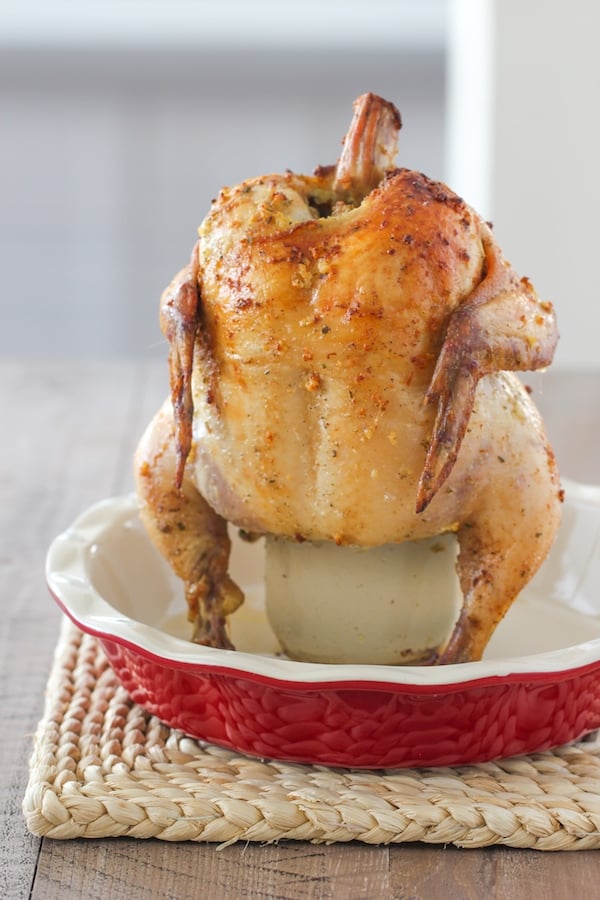
This method of roasting a chicken is very simple but creates amazing results. My favorite part of roasting a whole chicken is the crunchy chicken skin, and this way of cooking roasts the chicken evenly on all sides, creating that perfectly golden exterior.
There is a Russian/Belarusian recipe called Chicken on a Can – Курица на Банке, that uses this exact method. This is the first recipe that I was familiar with. A whole chicken is placed on top of a small jar and roasted upright in the vertical position until golden all around . In America, this recipe is known as Beer Can Chicken because the chicken is roasted or grilled while placed on top of a beer can.
What Are the Best Ways To Roast a Chicken Vertically?
There are several ways you can position the chicken so it is in a vertical position while it roasts in the oven. 1. Using a bundt pan. 2. Placing the chicken on top of a jar or can, or 3. Using a professionally created vertical roaster made just for this method of cooking. Since I always try to have multipurpose uses for the gadgets that I have in the kitchen, I prefer the first two options, which are making use of things in your kitchen that you can use for many other different things. I would rather not have a vertical roaster that I will only use for one recipe. But that’s just my opinion. If you want to invest in one, that’s great. You can use this recipe for that.
Bundt Pan Roast Chicken
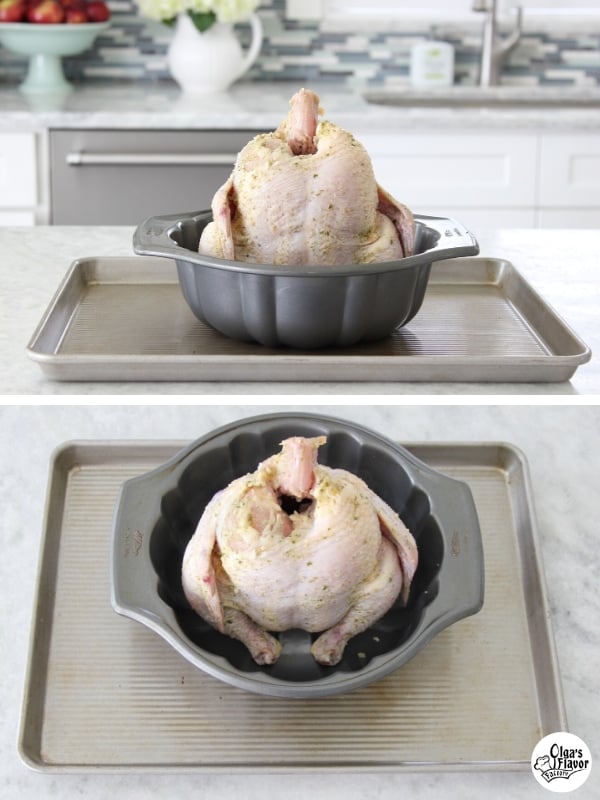
Place the chicken cavity over the center of the bundt pan. It’s perfectly shaped to hold the chicken upright.
Place the bundt pan on top of another baking sheet and roast until the chicken is cooked through all the way.
Chicken Roasted on a Can aka Beer Can Chicken
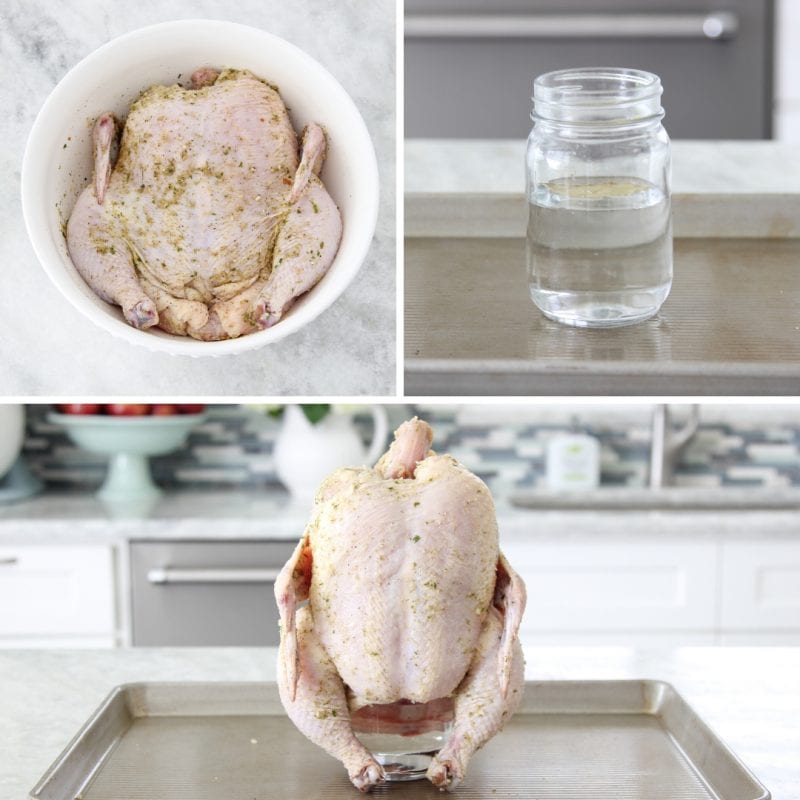
We don’t drink beer in our family, so I don’t want to buy a can of beer just for this purpose, so I have found that roasting a chicken on top of a small jar works just as well. Actually, back in Belarus, this is exactly what cooks used for this recipe – not beer cans but small glass jars.
Fill a small glass jar 1/3-1/2 way full of water or broth. You can add some garlic, onion, bay leaves and/or other herbs and lemon to the jar for added flavor. As the chicken roasts, the water will gradually heat up, helping to prevent the jar from cracking, provide the steam to permeate the chicken from the inside. You can just fill the jar with water and that will work just as well too. The other ingredients are just for added flavor. If using a beer can, open the can, pour out half of the beer and then proceed with the same method.
What Size Jar Should Be Used?
A 16 oz jar, with a regular mouth, not a wide mouth should be used. It’s the perfect size for the cavity of the chicken to fit on. A wide mouth jar is too big and the chicken won’t fit on it. A regular mouth is about 2.5 inches in diameter and is the perfect size.
How to Roast the Chicken When It’s in an Upright Vertical Position
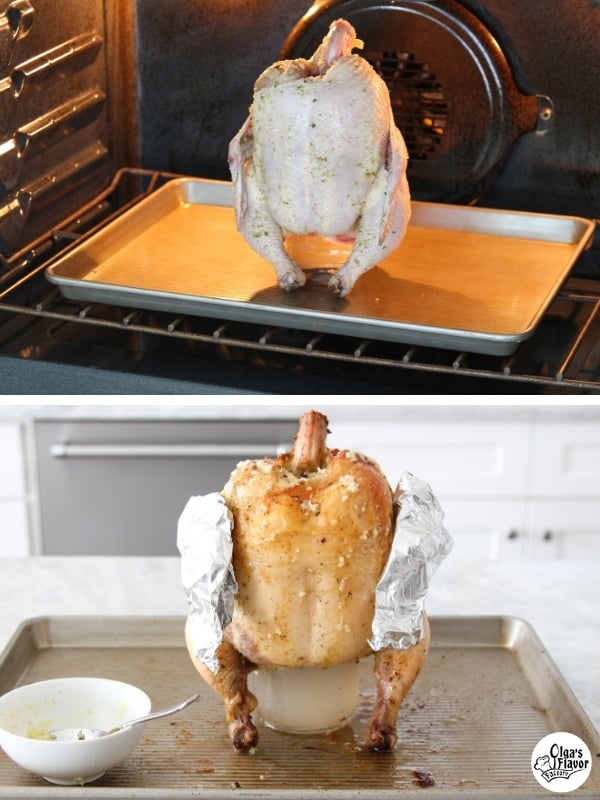
Make sure the oven rack in on the lowest position and preheat it to 375 degrees Fahrenheit.
Place the chicken on the can/jar on top of a rimmed baking sheet. Carefully transfer it to the preheated oven. Roast it for about 1 1/2 hours, depending on the size of your chicken. The chicken breast should be 165 degrees Fahrenheit on an instant read thermometer and 175 degrees Fahrenheit in the center of the thigh meat.
Adding Garlic to the Chicken, Serving Vertically Roasted Chicken
If you add minced garlic to the chicken right away, the garlic will burn while the chicken is in the oven and will give it a bitter taste. Adding the garlic at the very end prevents the garlic from burning and will add lots of great flavor to the chicken.
If the chicken wings are starting to turn brown too quickly, wrap them with aluminum foil to prevent the wing tips from burning.
When the chicken is cooked through in the center and is golden brown on the exterior, carefully take it out of the oven and let it rest for about 15 minutes before slicing it and serving it. Remove it from the can or the bundt pan before serving.
Vertical Roasted Chicken

Roasting chicken vertically creates the most golden and crisp exterior, with juicy and tender meat on the inside and the crunchiest chicken skin all around.
- Prep Time: 30 min
- Cook Time: 90 min
- Total Time: 2 hours
- Yield: 4-6 1x
- Category: poultry
Ingredients
1 whole chicken
salt, ground black pepper, to taste
1/2 Tablespoon dry spices and herbs, poultry seasoning, etc.
1 1/2 Tablespoons melted butter, or oil
2 garlic cloves, minced
Instructions
Season the chicken on all sides and inside the chicken cavity with salt, ground black pepper and spices/herbs. You can use any combination that you like, such as Italian seasoning, poultry seasoning, taco seasoning, Herb de Provence, dry thyme, rosemary, parsley, granulated garlic/onion, etc. You can also add some paprika, curry powder, and/or a bit of cayenne pepper to make it spicier.
Marinate the chicken overnight, storing the chicken in the refrigerator. If you don’t have extra time, you can just season the chicken and bake right away, but the chicken will have more flavor if it has time to marinate.
Preheat the oven to 375 degrees Fahrenheit.
If you are using a can or glass jar, fill it 1/3-1/2 way with water or broth. For added flavor, you can add some onions, garlic or herbs to the liquid, which will steam up and permeate the chicken as it bakes.
Fit the chicken cavity down over the can or the bundt pan. Roast in the preheated oven.
If the chicken wing tips start to get too brown before the chicken finishes roasting, cover them with aluminum foil. Roast until an instant read thermometer reads 175 degrees in the center of the thigh and 165 degrees Fahrenheit in the breast meat. It can take anywhere from 1 1/2 hours – 2 hours, depending on the size of your chicken and your oven. The thermometer is the most accurate way of knowing when the chicken is ready.
Meanwhile, melt the butter or use oil and mix with the minced garlic.
When the chicken has just a few minutes left of roasting, take it out of the oven and brush with the butter and garlic mixture.
Roast just until the meat is done cooking and the chicken is golden brown and crisp on the outside.
Take the chicken out of the oven and rest for about 15 minutes before serving. Remove from the can before slicing.
Rymma
I made this for Thanksgiving dinner (we do not like turkey). This chicken turned out very delicious. Moist and so much flavor! I would recommend this recipe.
olgak7
I’m so glad you enjoyed it Rymma:).
kathleen s nichols
I see melted butter or oil in the ingredient list but doesnt say what to do with it?
olgak7
(This is from the recipe instructions in the recipe card.) Hope this helps!
“Meanwhile, melt the butter or use oil and mix with the minced garlic.
When the chicken has just a few minutes left of roasting, take it out of the oven and brush with the butter and garlic mixture.”
Rosebud
Gonna give it a try, wish Mee luck! (If u knew mee, u’d know I’m gonna need it.😁🌹❤️
Helene
Very good and easy, and thank you for the hint and picture of using aluminum foil on the wings!