
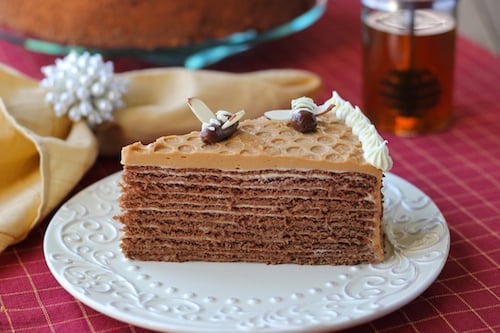
 This is one of my favorite cakes. It's a chocolate-honey layer cake with pastry cream. The thin layers of cake are so soft and tender and paired with the pastry cream, make this a very delicate and tender cake. The topping has a caramel taste and a mousse like textuer. I got the idea to decorate it to look like a honeycomb from a Russian recipe forum and made the bees from the book The Pie and Pastry Bible.
Ingredients:
For the cake:
½ cup milk
3 Tablespoons honey
1 cup sugar
4 Tablespoons butter
2 teaspoons baking soda
4-5 Tablespoons cocoa
1 egg
2 ½ cups flour
Pastry cream:
4 Tablespoons flour
3 Tablespoons cornstarch
2 cups milk
¼-1/3 cup sugar
3 egg yolks
¼ teaspoon salt
2 teaspoons vanilla
2 Tablespoons butter
1 cup heavy cream
For the top of the cake:
½ can of cooked condensed milk, dulce de leche
½ stick butter, softened
¼ cup sour cream
2 Tablespoons water
2 ¼ teaspoons gelatin
For the chocolate-almond bees:
3 oz. semisweet chocolate
⅓ cup heavy cream
1 Tablespoon honey
slivered almonds
1 oz. white chocolate, melted
Instructions:
Preheat the oven to 350 degrees.
In a medium saucepan, heat up the milk, honey, sugar, butter, baking soda and cocoa, just until butter melts and the sugar dissolves. ") Whisk the egg and add a little bit of the heated batter, while whisking. This is called tempering and will keep the egg from curdling.
Whisk the egg and add a little bit of the heated batter, while whisking. This is called tempering and will keep the egg from curdling. ") Add the tempered mixture to the rest of the batter. Add the flour and mix until combined. Allow the dough to cool slightly, just enough that you can handle it, however, you need to work quickly because it won't roll out properly if it's too cold.
Add the tempered mixture to the rest of the batter. Add the flour and mix until combined. Allow the dough to cool slightly, just enough that you can handle it, however, you need to work quickly because it won't roll out properly if it's too cold. ") Roll the dough out very thinly and cut it out into an 8-10 inch circle. I use a lid or the bottom of a springform pan to trace and cut it out with a paring knife. If you have a tart pan, that works the best, actually. Use a fork to poke some holes across the surface of the cake layer.
Roll the dough out very thinly and cut it out into an 8-10 inch circle. I use a lid or the bottom of a springform pan to trace and cut it out with a paring knife. If you have a tart pan, that works the best, actually. Use a fork to poke some holes across the surface of the cake layer. ") A tip about rolling out the dough. This dough is pretty sticky, but if you add too much flour it will have too much gluten and will keep shrinking back when you roll it out. I use a spoon to take out a handful of dough and scrape it off with another spoon right onto a generously floured surface, sprinkle more flour on top and start rolling, adding more flour as needed.
A tip about rolling out the dough. This dough is pretty sticky, but if you add too much flour it will have too much gluten and will keep shrinking back when you roll it out. I use a spoon to take out a handful of dough and scrape it off with another spoon right onto a generously floured surface, sprinkle more flour on top and start rolling, adding more flour as needed.
You will have 10-15 layers of cake, depending on the size of your circles. They are very hard, but will soften when topped with pastry cream.
Line a baking sheet with parchment paper. If you're using a tart pan, sprinkle it with flour. Bake for 4-6 minutes. Take off the baking sheet or tart pan right away. They bake really quickly, so it really doesn't take very long to do all the cake layers. Brush off the flour with a pastry brush. ") To make the pastry cream, whisk the flour and cornstarch in a bowl. Heat up the milk in a saucepan just until it is starting to foam. Meanwhile, whisk the egg yolks with the sugar and then add the flour, cornstarch.
To make the pastry cream, whisk the flour and cornstarch in a bowl. Heat up the milk in a saucepan just until it is starting to foam. Meanwhile, whisk the egg yolks with the sugar and then add the flour, cornstarch. ") Add a little bit of milk to the egg mixture, whisking constantly and gradually adding the rest of the milk.
Add a little bit of milk to the egg mixture, whisking constantly and gradually adding the rest of the milk. ") There you go, tempering again, to make sure the eggs don't curdle. Twice in the same recipe. This doesn't happen very often. Return to the saucepan and cook on medium heat, whisking constantly again until the pastry cream has thickened.
There you go, tempering again, to make sure the eggs don't curdle. Twice in the same recipe. This doesn't happen very often. Return to the saucepan and cook on medium heat, whisking constantly again until the pastry cream has thickened. ") Add the salt, butter, and vanilla, stirring until the butter is melted. Pour into a bowl, cover with plastic wrap, laying right on top of the pastry cream. This will prevent the pastry cream from forming a skin. Refrigerate until completely cool.
Add the salt, butter, and vanilla, stirring until the butter is melted. Pour into a bowl, cover with plastic wrap, laying right on top of the pastry cream. This will prevent the pastry cream from forming a skin. Refrigerate until completely cool. ") In a cold bowl and a cold whisk attachment, whip up the cream.
In a cold bowl and a cold whisk attachment, whip up the cream. ") Fold gently into the pastry cream.
Fold gently into the pastry cream. ") To assemble the cake, top each cake layer with pastry cream, about ⅓ cup.
To assemble the cake, top each cake layer with pastry cream, about ⅓ cup. ") Refrigerate for at least 30 minutes.
Refrigerate for at least 30 minutes.
You will need bubble wrap to create the honeycomb look. Cut out enough bubble wrap to cover the surface of the cake and cut out another strip of bubble wrap to cover the sides of the cake.
When the cake is cool and ready to decorate, mix the condensed milk, butter, and sour cream until smooth. ") Sprinkle the gelatin on top of the water and allow to stand for about 5 minutes.
Sprinkle the gelatin on top of the water and allow to stand for about 5 minutes. ") Heat in the microwave or on the stovetop until dissolved, but do NOT bring to a boil.
Heat in the microwave or on the stovetop until dissolved, but do NOT bring to a boil. ") Pour into the prepared cream and mix to combine. Since it's so hot, it will make the cream very thin in consistency. Working quickly, pour over the cake and spread evenly on the top and the sides. It will thicken within minutes, so you have to work fast. In fact, both Sergi and I were working on this together and we didn't even have time to take a picture. Place the bubble wrap on top of the cake, pressing gently so it adheres completely, forming the little pockets for the honeycombs. Sometimes, I put the bubble wrap only on top of the cake and not the sides. Make crumbs out of some of the cake layer scraps and press it into the sides of the cake. Refrigerate until cool.
Pour into the prepared cream and mix to combine. Since it's so hot, it will make the cream very thin in consistency. Working quickly, pour over the cake and spread evenly on the top and the sides. It will thicken within minutes, so you have to work fast. In fact, both Sergi and I were working on this together and we didn't even have time to take a picture. Place the bubble wrap on top of the cake, pressing gently so it adheres completely, forming the little pockets for the honeycombs. Sometimes, I put the bubble wrap only on top of the cake and not the sides. Make crumbs out of some of the cake layer scraps and press it into the sides of the cake. Refrigerate until cool. ") For the bees, make the ganache. Cut the chocolate.
For the bees, make the ganache. Cut the chocolate. ") In a saucepan, cook the cream, honey, and chocolate until melted. Cool. Form little bees with the chocolate. It's very easy to work with. Press two slivers of almond to each side for wings and pipe out white chocolate on top to create stripes.
In a saucepan, cook the cream, honey, and chocolate until melted. Cool. Form little bees with the chocolate. It's very easy to work with. Press two slivers of almond to each side for wings and pipe out white chocolate on top to create stripes. ") Peel off the bubble wrap from the cake.
Peel off the bubble wrap from the cake. ") Add the bees to the top of the cake. You can pipe a border around the outside of the cake from buttercream. (Recipe not included. I think this post is long enough.) You can bake the cake layers ahead of time and store until you're ready to assemble the cake. You can also make the pastry cream and refrigerate it, just don't add the whipped cream.Instead of the honeycomb topping, you can cover the cake with more pastry cream and decorate it with chocolate shavings or use one of the cake layers, crush it and sprinkle over the cake. Another option is to cover the cake with a chocolate ganache.
Add the bees to the top of the cake. You can pipe a border around the outside of the cake from buttercream. (Recipe not included. I think this post is long enough.) You can bake the cake layers ahead of time and store until you're ready to assemble the cake. You can also make the pastry cream and refrigerate it, just don't add the whipped cream.Instead of the honeycomb topping, you can cover the cake with more pastry cream and decorate it with chocolate shavings or use one of the cake layers, crush it and sprinkle over the cake. Another option is to cover the cake with a chocolate ganache.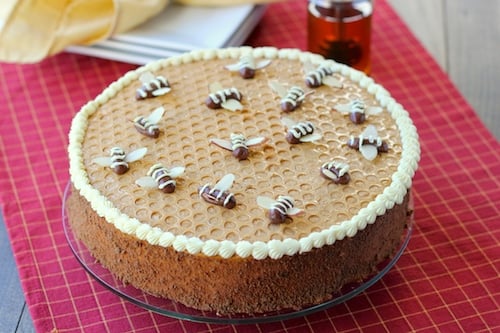
Chocolate Honey Layer Cake - Торт "Спартак"
- Yield: 9 inch round cake 1x
- Category: Sweets
Ingredients
For the cake:
- ½ cup milk
- 3 Tablespoons honey
- 1 cup sugar
- 4 Tablespoons butter
- 2 teaspoons baking soda
- 4-5 Tablespoons cocoa
- 1 egg
- 2 ½ cups flour
Pastry cream:
- 4 Tablespoons flour
- 3 Tablespoons cornstarch
- 2 cups milk
- ¼-⅓ cup sugar
- 3 egg yolks
- ¼ teaspoon salt
- 2 teaspoons vanilla
- 2 Tablespoons butter
- 1 cup heavy cream
For the top of the cake:
- ½ can of cooked condensed milk, dulce de leche
- ½ stick butter, softened
- ¼ cup sour cream
- 2 Tablespoons water
- 2 ¼ teaspoons gelatin
For the chocolate-almond bees:
- 3 oz. semisweet chocolate
- ⅓ cup heavy cream
- 1 Tablespoon honey
- slivered almonds
- 1 oz. white chocolate, melted
Instructions
- Preheat the oven to 350 degrees.
- In a medium saucepan, heat up the milk, honey, sugar, butter, baking soda, and cocoa, just until butter melts and the sugar dissolves.
- Whisk the egg and add a little bit of the heated batter, while whisking. This is called tempering and will keep the egg from curdling.
- Add the tempered mixture to the rest of the batter. Add the flour and mix until combined. Allow the dough to cool slightly, just enough that you can handle it, however, you need to work quickly because it won't roll out properly if it's too cold.
- Roll the dough out very thinly and cut it out into an 8-10 inch circle. I use a lid or the bottom of a springform pan to trace and cut it out with a paring knife. If you have a tart pan, that works the best, actually. Use a fork to poke some holes across the surface of the cake layer.
- A tip about rolling out the dough. This dough is pretty sticky, but if you add too much flour it will have too much gluten and will keep shrinking back when you roll it out. I use a spoon to take out a handful of dough and scrape it off with another spoon right onto a generously floured surface, sprinkle more flour on top and start rolling, adding more flour as needed.
- You will have 10-15 layers of cake, depending on the size of your circles. They are very hard but will soften when topped with pastry cream.
- Line a baking sheet with parchment paper. If you're using a tart pan, sprinkle it with flour. Bake for 4-6 minutes. Take off the baking sheet or tart pan right away. They bake really quickly, so it really doesn't take very long to do all the cake layers. Brush off the flour with a pastry brush.
- To make the pastry cream, whisk the flour and cornstarch in a bowl. Heat up the milk in a saucepan just until it is starting to foam. Meanwhile, whisk the egg yolks with the sugar and then add the flour, cornstarch.
- Add a little bit of milk to the egg mixture, whisking constantly and gradually adding the rest of the milk. There you go, tempering again, to make sure the eggs don't curdle. Twice in the same recipe. Return to the saucepan and cook on medium heat, whisking constantly again until the pastry cream has thickened.
- Add the salt, butter, and vanilla, stirring until the butter is melted. Pour into a bowl, cover with plastic wrap, laying right on top of the pastry cream. This will prevent the pastry cream from forming a skin. Refrigerate until completely cool.
- In a cold bowl and a cold whisk attachment, whip up the cream. Fold gently into the pastry cream.
- To assemble the cake, top each cake layer with pastry cream, about ⅓ cup. Refrigerate for at least 30 minutes.
- You will need bubble wrap to create the honeycomb look. Cut out enough bubble wrap to cover the surface of the cake and cut out another strip of bubble wrap to cover the sides of the cake.
- When the cake is cool and ready to decorate, mix the condensed milk, butter, and sour cream until smooth.
- Sprinkle the gelatin on top of the water and allow to stand for about 5 minutes.
- Heat in the microwave or on the stovetop until dissolved, but do NOT bring to a boil.
- Pour into the prepared cream and mix to combine. Since it's so hot, it will make the cream very thin in consistency. Working quickly, pour over the cake and spread evenly on the top and the sides. It will thicken within minutes, so you have to work fast. In fact, both Sergi and I were working on this together and we didn't even have time to take a picture. Place the bubble wrap on top of the cake, pressing gently so it adheres completely, forming the little pockets for the honeycombs. Sometimes, I put the bubble wrap only on top of the cake and not the sides. Make crumbs out of some of the cake layer scraps and press it into the sides of the cake. Refrigerate until cool.
- For the bees, make the ganache. Cut the chocolate.
- In a saucepan, cook the cream, honey, and chocolate until melted. Cool. Form little bees with the chocolate. It's very easy to work with. Press two slivers of almond to each side for wings and pipe out white chocolate on top to create stripes.
- Peel off the bubble wrap from the cake.
- Add the bees to the top of the cake. You can pipe a border around the outside of the cake from buttercream. (Recipe not included. I think this post is long enough.) You can bake the cake layers ahead of time and store until you're ready to assemble the cake. You can also make the pastry cream and refrigerate it, just don't add the whipped cream.Instead of the honeycomb topping, you can cover the cake with more pastry cream and decorate it with chocolate shavings or use one of the cake layers, crush it and sprinkle over the cake. Another option is to cover the cake with a chocolate ganache.

Hi Olga: This is a great looking cake I think I will try to make it this weekend. How long does it take to bake 1 layer in the oven?.
I love your blog I love to bake. I Bake lots of different type of bread . Just started to really get into baking cakes. More of a bread and tart man. Thanks again.
Hi Olga, this cake is very pretty! I want to bake it for my girl Birthday, she is turning 3. I think you need to let rest the cake for some time to get the pastry layers to soften, right? The party is going to be in the afternoon. It is better I assemble it in the morning or the day before and keep refrigerate?
Thank a lot for the recipe and suggestions!
Francesca
I would recommend making the cake the day before. I usually make all my cakes the day before I plan to serve them.
Happy Birthday to your girl! 3 is a fun age:).
Great, I'll let you know how it goes!
Thanks!
Enjoy!
How long am I supposed to cook the chocolate for the bees? It took about a minute for everything to melt so took it off stove right away, its been cooling for 30 mins already and still very runny.
Mine haven't thickened either. I guess I should of boiled it until it thickens or something. So I just used tootsie rolls instead.
What about the salt in the pastry? Did I miss something?
Olga, I baked my layers but they are not too hard. How hard do they need to be? Thanks so much for sharing this recipe.
They should be pretty hard, Dina. It's hard for me to describe, but it should be like a hard cookie.
Hi Olga, I love your blog and used many of your recipes. I esp. like the step by step pictures. One thing though, (my opinion only) I would really like to see the pictures on the dishes you're describing on the home page instead of just the headings. You know they say you eat with your eyes, same thing I want to quickly skim throught the newest recipes without having to take the time to open each one or read through them.
Thank you Dina.
What exactly do you mean? The most recent recipes are on the home page. They are below the slider, so maybe you didn't notice it? You need yo scroll underneath the slider to see them. Hope that helps.
What I meant was on the main page under the slider you have the newest recipes with the headings and descriptions but no pictures of the recipes, it would be nice to have the picture too for us visual people.
Hmmm.... I'm not sure why you're not seeing the pictures. I have a picture next to each post.
Hi i was wondering how long does rhis cake need to stand before serving in order for the layers to soften. The spartak i make now must sit for 2 days in order for the laters to soften.
No, it doesn't need 2 days for sure, Diana. If you let if stand for a couple hours it should be fine. I usually do it overnight, or assemble it in the morning when I plan to serve it, but it only needs a few hours to soften.
Yes overnight is good
Hey Olga,
I made this cake yesterday for Romka's Birthday, he absolutely loved it:) One quick question, can I use whip cream instead of the homemade, whipped-up heavy cream? Also, my cornstarch didn't want to thicken the cream... any suggestions?
Thank you so much for your recipes and ideas:)
That's wonderful, Viktoriya!Happy Birthday to Roman.
You can use Cool Whip instead of whipping heavy cream yourself.
You may have not cooked the pastry cream long enough or the heat was too low. If the pastry cream isn't thickening, I increase the temperature gradually.
Thank you:) Sounds good, I'll try that next time. Have fun cooking up another creation;)
I love Spartak! I would really love to make this for my son's 4th Birthday party this weekend, but I am afraid i wont come out as good 🙁 Is it hard to bake the actual layers? is it easy to roll out?
BTW it looks Amazing 🙂 the first time I saw it I fell in love with it. Great Job! 🙂
Hi Nadia,
I wouldn't say that it's hard to do the cake layers. Good luck!
this cake is so so good!!!! literally had to hide it to make sure I could have a 2nd piece! olga, you are the best!
Thank you SOOO SOOOO MUCH for posting this cake Olga!!! Every time I think of this cake my mouth waters uncontrollably!! Its like Pavlov with the dogs 🙂 Definately one of my all time favorite cakes. Just the texture of the outside layer mixed with the melting in your mouth inner part:) Like a perfect girl this cake has a perfect inside which compliments the spectacular outside!!!!
You are so funny, Valentin! Glad you like the cake:)
How far in advance van the bees be made?
Hi Alla, I've never personally made them more than 24 hours in advance, but I'm pretty sure that you can make them a few days in advance.
Oh my.. This is definitely the cutest cake I've ever seen! You are so creative! Btw, I just happened to stumble upon your site and have been stuck browsing your recipes for at least an hour! Everything looks so delicious, I can't wait to try some of your recipes! Thanks for sharing and God bless!!
Welcome, Luda! Thanks for stopping by:).
If you can't make the bees that way you can mold tootsie rolls 🙂
Liza,
That's a very good idea!
Can you wait until the cream has thickened to put it on?
Liza,
No, if it stiffens you won't be able to spread it at all.