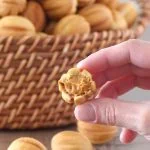
Oreshki – Russian Walnut Shaped Cookies
Oreshki are Russian walnut shaped cookies, made by cooking them in a special skillet. The crisp, golden exterior of the cookies hold a very creamy, caramely filling made with dulce de leche.
- Prep Time: 2 hours
- Cook Time: 80 minutes
- Total Time: 3 hours 20 minutes
- Yield: 115 cookies 1x
- Category: Dessert
Ingredients
Scale
Cookies:
- 2 large eggs, room temperature
- 1 1/2 cups granulated sugar
- 1 cup butter, melted and slightly cooled (16 Tablespoons)
- 3 1/2 Tablespoons mayonnaise
- 1/2 cup sour cream
- 1 teaspoon baking soda dissolved in 1 teaspoon vinegar
- 4 – 4 1/4 cups all purpose flour (start with 4 and only add more if you need to)
Filling:
- 1 1/2 (14 oz) cans dulce de leche (cooked condensed milk (21 oz total))
- 1 cup butter (or 16 Tablespoons, room temperature)
- 4 oz cream cheese (room temperature), optional
- 1 teaspoon vanilla extract
Instructions
- Make the cookie dough. In a large bowl, using a stand mixer with a whisk attachment or a hand held mixer, mix the eggs and sugar until pale yellow and fluffy, at least 5 minutes.
- Add the melted butter, mayonnaise, sour cream until evenly mixed. Add the baking soda dissolved in vinegar and mix again until combined.
- Add 4 cups of the flour and mix, (switch to a paddle attachment) starting on low speed and gradually increasing the speed to medium, until all the flour is incorporated. The dough should be really soft but not stick to your hands. Add a few tablespoons more if it needs it, up to 1/4 of a cup. Keep in mind that the dough will get thicker as it stands, so don’t add too much flour.
- Shape little balls from the prepared cookie batter for each walnut shape. It’s very helpful to shape a lot of the cookie balls before you start cooking them. For the stovetop oreshnitsa, I use slightly more than 1/2 teaspoon of dough and for the electric oreshnitsa, I use slightly less than 3/4 teaspoon of dough. (You may want to cover the dough balls with plastic wrap to keep them from drying out.)
- Preheat the oreshnitsa on medium heat until hot or turn on the electric oreshnitsa until it’s preheated.
- Quickly place a cookie ball into each of the cookie wells, close the lid and tightly hold the two ends, squeezing them as tight as you can. Cook each side until golden on both sides, flipping the griddle over halfway through. The time really depends on the type of griddle you are using and on your stove. I cooked mine for only 1 – 1 1/2 minutes per side, but you might need to cook them longer, up to 3 minutes per side.
- The cookie batter will spread when you’re squeezing the two sides together and that’s a good thing, since it makes sure that the entire walnut shape is completely covered and you will also use all the leftover cookie scraps in the filling. Wipe the outside of the pan right away, getting rid of any melting butter and scrape off any excess dough too.
- Cook all the cookies, laying them flat too cool off. Then, gently break off each walnut half, and use a vegetable peeler to make the sides smooth and even. Crush all the cookie scraps into small crumbs, using a ziplock bag and a rolling pin, or a food processor.
- For the filling, in a large bowl, using a stand mixer or a hand held mixer, combine the dulce de leche, butter, cream cheese and vanilla extract until evenly combined. Add the cookie crumbs to the filling and mix again to combine. Instead of the crumbs, you can use crushed nuts.
- Fill the inside of two walnut shaped cookies with the filling and place two of the cookies, filling side down, toward each other, gently squeezing, and scrape off the excess filling with a small paring knife.
- Continue to fill the cookies, gently squeezing the two halves of the cookies together. You should have a anywhere from 110-146 cookies total, filled and assembled. It depends on the oreshnitsa that you use and if you have any excess dough wasted if you overfill the oreshnitsa.
- Store the cookies in an airtight container at room temperature. You can serve them immediately, but they will stay fresh for at least 1 week. They get softer as they stand, but still remain crunchy on the outside if you use this recipe.
- To keep them as crunchy as possible, store the filled cookies in the refrigerator. You can also freeze them in an airtight container for up to 3 months.
