
Try this Chocolate Volcano Cake that is so delicious, with chocolate cake layers assembled into the shape of a volcano with a sour cream frosting, crunchy nuts and covered with a chocolate glaze.

This Chocolate Volcano Cake is a cake I have been making since I was a teenager. When there's an event that requires a cake, this is one of the cakes that I can almost make in my sleep, doesn't require too much work, and always tastes phenomenal.
In our family, we call it the "Pincher" cake - Торт "Пинчер". It's chocolaty, moist, not too sweet, and has the crunch and nutty flavors of whatever nuts you like. The chocolate glaze that's drizzled on top of the cake is so good, you might want to make extra to eat with a spoon:). You can also add fresh or dry fruit or berries to it. Maybe once you try this cake it will become a go-to favorite for you too.
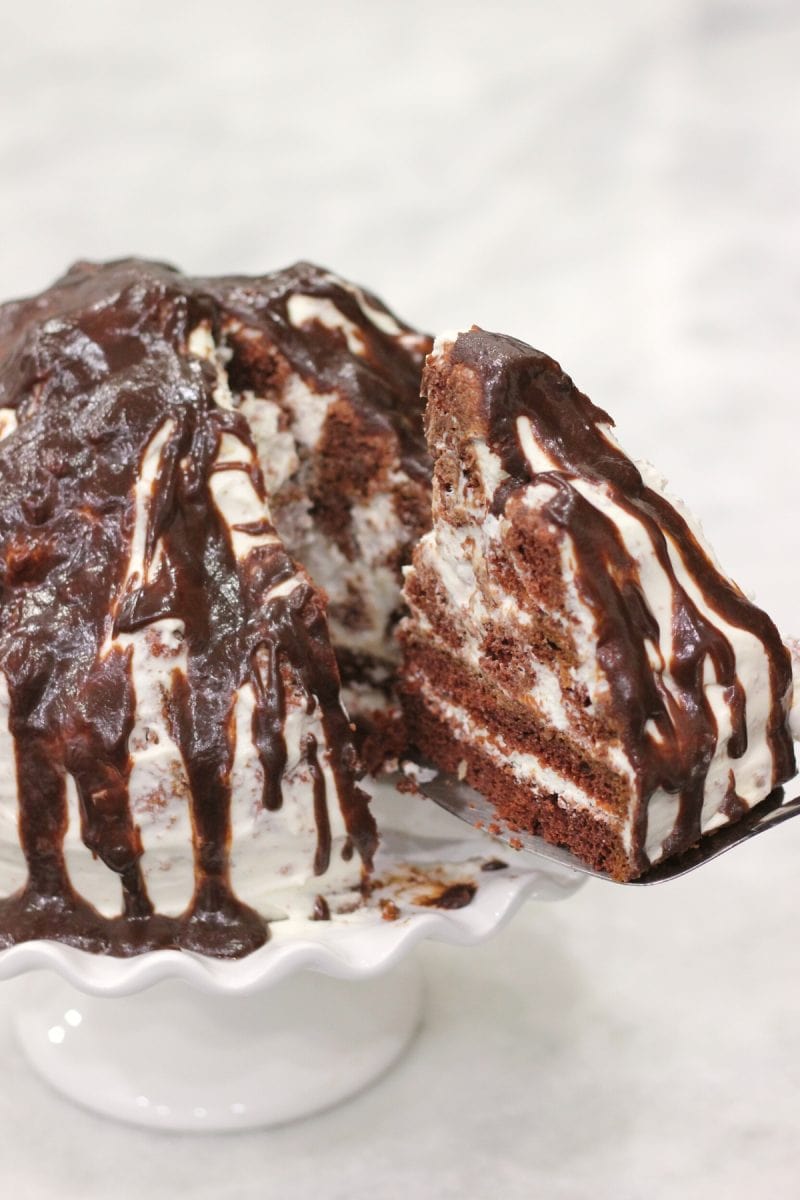
It's so fun to make it into the shape of a volcano with lots of delicious sour cream chocolate glaze streaming down. I also love that it's so easy to assemble into something that makes a statement without too much precision.
Ingredients:
Cake:
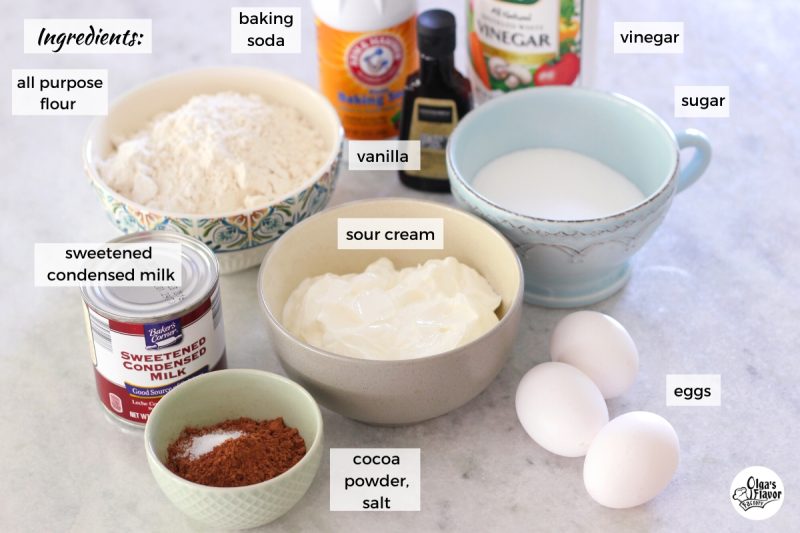
3 large eggs
1 cup granulated sugar
1 ½ cups sour cream
¾ (14 oz) of a can sweetened condensed milk
3 teaspoons baking soda dissolved in 1 teaspoon white vinegar
1-2 teaspoons vanilla extract
2 ¼ cups all purpose flour
4 Tablespoons cocoa powder
¼ teaspoon salt
Sour Cream Frosting:
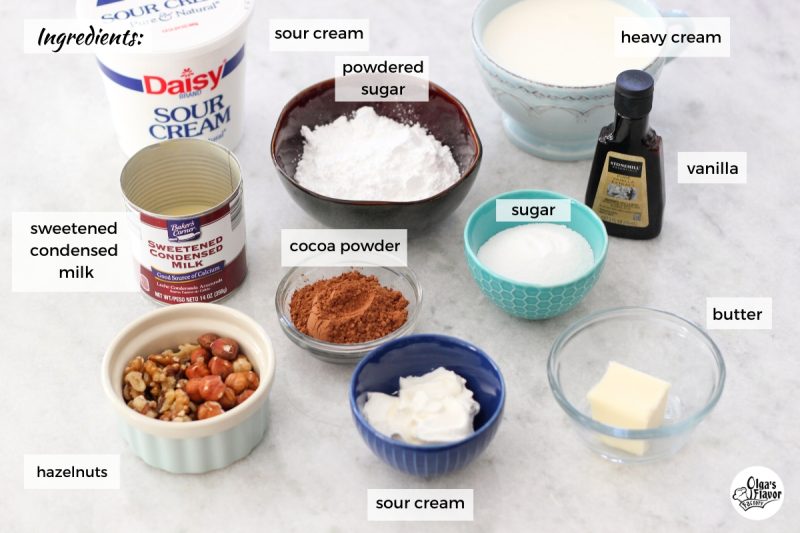
24 oz. sour cream
¼ can (14 oz) sweetened condensed milk
1 cup powdered sugar (or more depending on your taste preference)
1-2 teaspoons vanilla extract
1 ½ cups heavy cream
1 cup chopped and toasted walnuts, hazelnuts (or any other nuts)
fresh or dry fruit or berries (raisins, cranberry, cherries, etc.) optional
Chocolate Glaze:
2-3 Tablespoons cocoa powder
4 Tablespoons sour cream
6 Tablespoons sugar
2 Tablespoons butter
Instructions:
How To Make a Chocolate Volcano Cake
- Preheat the oven to 350 degrees Fahrenheit. Grease 2 (9 inch) round springform cake pans.
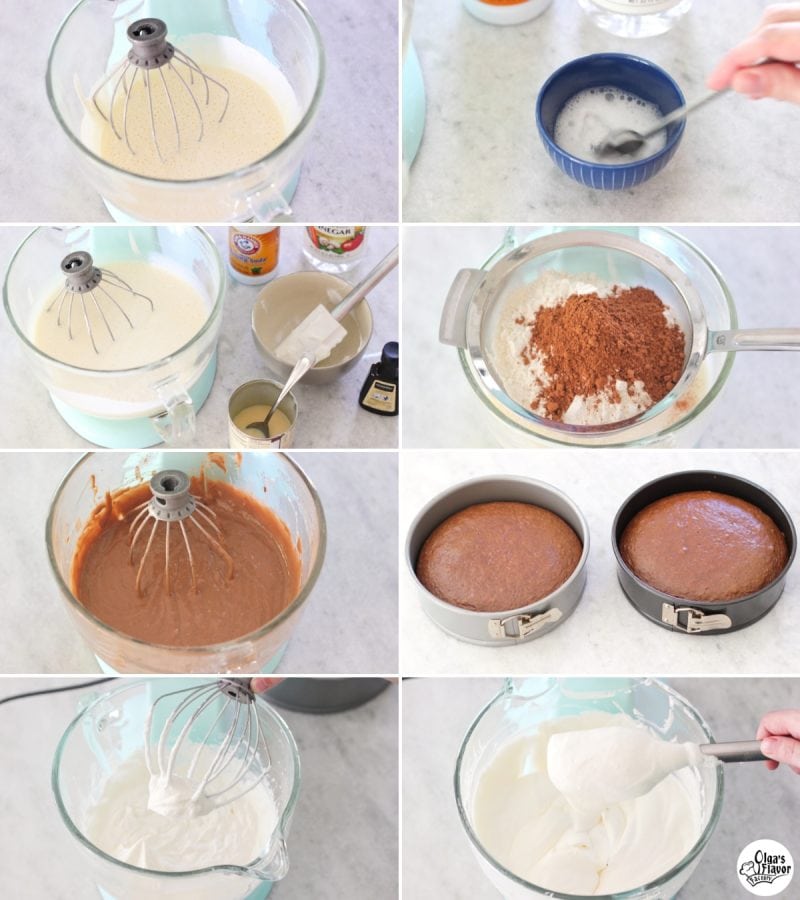
- In the bowl of a standing mixer using a whisk attachment, mix the eggs and sugar until pale yellow and frothy, 5-10 minutes.
- Add the sour cream, condensed milk, the baking soda dissolved in vinegar and vanilla extract. Mix to combine.
- Sift in the flour, cocoa powder and salt. Mix to combine.
- You don't have to be too careful with the batter. This is not a sponge cake, so it's not supposed to be really light and fluffy. You don't have to be delicate with it.
- Bake the cake layers. Divide the batter between the 2 prepared cake pans. Bake in the preheated oven for about 25 minutes.
- You can check to make sure the cakes are baked through completely by using a toothpick. If the toothpick comes out clean when you poke it into the center of the cake, the cake is done. Cool the cakes completely.
- Meanwhile, make the sour cream frosting.
- Whip the heavy cream in a chilled bowl of a standing mixer using a whisk attachment until frothy and thick. Set aside.
- Mix the sour cream with the remaining condensed milk, powdered sugar and vanilla. You can add as much or as little sugar as you like.
- Fold the whipped cream into the sour cream. Set aside.
Assembling the Chocolate Volcano Cake
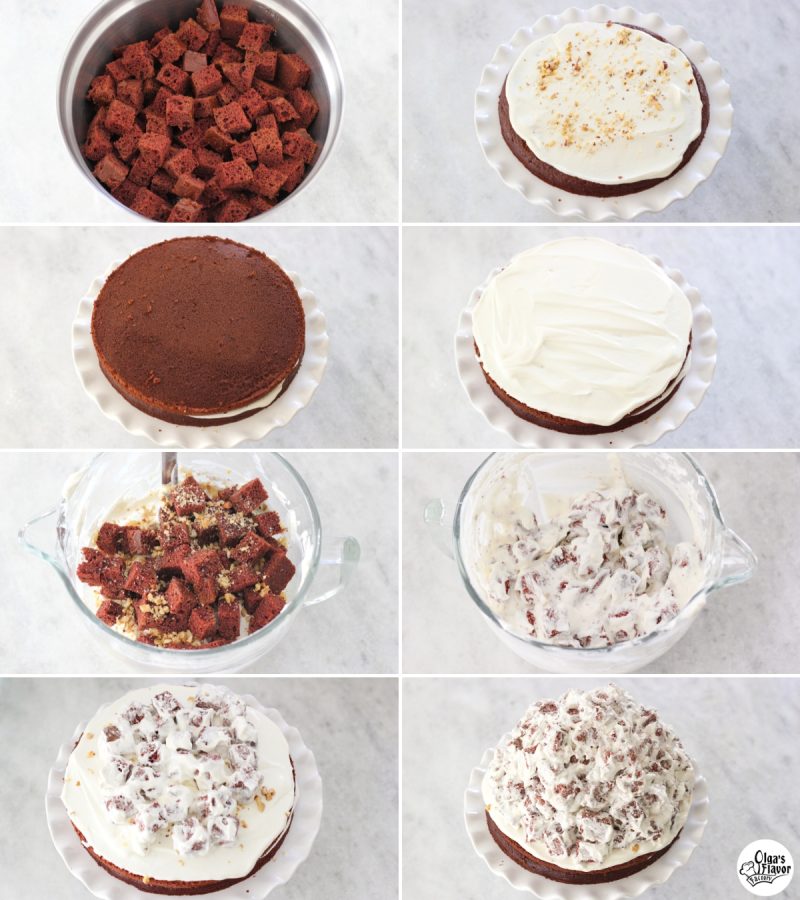
- Cut one of the cake layers in half horizontally.
- For the second cake layer, cut it into cubes, as big or as little as you want.
- Place a dollop of sour cream frosting onto the bottom of a cake platter.
- Next, place one of the divided cake layers on top and spread out a layer of frosting all over the surface.
- Sprinkle some of the nuts over the frosting.
- Place the second half of the cake layer on top and spread more frosting and sprinkle with more nuts.
- Set aside some of the frosting for the sides of the cake and the top.
- Gently toss the cubed cake pieces with the rest of the frosting and the nuts.
- As I already mentioned, you can use any nuts that you like and well as fresh or dried fruit or berries.
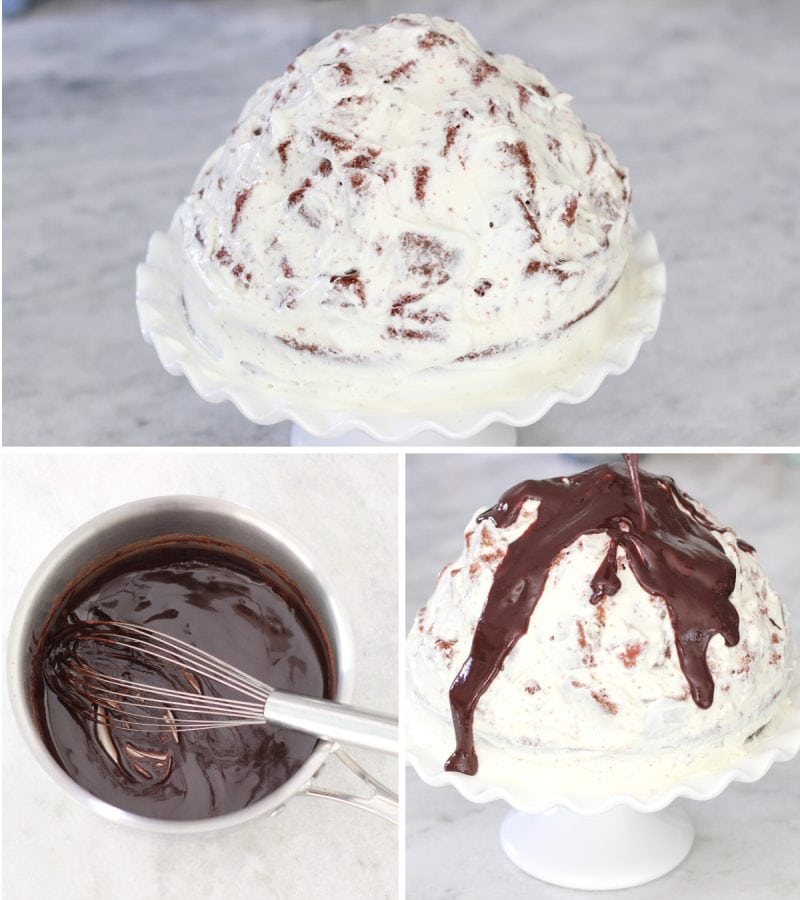
- Arrange all the cake pieces on top of the cake in the shape of a volcano, piling them up one on top of another.
- Spread the frosting that you set aside over the sides of the cake and cover the top with a thin layer of frosting as well.
- Place the cake in the refrigerator.
Decorate the Cake
- Meanwhile, make the chocolate glaze.
- In a small saucepan, whisk together all the ingredients EXCEPT the butter, while they are still cold.
- Cook over medium heat until it comes to a boil, simmer for a few minutes, until the sugar dissolves and the glaze thins out to a syrupy consistency.
- Whisk in the butter.
- Drizzle the hot glaze over the top of the cake. Since this is a volcano cake, I just have the chocolate stream from the top of the cake and down the sides.
- It's much easier to do if you're not trying to take a picture of the process at the same time:).
Refrigerate the cake for at least a few hours. I usually keep it refrigerated overnight. It’s very important to give the cake time to set and chill, otherwise it will fall apart when you cut it.
Chocolate Volcano Cake
Try this Chocolate Volcano Cake that is so delicious, with chocolate cake layers assembled into the shape of a volcano with a sour cream frosting, crunchy nuts and covered with a chocolate glaze.
- Prep Time: 1 hour 30 mins
- Cook Time: 25 mins
- Total Time: 1 hour 55 mins
- Yield: 1 (9-10 inch) round cake 1x
- Category: Sweets
Ingredients
Cake:
- 3 large eggs
- 1 cup granulated sugar
- 1 ½ cups sour cream
- ¾ (14 oz) of a can sweetened condensed milk
- 3 teaspoons baking soda dissolved in 1 teaspoon white vinegar
- 1-2 teaspoons vanilla extract
- 2 ¼ cups all purpose flour
- 4 Tablespoons cocoa powder
- ¼ teaspoon salt
Sour Cream Frosting:
- 24 oz. sour cream
- ¼ can (14 oz) sweetened condensed milk
- 1 cup powdered sugar (or more depending on your taste preference)
- 1-2 teaspoons vanilla extract
- 1 ½ cups heavy cream
- 1 cup chopped and toasted walnuts, hazelnuts (or any other nuts)
- fresh or dry fruit or berries (raisins, cranberry, cherries, etc.) optional
Chocolate Glaze:
- 2-3 Tablespoons cocoa powder
- 4 Tablespoons sour cream
- 6 Tablespoons sugar
- 2 Tablespoons butter
Instructions
Cake
- Preheat the oven to 350 degrees Fahrenheit. Grease 2 (9 inch) round springform cake pans.
- In the bowl of a standing mixer using a whisk attachment, mix the eggs and sugar until pale yellow and frothy, 5-10 minutes.
- Add the sour cream, condensed milk, the baking soda dissolved in vinegar and vanilla extract. Mix to combine.
- Sift in the flour, cocoa powder and salt. Mix to combine. You don't have to be too careful with the batter. This is not a sponge cake, so it's not supposed to be really light and fluffy. You don't have to be delicate with it.
- Divide the batter between the 2 prepared cake pans.
- Bake in the preheated oven for about 25 minutes. You can check to make sure the cakes are baked through completely by using a toothpick. If the toothpick comes out clean when you poke it into the center of the cake, the cake is done. Cool the cakes completely.
Sour Cream Frosting and Chocolate Glaze
- Meanwhile, make the sour cream frosting. Whip the heavy cream in a chilled bowl of a standing mixer using a whisk attachment until frothy and thick. Set aside.
- Mix the sour cream with the remaining condensed milk, powdered sugar and vanilla. You can add as much or as little sugar as you like.
- Fold the whipped cream into the sour cream. Set aside.
- Cut one of the cake layers in half horizontally.
- Cut the second cake layer into cubes, as big or as little as you want.
- Place a dollop of sour cream frosting onto the bottom of a cake platter. Place one of the divided cake layers on top and spread out a layer of frosting all over the surface. Sprinkle some of the nuts over the frosting. Place the second half of the cake layer on top and spread more frosting and sprinkle with more nuts.
- Set aside some of the frosting for the sides of the cake and the top.
- Gently toss the cubed cake pieces with the rest of the frosting and the nuts. As I already mentioned, you can use any nuts that you like and well as fresh or dried fruit or berries.
- Arrange all the cake pieces on top of the cake in the shape of a volcano, piling them up one on top of another.
- Spread the frosting that you set aside over the sides of the cake and cover the top with a thin layer of frosting as well.
- Place the cake in the refrigerator.
- Meanwhile, make the chocolate glaze.
- In a small saucepan, whisk together all the ingredients EXCEPT the butter, while they are still cold.
- Cook over medium heat until it comes to a boil, simmer for a few minutes, until the sugar dissolves and the glaze thins out to a syrupy consistency. Whisk in the butter.
- Drizzle the hot glaze over the top of the cake in any design that you like.
- Refrigerate the cake for at least a few hours. I usually keep it refrigerated overnight. It’s very important to give the cake time to set and chill, otherwise it will fall apart when you cut it.
Hi Olga, I want to make this cake as a layer cake and also want to skip the cocoa, do you think by skipping the cocoa it will be good as a white cake? Thanks so much for all your work and I loveeee all the pictures with the pretty spoons!!
Hmmm... I don't know what to tell you. I've never done it any other way, so I have no idea how it will turn out, Ayana.
How much vanilla extract goes in the cake? its missing from the ingredients list.
Thanks for another great dessert!
1-2 teaspoons of vanilla, Inna. Although to be honest, I never measure vanilla. You can just eyeball it whenever you use it in baking.
Love chocolate cake! Looks delicious Olga! And the spoons are unique and beautiful decorations too! 🙂
Thank you, Valya. I appreciate it.
Olga! Thank you so much for sharing this recipe, my mom used to make it every year for my birthday. She hasn't made it in a while and wad trying to remember the recipe when we came across your blog. And its exactly how she made it!!
PS we are from Belarus too (loved your potato babka recipe) and now live in Canada 🙂
Glad to "meet" another Belorussian:).
Don't you just love those recipes that bring back warm memories? I love nostalgic recipes. I'm so glad you'll be able to enjoy this cake again:).
Wow! This cake looks just like something I saw on valyas taste of home!! Curly boy cake!
There are so many variations of this cake. I guess it's popular for a reason - it's really good:).
Seems like not very hard recipe which I like. Making it right now. Thank you!
Yep, not complicated at all. I appreciate that in desserts, especially cakes. We must be kindred spirits, Yelena:).
I made this cake last night. I wanted it all day from the moment I seen you post it. It is very delicious! And the volcano/ cubed pieces itself are the best part of the cake! Mmmm.
Thanks you!
Thank you so much for taking the time to write!
That's my favorite part of the cake too.
This is such a show-stopper, Olga! Can't wait to try this recipe.
Thanks so much, Shinee!
Hello Olga, this cake looks wonderful! What kind of dried fruit do you think will pair well with this cake? (Besides cranberries and cherries).
Thank you,
Ella
That depends on your taste preference, Ella. Dry blueberries, pineapple, apricots, prunes, orange. Anything will work. You can even add fresh cherries, strawberries, raspberries, pineapple, mandarin oranges, etc. I usually prefer to keep it simple and only add nuts. Sometimes I will add raspberries, but usually I don't.
Hello Olga,
Thank you for the quick reply. I prefer simple tastes as well, but I have a friend asking me to make a moist, chocolate cake with nuts and fruit, and this recipe seems to be perfect for it. 🙂
Raspberries sounds like they'd be delicious with chocolate and roasted walnuts! Is there a significant taste difference between fresh fruit and dried fruit? Do you have a preference?
If you use fresh fruit, you will need to serve it the same day or the day after. Fresh fruit will not stay fresh for very long.
I have never seen this cake before yet it seems so popular on instagram. I do want to try it but it looks a Lil unappealing. Have you had weird stares at it?
I guess it's a matter of taste. I've never had any weird stares:). Maybe some people thought so, but were too polite to say something. I definitely wouldn't put in the effort to make something that I thought was unappealing. There are so many beautiful cakes out there to try, so if this one doesn't appeal to you, there are so many others you can make.
Hi Olga!
I Love your blog and your recipes,but your spoons are killing me. You have these wonderful images and everywhere where "the spoon" is featured makes me wanna grab some baking soda and scrub them,or better throw them out and get a new quality one. Cheap cutlery is cheap cutlery.
The fork on Campanella pasta should have retired years ago. I honestly don't mean to offend. Just my view.
Hi Irina,
I am no Olga, but I just had to say something lol.
The word "cheap" has nothing to do with that cutlery. The weathered look is part of the ongoing trend of displaying antique (looking) cutlery around dishes. Check out http://vikalinka.com she's someone who does that with a lot of grace 🙂 It's a matter of opinion, not esthetics 🙂
Thanks, Marina:).
I'm sorry to hear that my spoons and fork are distressing you, Irina. I was going for a vintage look when I bought them specifically to use as photo props. I guess it's a matter of taste. It never even crossed my mind that someone would see it as "cheap cutlery", but I can see where you're coming from. Thanks for sharing your opinion.
Hey! Everyone i know calls this "curly boys cake". Very interesting. And I thought grafskiye rozvalini was from meringue?
We called it curly boys too! 🙂
В Бресте мы этот торт называли "Графские развалины" - очень к изображению торта подходит 🙂 Спасибо за рецепт, Олечка!!!
I've heard it called that as well as many other names:). Enjoy the cake!
We called "Grafskie Razvalinu" a cake made of meringue mounds bound together with condensed milk buttercream 🙂
Yes, that's what I know "Grafskie Razvalini" too; made with meringue. Although many people that I know call this cake "Grafskie Razvalini" too. Also, another version of this cake makes the cake layers both vanilla and chocolate. I guess it's one of those things that has many variations and names.
Excited to make this cake tonight, Thanks Olga!!!
Always loved this cake but haven't made it in..foreeever! Thanks for sharing!
You're welcome, Marina:). You make so many stunning cakes yourself!
Mmmmmmmmm!! This cake looks amazing!!! Can't wait to try it!!