
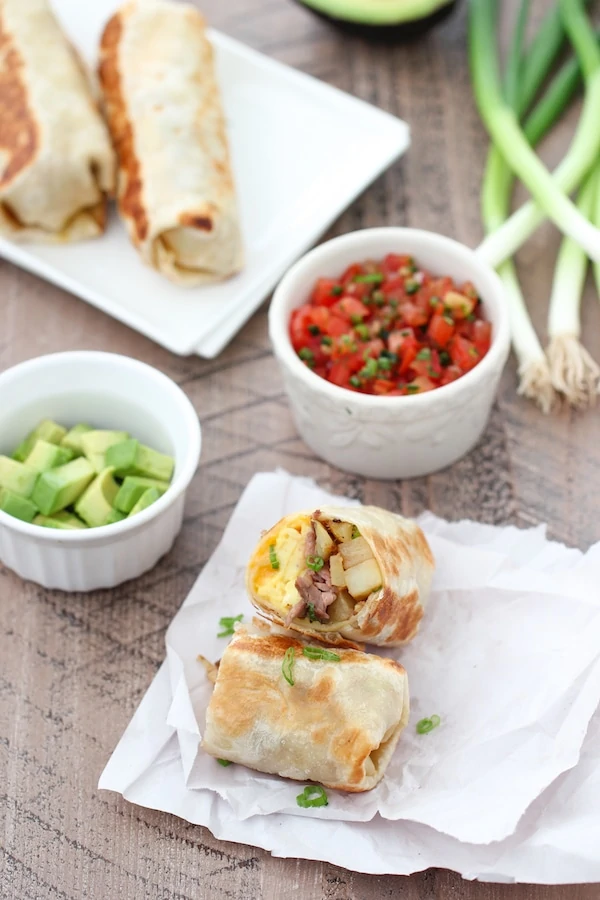
Breakfast Burritos are hearty and filling and there are so many different variations. Steak and potato burritos are one of my favorites for two reasons: 1. They are SO tasty - the steak, potatoes, tender eggs, melted cheese and the crisp tortilla all pair perfectly together. 2. They can be made in advance AND using leftovers too.
 Whenever I have leftover steak and potatoes, I like to make these burritos. You can assemble them in advance, keep them in your refrigerator or freezer and then just heat them up for a quick and hearty breakfast in the morning.
Breakfast burritos are very convenient to take with you on the go to school or work, or you can go the extra mile and serve them on a leisurely weekend morning with pico de gallo, avocados and sour cream for an indulgent meal that will keep you full for hours.
If your steak is cooked rare or medium, the steak will remain really tender and juicy even when it's heated up in the burrito, which is one of the best ways to repurpose your leftover steak.
 Repurposing Leftovers For Breakfast Burritos
 Repurposing Leftovers For Breakfast Burritos
For this recipe, leftover cooked potatoes or leftover steak works really well. Cut up the leftover potatoes and the slice the steak thinly.
These are my favorite steak recipes to make a bigger portion specifically so I can make these Breakfast Burritos:
- Beef Fajitas When I serve this for dinner, I make sure to buy extra tortillas and cook extra beef, peppers and onions, which I add to the burritos.
- Garlic and Herb Roasted Potatoes - these roasted potatoes are so delicious for dinner and are perfect to add to the burritos.
- You can also use leftover boiled or baked potatoes as well. Almost any leftover steak can be used in this recipe too.
Other options to use instead of Steak and/or Potatoes:
Instead of the steak, you can use cooked sausage, kielbasa, ham or other deli meat. You can also omit the meat and use other vegetables or mushrooms instead.
Cooking the Potatoes
If you are starting with raw potatoes, here is how to cook them.
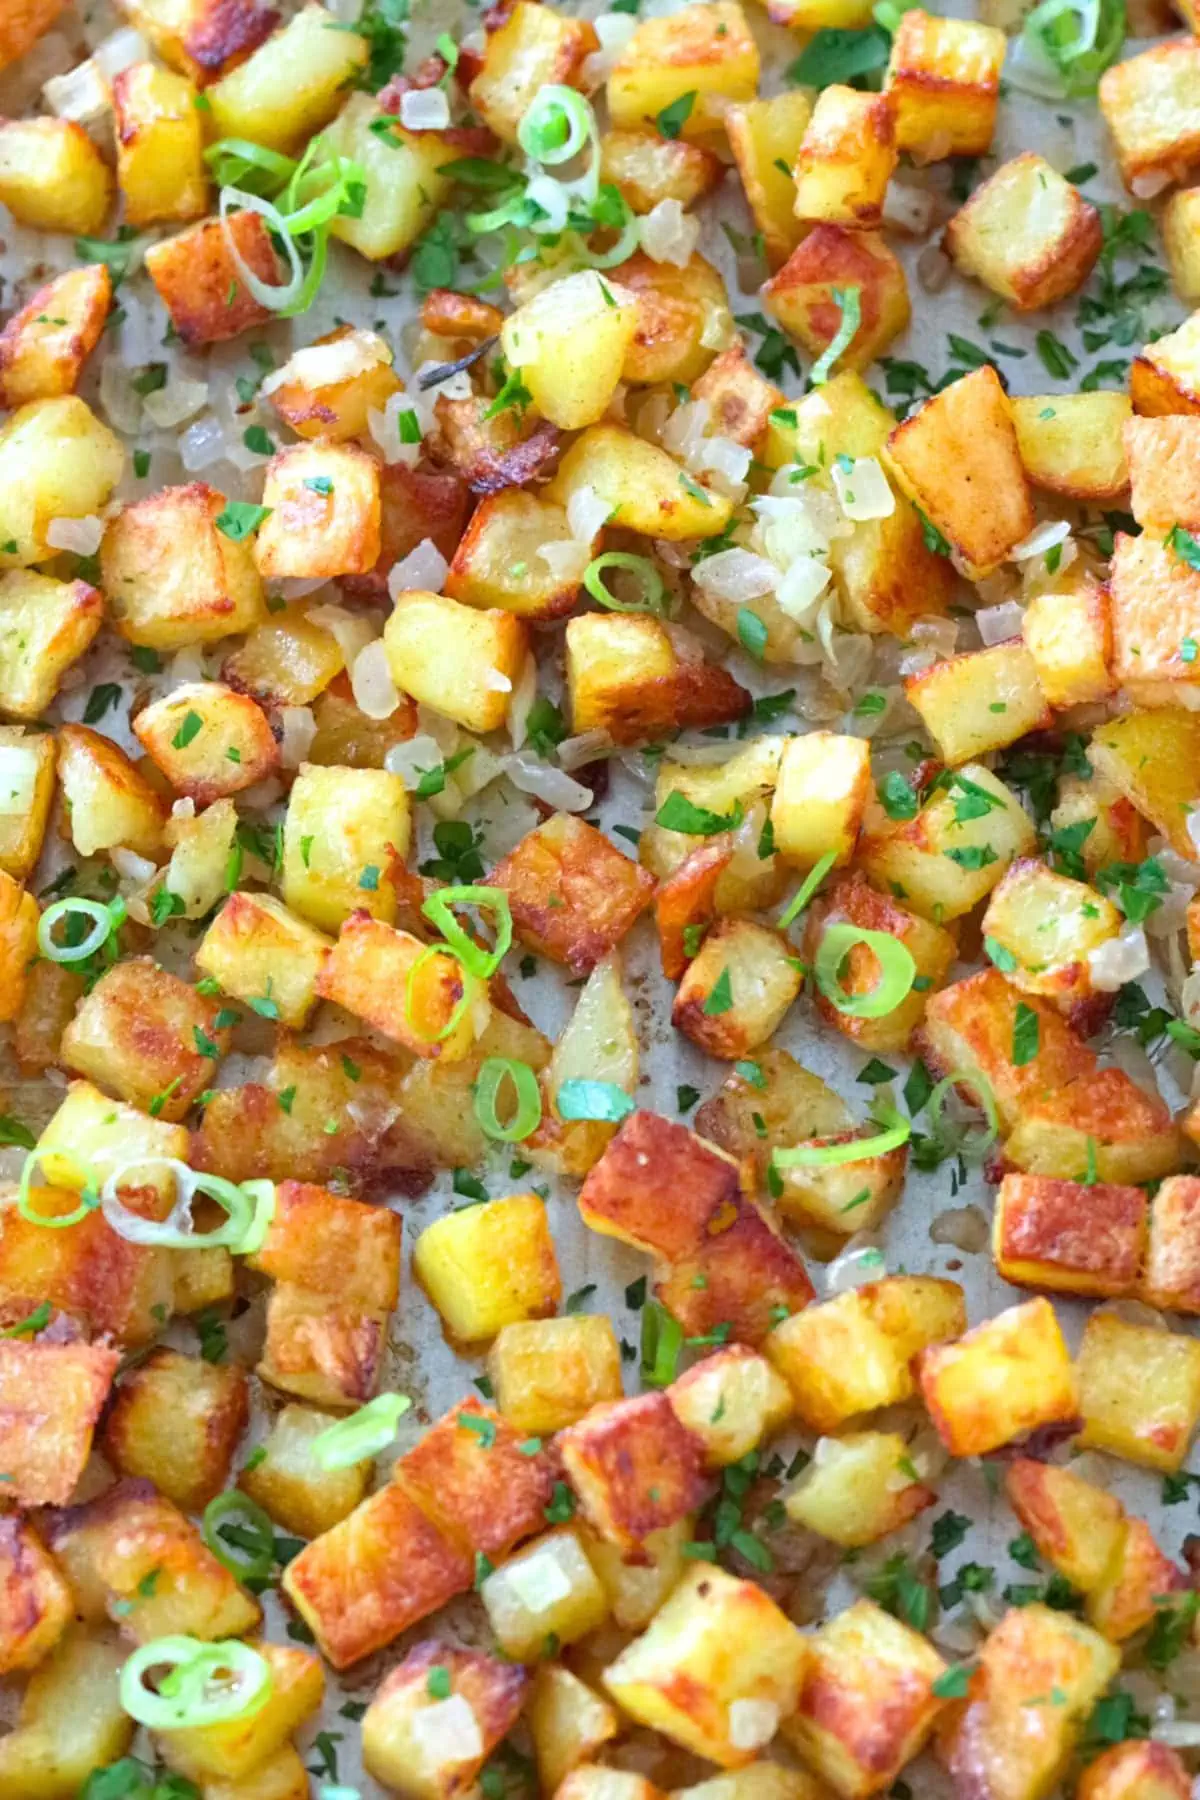
Cut the potatoes into cubes (about ½ inches, although you can cut them smaller or larger, whichever you prefer). Mince the onion. 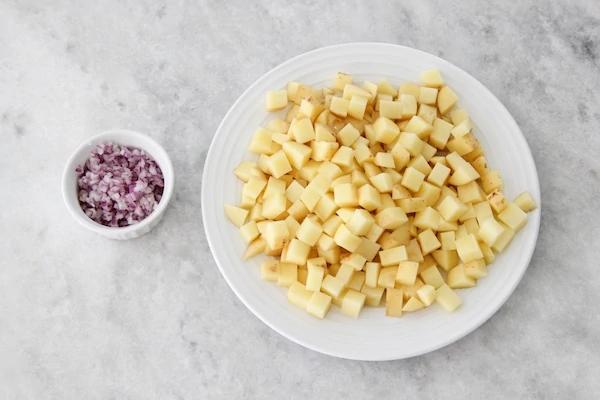
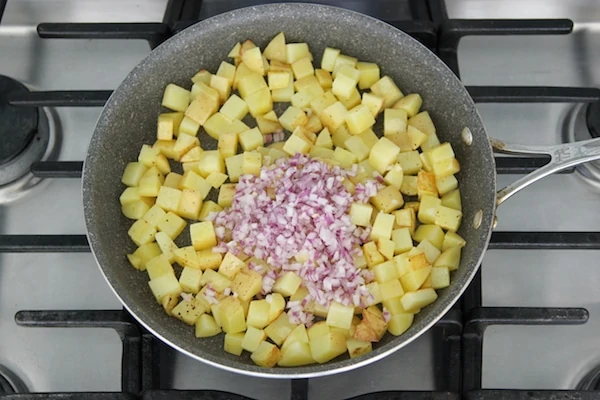
Heat about 1 Tablespoon of oil in a skillet and then add the potatoes when the oil is hot. Cook the potatoes on medium heat for about 5-7 minutes.
Add the chopped onion to the potatoes, season with salt and ground black pepper and keep cooking, covered on medium low heat until the potatoes are cooked through and fork tender, another 5-7 minutes, depending on how big you cut the potatoes.
 Add the white and light green parts of the green onion to the potatoes and set aside.
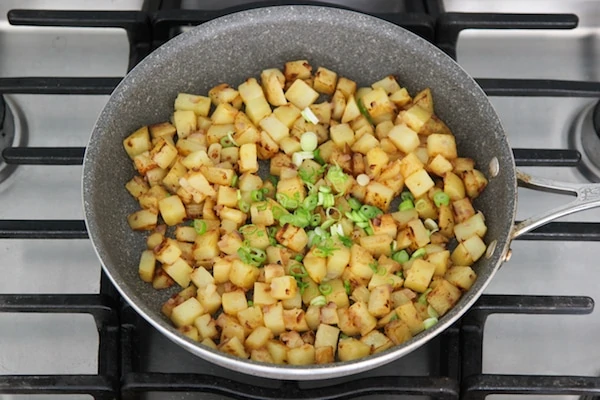
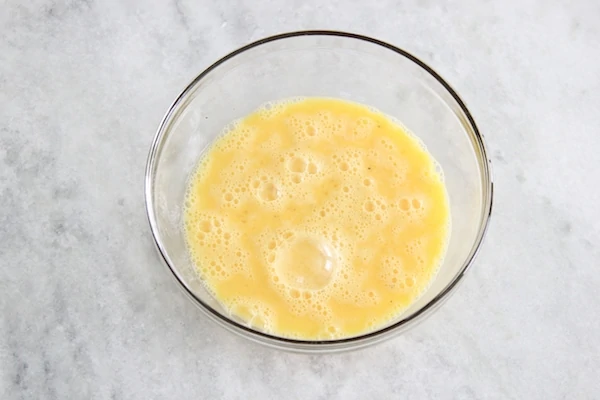
Scrambling the Eggs
Wipe out the skillet, you will be using it to scramble the eggs.
In a large bowl, whisk the eggs until thoroughly mixed. Add ⅓ teaspoon of salt and ¼ teaspoon ground black pepper.
 Add a 1 - 2 teaspoons more of oil (you can also use butter) and heat until shimmering. Pour in the mixed eggs and scramble on low heat until the eggs are mostly set but still just a little bit loose and a little bit shy of being completely cooked though.
 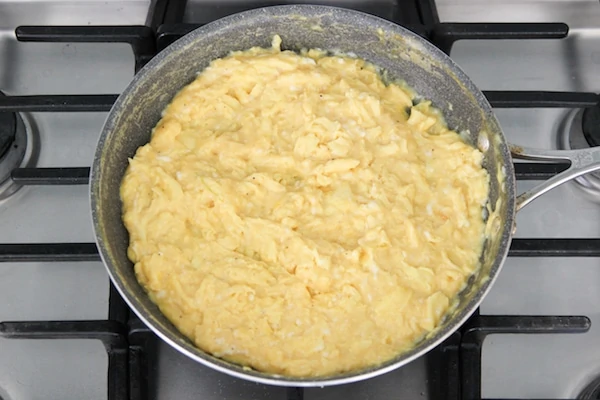 Since you will still cook the burritos when you fill them, the eggs need to be a tiny bit undercooked so they aren't too dry and overcooked when you will serve them.
Assembling the Burritos
 Place about ¼ cup of the cooked potatoes in the center bottom of a tortilla.
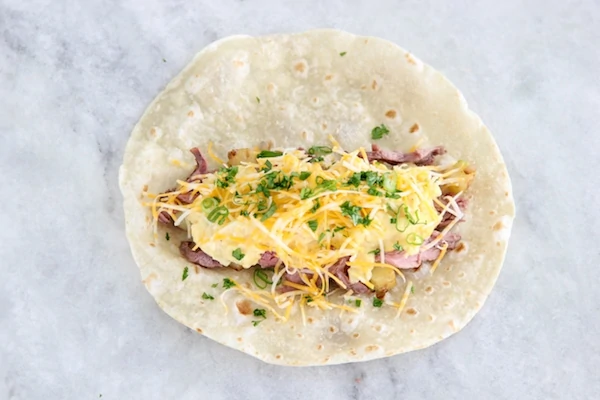
 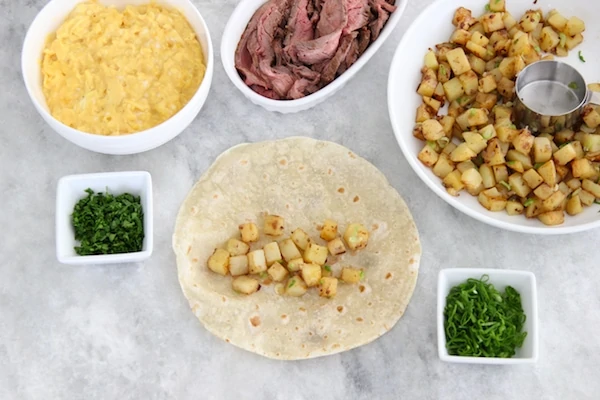 Top with another ¼ cup of the scrambled eggs, then with the steak and finishing with the cheese and the fresh herbs.
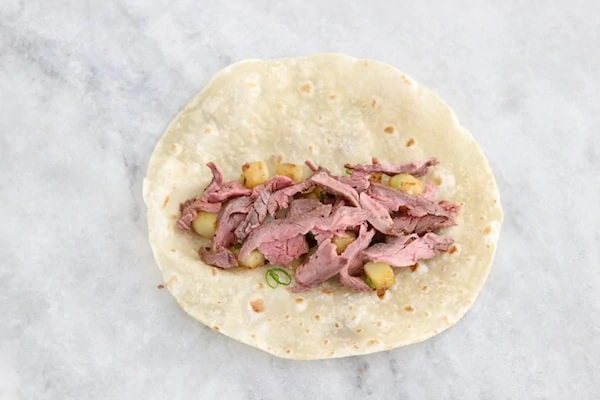
 Fold the sides over the filling and then with the sides folded in, use your thumbs to bring up the bottom of the tortilla. Roll it up tightly until you have a neat little burrito.
 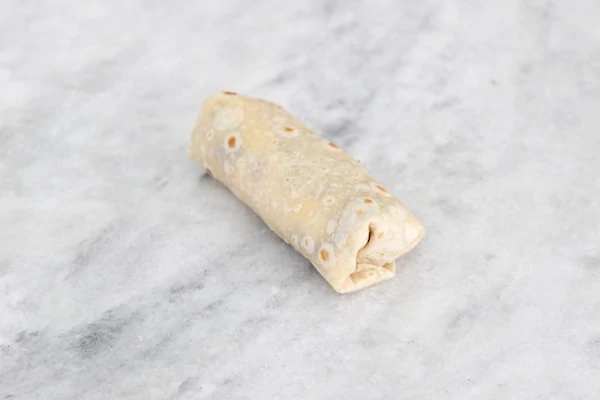 Repeat with all the ingredients until you have all 8 tortillas filled.
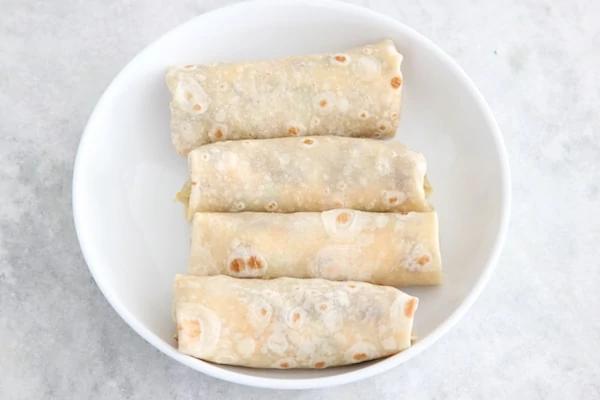
Storing the Burritos and How To Freeze Them
Store the filled burritos in the refrigerator for 3-5 days or in the freezer up to 6 months.
To freeze the burritos, wrap each individual burrito in parchment paper and then plastic wrap or aluminum foil and then storing all the wrapped burritos in a freezer ziptop bag or an airtight container.
To Serve:
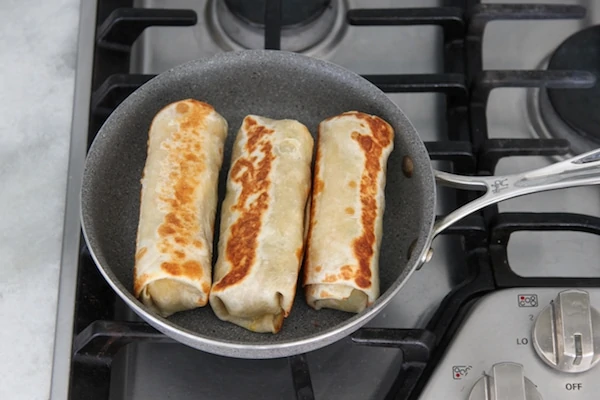
Cook in the microwave until hot or brown in a skillet on medium low heat, covered, until golden on all sides. (You can use butter or oil to brown the burritos.)
 Serve with tomato salsa, pico de gallo, sour cream, guacamole, chopped avocados, more fresh herbs and/or crema.
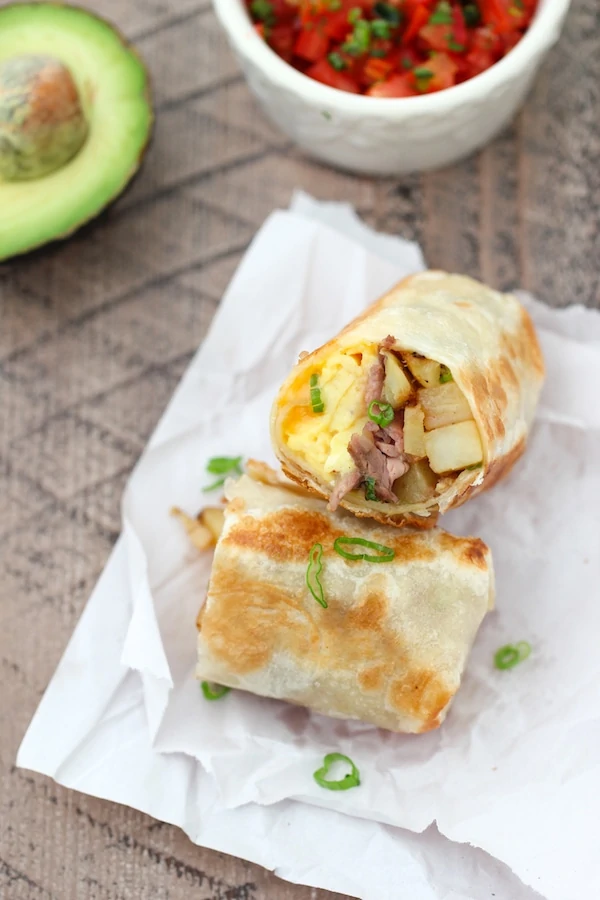
Steak and Potato Breakfast Burritos

Breakfast Burritos are hearty and filling and there are so many different variations. Steak and potato burritos are are SO tasty - the steak, potatoes, tender eggs, melted cheese and the crisp tortilla all pair perfectly together. They can also be made in advance, which makes them really convenient.
- Prep Time: 20 mins
- Cook Time: 10 min
- Total Time: 30 minutes
- Yield: 4-6 1x
- Category: Breakfast
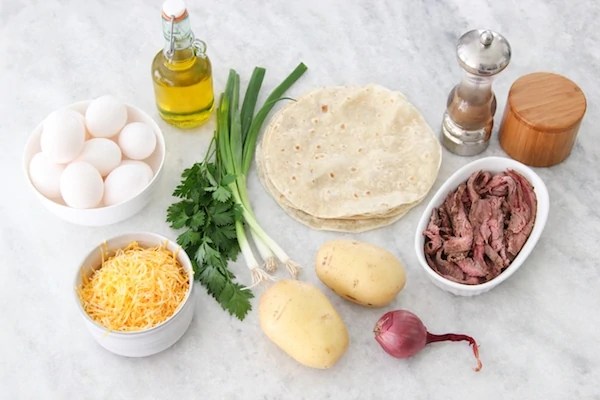
Ingredients
2-3 medium potatoes (about 3 ½ cups chopped raw potatoes, or about 2 ¾-3 cups cooked chopped potatoes)
salt, ground black pepper
1 small onion, yellow or red, minced
oil, for sautéing (sunflower, light olive oil, avocado, grape seed, etc)
10 eggs
2 cups sliced cooked beef or roast beef, pastrami deli meat
1 Tablespoon green onions, thinly sliced
½ Tablespoon fresh parsley, minced, optional, to garnish
4 oz grated cheese (I used Colby Jack, you can also use cheddar, mozzarella, provolone, monterey jack, colby, gruyere, gouda, havarti, etc.)
8 flour tortillas (8-9 inches in diameter)
To serve with the burritos, optional: tomato salsa, pico de gallo, guacamole, chopped avocados, sour cream
Instructions
For this recipe, leftover cooked potatoes or leftover steak works really well. Cut up the leftover potatoes and the slice the steak thinly. Instead of the steak, you can use cooked sausage, kielbasa, ham or other deli meat. You can also omit the meat and use other vegetables or mushrooms instead.
If you are starting with raw potatoes, here is how to cook them.
Cut the potatoes into cubes (about ½ inches, although you can cut them smaller or larger, whichever you prefer).
Heat about 1 Tablespoon of oil in a skillet and then add the potatoes when the oil is hot. Cook the potatoes on medium heat for about 5-7 minutes. Add the chopped onion to the potatoes, season with salt and ground black pepper and keep cooking, covered on medium low heat until the potatoes are cooked through and fork tender, another 5-7 minutes, depending on how big you cut the potatoes.
Add the white and light green parts of the green onion to the potatoes and set aside. Wipe out the skillet, you will be using it to scramble the eggs.
In a large bowl, whisk the eggs until thoroughly mixed. Add ⅓ teaspoon of salt and ¼ teaspoon ground black pepper.
Add a 1 - 2 teaspoons more of oil (you can also use butter) and heat until shimmering. Pour in the mixed eggs and scramble on low heat until the eggs are mostly set but still just a little bit loose and a little bit shy of being completely cooked though. Since you will still cook the burritos when you fill them, the eggs need to be a tiny bit undercooked so they aren't too dry and overcooked when you will serve them.
Assemble the burritos.
Place about ¼ cup of the cooked potatoes in the center bottom of a tortilla. Top with another ¼ cup of the scrambled eggs, then with the steak and finishing with the cheese and the fresh herbs. Fold the sides over the filling and then with the sides folded in, use your thumbs to bring up the bottom of the tortilla. Roll it up tightly until you have a neat little burrito. Repeat with all the ingredients until you have all 8 tortillas filled.
Store the filled burritos in the refrigerator for 3-5 days or in the freezer up to 6 months.
To freeze the burritos, wrap each individual burrito in parchment paper and then plastic wrap or aluminum foil and then storing all the wrapped burritos in a freezer ziptop bag or an airtight container.
To Serve:
Cook in the microwave until hot or brown in a skillet on medium low heat, covered, until golden on all sides. (You can use butter or oil to brown the burritos.)
Serve with tomato salsa, pico de gallo, sour cream, guacamole, chopped avocados, more fresh herbs and/or crema.
Notes
Other great additions to the burritos:
sausage, peppers, mushrooms, bacon, hash browns, any grated or cubed cheese, tomatoes, spinach, avocados


Did you use raw tortillas? I usually always use cooked ones.
I used raw tortillas but cooked them first before adding all the other ingredients, so technically, they are cooked.
I'm finishing up making these now and I can tell that they're going to taste amazing 🙂 the one thing I'm not seeing is how the burritos will ever actually brown on medium low! I've got it up to medium now, and they're juuust starting to get any coloring. When I saw your picture, I imagined they were supposed to cook in the oven to get that level of crisp! Alas, the first burrito is ready as I didn't figure my toddler would want it too hot/crisp, and she is devouring it ha. Definitely a yummy recipe.
Hi Hahna,
I hope you enjoy the burritos.
Of course, the temperature will depend on your stove, your skillet, etc. but I use medium low for mine to get the results that I shared in the post.
The heat is on medium low is because the burritos need time to get completely warm all the way through. If you cook them on a higher heat, what often happens is that that burritos are golden brown and perfect on the outside, but still cold in the middle. Especially if you make these with leftover ingredients, which is the majority of the time, they are all cold to start with. I did not cook them in the oven, just on the stove in a skillet. As always, adjust to your circumstances.
Well then I'll just remains jealous of the amazing color you achieved haha! They tasted amazing but I never got more than a lightly golden color in parts and the rest remained white, bit the insides were well-melted and delicious 🙂
In that case, you can probably increase the heat next time, Hahna. I hope you get a nicer golden brown and crispy crust next time.
These are great and easy. I made them a week ago and going to make them again this morning. Thanks for sharing!
That's great, Victoria:). So happy that you enjoyed the burritos.
This recipe is amazing! Thank you for sharing it. I made these breakfast burritos ahead of time, froze them, and took them with us to our recent camping trip. Reheated them with some butter until crisp on our camping propane stove, and served them with sour cream and salsa. Everyone loved them! Easy to-go breakfast. Excellent make ahead breakfast recipe. I also made tortillas from scratch, which made this extra special. 🙂
I'm so happy to hear that you were happy with this recipe. It is so convenient to have ready meals on hand, especially breakfast:).
These look amazing
Will definitely try!