
This Dulce de Leche Pumpkin Pie combines a creamy dulce de leche cheesecake layer with a rich pumpkin filling for a perfect fall dessert.
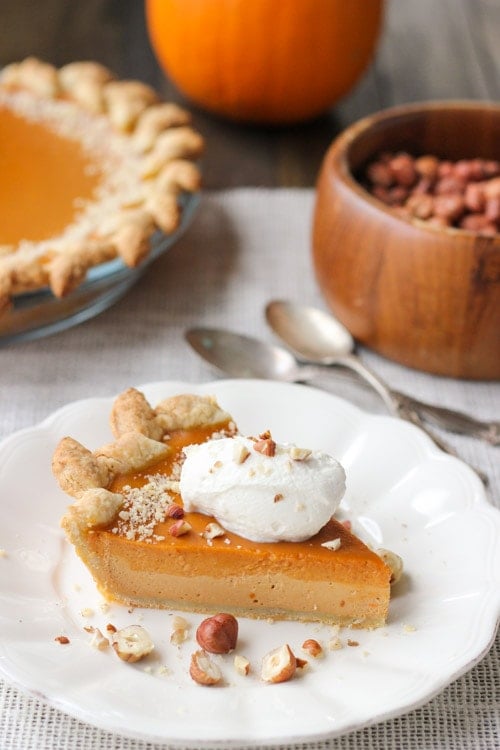
If you're looking for a dessert that combines the best of both worlds, this Dulce de Leche Pumpkin Pie is the perfect treat. It features two delicious layers: a creamy dulce de leche cheesecake layer topped with a pumpkin filling. This combination creates an indulgent, rich pie that’s both decadent and comforting.
The pie is built on a tender cream cheese crust with hazelnut, that has a flazy, nutty and buttery flavor. It really complements the sweetness of the dulce de leche and the autumnal flavor of the pumpkin. With the layers of flavor blending together, every bite is a delicious balance of creamy and smooth goodness.
This dulce de leche pumpkin pie is surprisingly easy to make and can be prepared ahead of time, making it the perfect dessert for any special occasion or holiday. It’s sure to impress with its elegant presentation and irresistible flavors, and it’s a great way to elevate your usual pumpkin pie.
Recipe slightly adapted from Better Home and Gardens.
Ingredients:
Hazelnut Pie Crust:
1 ¼ cup all purpose flour
¼ cup toasted, ground hazelnuts
pinch of salt
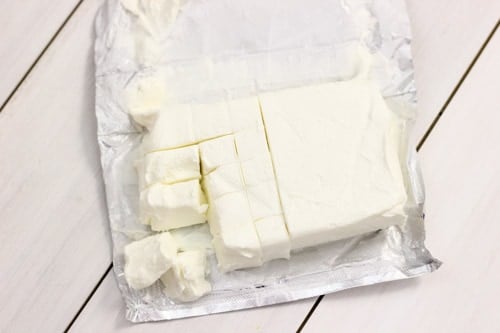
½ package (4 oz.) cream cheese, cold
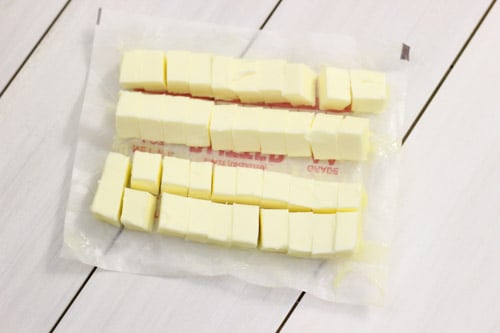
1 stick (8 Tablespoons) butter, cold
1 egg yolk
1 Tablespoon ice cold water
Cheesecake Filling:
1 package (8 oz.) cream cheese, softened
⅓ of a 14 oz. can dulce de leche (or to taste)
1 egg
1-2 teaspoons hazelnut liqueur or vanilla, optional
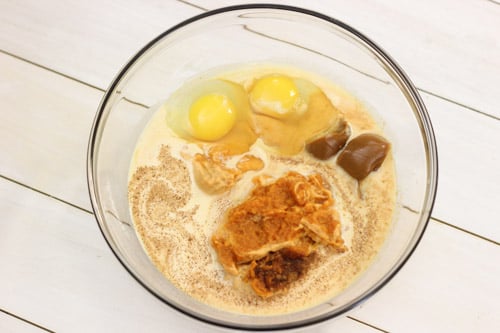
Pumpkin Filling:
1 ¼ cup canned pumpkin (NOT pumpkin pie filling)
½ cup evaporated milk
2 eggs
¼ cup sugar
2 teaspoons vanilla
1-2 teaspoons hazelnut liqueur, optional
¼-1/2 teaspoon cinnamon or pumpkin pie spice (I used cinnamon)
2 Tablespoon dulce de leche
To garnish:
Whipped cream
Hazelnuts
How To Make the Dulce de Leche Pumpkin Pie
Start with really cold ingredients. Place the flour in the refrigerator or freezer to cool for a few minutes, and cut the cream cheese and butter and cut them into small pieces and also place them in the freezer to chill for about 10 minutes.
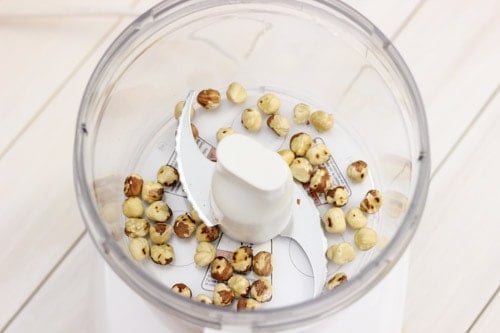
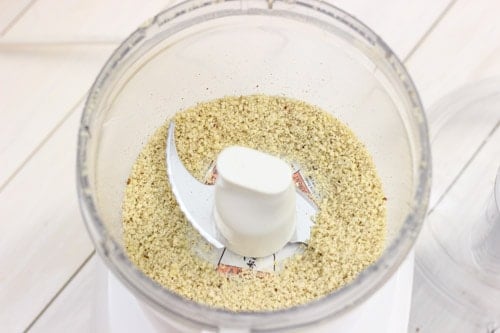
 Toast the hazelnuts and cool. Pulse them in the food processor until finely ground, yet still has a bit of texture, not into a powder. (You will need to use about ⅓ cup of hazelnuts to end up with ¼ cup of ground hazelnuts, with a bit left over, which I used to decorate the pie later.)
 In a food processor, combine the flour, ground hazelnuts and salt.
 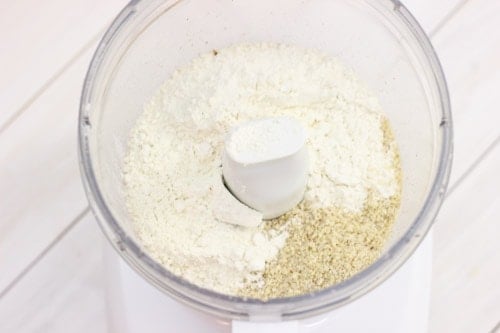 Add the pieces of cold cream cheese and pulse a few times to combine.
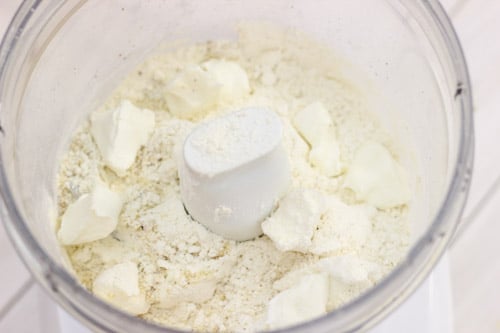
 Add the cold butter pieces and pulse to combine, just a few times, until you have pea sized butter pieces dispersed in the dough.
 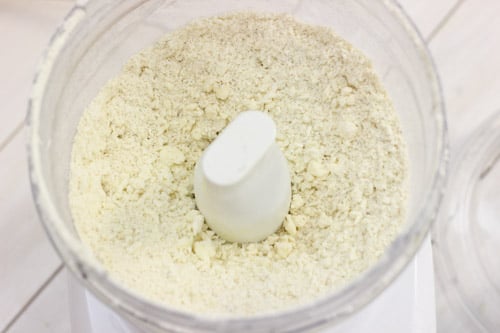 Add the egg yolk and cold water and pulse to combine a few more times.
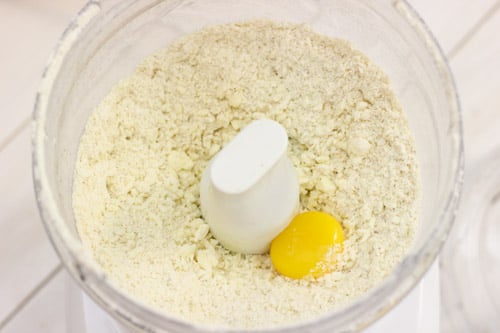
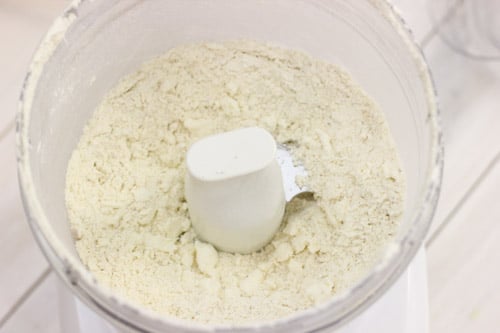
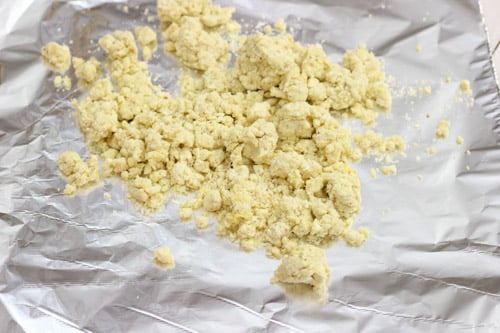
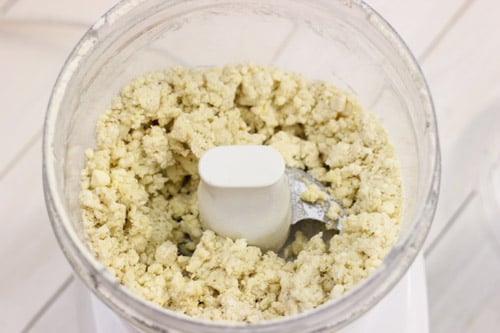 The dough will be very shaggy at this point. Dump it out onto a piece of aluminum foil or parchment paper and quickly gather it together into a disc shape. Don't work it too much with your hands, or the warmth of your hands will melt the butter in the dough and we want it to remain in little bits distributed throughout the crust. Wrap the pie dough in the aluminum foil or parchment paper and chill for at least 1 hour. I like to make my pie crusts the night before.
In a standing mixer with a paddle attachment or using a bowl and a hand held mixer, mix the softened cream cheese with the dulce de leche, until it's smooth and creamy. Adjust the amount of dulce de leche according to how sweet you would like it to be. Add the egg and the hazelnut liqueur or vanilla. Mix to combine.
 To Assemble the Pie:
Preheat the oven to 350 degrees Fahrenheit.
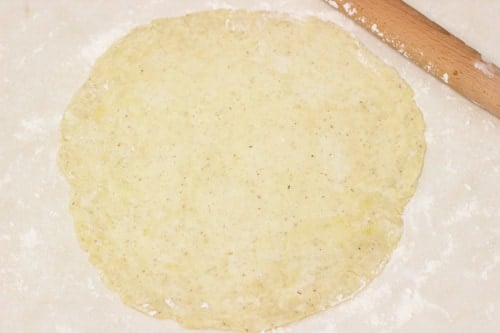
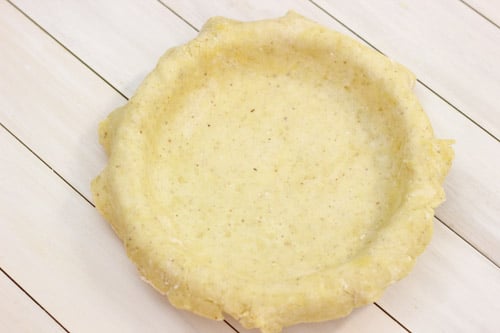
On a lightly floured surface, roll out the pie crust into approximately 11 inches and place it in a 9 inch pie pan. (You may want to let the pie dough rest at room temperature for about 10 minutes before rolling it out, if it was in there refrigerator overnight, to make it easier to roll out.)
 Trim the really long pieces of pie crust off with kitchen scissors, leaving about ½ inch of dough hanging off the edge of the pie pan.
 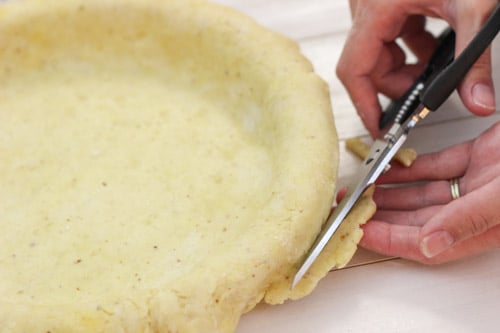 Fold the excess dough, so it will be underneath the edge of the pie plate.
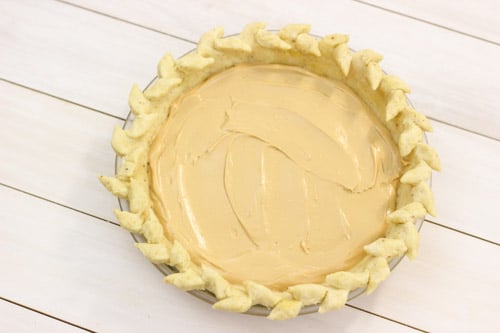
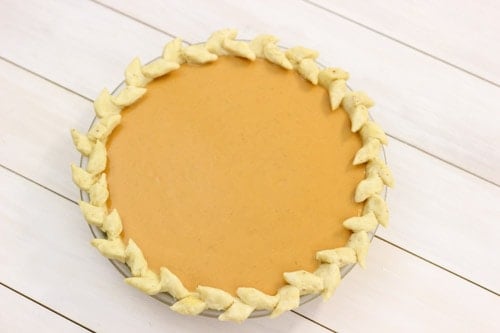
 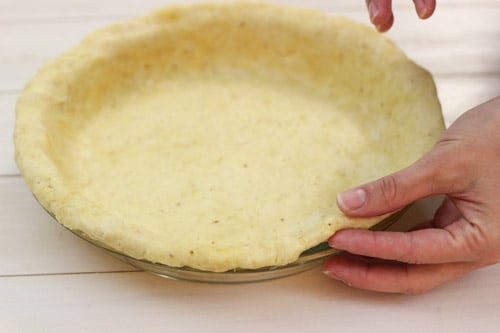 Crimp the edges. I used this really neat wheat design.
Here's how to do it:
With kitchen scissors, make 45 degree diagonal cuts, every ½ -¾ inch, all the way around the crust. 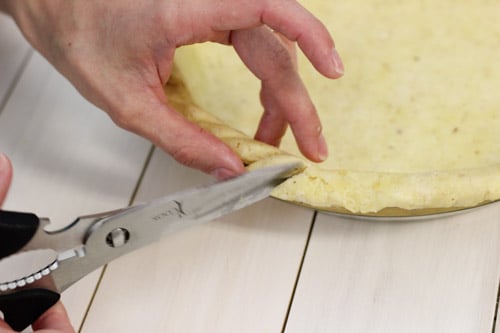 Then, simply bend every other piece in the opposite direction, pinching the end to make it slightly pointed.
 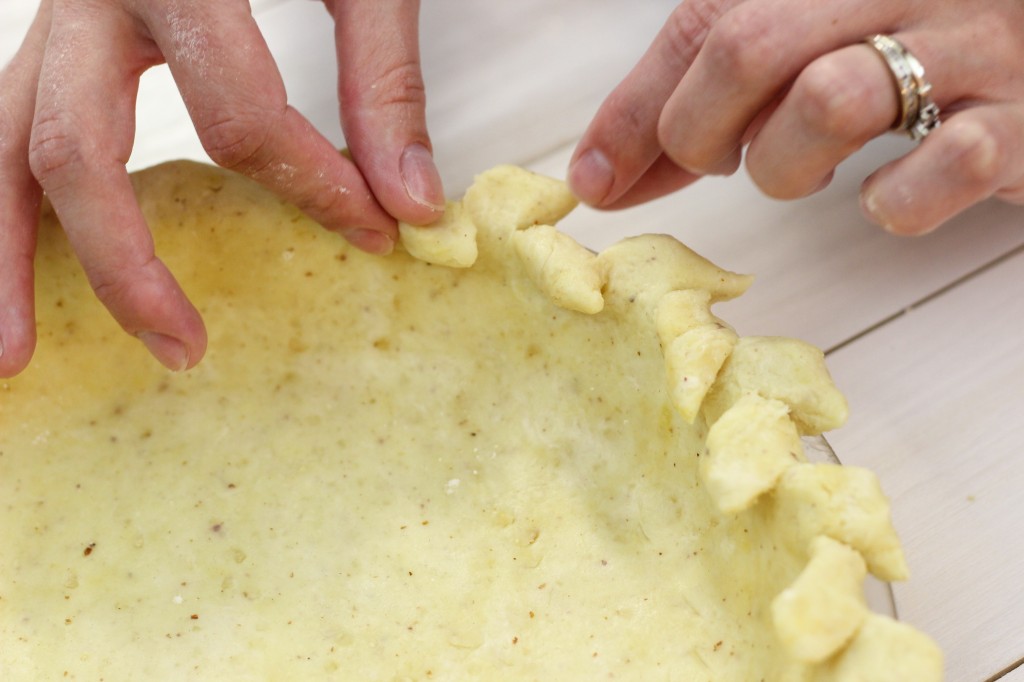 Make sure that the edges of the crust are not hanging off too much from the edge of the pie plate, or they will break off very easily.
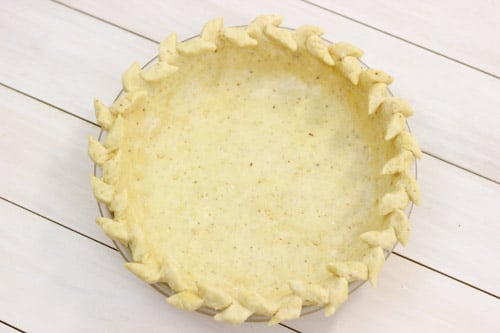 Pour the cheesecake filling inside the pie crust and chill in the refrigerator for about 30 minutes.
 Meanwhile, make the Pumpkin Filling.
Pumpkin Filling:
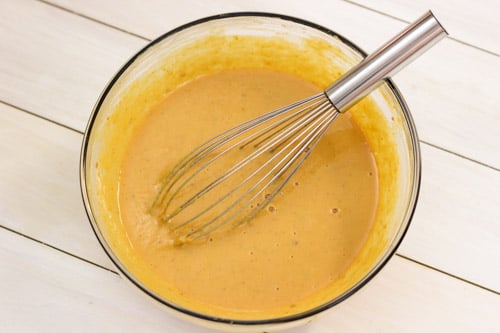
In another bowl, combine the canned pumpkin, evaporated milk, 2 eggs, sugar, vanilla, hazelnut liqueur (if using) and the dulce de leche until evenly mixed.
 Baking the Pie:
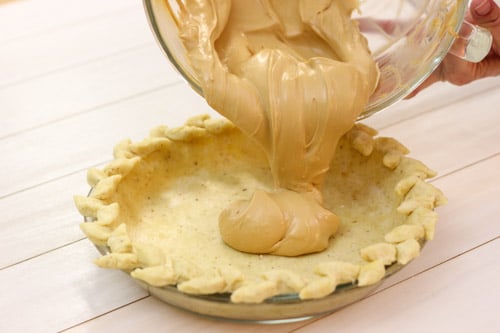
When the cheesecake layer has chilled, carefully pour the pumpkin filling over it and smooth it out. 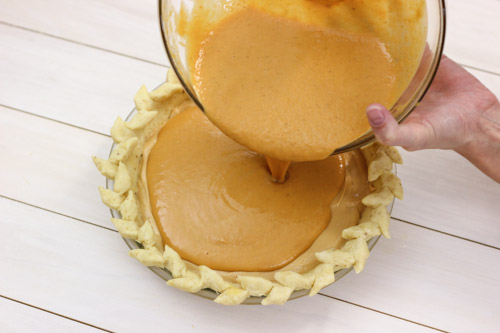
 Bake the pie in the preheated oven for about 25 - 30 minutes, then cover the pie loosely with aluminum foil, being careful not to break the pretty edge of the pie and bake for another 25 - 30 minutes, until the filling is set in the middle. Cool completely. (I would recommend making this pie the day before you plan to serve it and storing it in the refrigerator overnight. It will be so much easier to cut.)
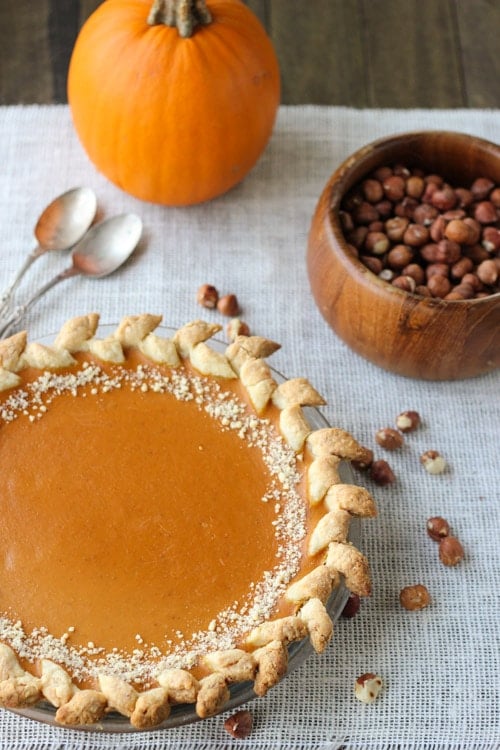 Serve with whipped cream and more hazelnuts. I sprinkled the ground hazelnuts that I had left over from the pie crust around the edge of the pie and topped each slice with more toasted and coarsely chopped hazelnuts. I also added a splash of hazelnut liqueur to the cream when I was whipping it up.

Dulce de Leche Pumpkin Pie
Ingredients
Hazelnut Pie Crust:
- 1 ¼ cup all purpose flour
- ¼ cup toasted ground hazelnuts
- pinch of salt
- ½ package 4 oz. cream cheese, cold
- 1 stick 8 Tablespoons butter, cold
- 1 egg yolk
- 1 Tablespoon ice cold water
Cheesecake Filling:
- 1 package 8 oz. cream cheese, softened
- ⅓ of a 14 oz. can dulce de leche or to taste
- 1 egg
- 1-2 teaspoons hazelnut liqueur or vanilla optional
Pumpkin Filling:
- 1 ¼ cup canned pumpkin NOT pumpkin pie filling
- ½ cup evaporated milk
- 2 eggs
- ¼ cup sugar
- 2 teaspoons vanilla
- 1-2 teaspoons hazelnut liqueur optional
- ¼-1/2 teaspoon cinnamon or pumpkin pie spice I used cinnamon
- 2 Tablespoon dulce de leche
To garnish:
- Whipped cream
- Hazelnuts
Instructions
Hazelnut Pe Crust:
- Start with really cold ingredients. Place the flour in the refrigerator or freezer to cool for a few minutes, and cut the cream cheese and butter and cut them into small pieces and also place them in the freezer to chill for about 10 minutes.
- Toast the hazelnuts and cool. Pulse them in the food processor until finely ground, yet still has a bit of texture, not into a powder. (You will need to use about ⅓ cup of hazelnuts to end up with ¼ cup of ground hazelnuts, with a bit left over, which I used to decorate the pie later.)
- In a food processor, combine the flour, ground hazelnuts and salt. Add the pieces of cold cream cheese and pulse a few times to combine.
- Add the cold butter pieces and pulse to combine, just a few times, until you have pea sized butter pieces dispersed in the dough.
- Add the egg yolk and cold water and pulse to combine a few more times. The dough will be very shaggy at this point.
- Dump it out onto a piece of aluminum foil or parchment paper and quickly gather it together into a disc shape. Don't work it too much with your hands, or the warmth of your hands will melt the butter in the dough and we want it to remain in little bits distributed throughout the crust. Wrap the pie dough in the aluminum foil or parchment paper and chill for at least 1 hour. I like to make my pie crusts the night before.
Cheesecake Filling:
- In a standing mixer with a paddle attachment or using a bowl and a hand held mixer, mix the softened cream cheese with the dulce de leche, until it's smooth and creamy. Adjust the amount of dulce de leche according to how sweet you would like it to be. Add the egg and the hazelnut liqueur or vanilla. Mix to combine.
To Assemble the Pie:
- Preheat the oven to 350 degrees Fahrenheit.
- On a lightly floured surface, roll out the pie crust into approximately 11 inches and place it in a 9 inch pie pan. (You may want to let the pie dough rest at room temperature for about 10 minutes before rolling it out, if it was in there refrigerator overnight, to make it easier to roll out.)
- Trim the really long pieces of pie crust off with kitchen scissors, leaving about ½ inch of dough hanging off the edge of the pie pan. Fold the excess dough, so it will be underneath the edge of the pie plate. Crimp the edges. I used this really neat wheat design.
- Here's how to do it: With kitchen scissors, make 45 degree diagonal cuts, every ½ -¾ inch, all the way around the crust. Then, simply bend every other piece in the opposite direction, pinching the end to make it slightly pointed. Make sure that the edges of the crust are not hanging off too much from the edge of the pie plate, or they will break off very easily.
- Pour the cheesecake filling inside the pie crust and chill in the refrigerator for about 30 minutes.
- Meanwhile, make the Pumpkin Filling.
Pumpkin Filling:
- In another bowl, combine the canned pumpkin, evaporated milk, 2 eggs, sugar, vanilla, hazelnut liqueur (if using) and the dulce de leche until evenly mixed.
Baking the Pie:
- When the cheesecake layer has chilled, carefully pour the pumpkin filling over it and smooth it out.
- Bake the pie in the preheated oven for about 25 - 30 minutes, then cover the pie loosely with aluminum foil, being careful not to break the pretty edge of the pie and bake for another 25 - 30 minutes, until the filling is set in the middle. Cool completely. (I would recommend making this pie the day before you plan to serve it and storing it in the refrigerator overnight. It will be so much easier to cut.)
- Serve with whipped cream and more hazelnuts. I sprinkled the ground hazelnuts that I had left over from the pie crust around the edge of the pie and topped each slice with more toasted and coarsely chopped hazelnuts. I also added a splash of hazelnut liqueur to the cream when I was whipping it up.


Hi Olya!
I'm making this recipe right now. Cant wait to try it! I love love love your recipes. Thanks for all your hard work with this blog!
That's great, Inna! Hope you enjoy the pie. I'd love to hear what you think once you've tried it.
Just had a peice for lunch. It turned out amazing! You can really taste the different layers in the pie. Flaky nutty crust, rich caramelly cream cheese and the oh so yummy pumpkin layer. Love at first bite. Thanks again.
Yay! It always makes my day when I read comments like yours:).
Hi Olichka,
I have made this pie twice already since you've posted it and both times something interesting happens. I lay out the crust and then pour out the cheesecake layer and the pumpkin after but once it starts baking, this switch spots here and there. The layers are rubies and become uneven. Not only that, on the areas that the pumpkin later is on the bottom, the crust absorbs the liquid (evaporated milk ect.) and in that area, the crust doesn't cook through (no matter how long I bake it) and becomes soggy instead of flaky. Would you happen to know why this is happening? Or maybe you've come across this before.... it's quite frustrating lol. (other than that it tastes AMAZING) Any feedback would be appreciated!
Thank you 🙂
Hi Katie,
I'm sorry to hear that you didn't have success with the pie. Unfortunately, I can't help you. I've never had to deal with any of these issues.
Hi Olga, thank you for another wonderful recipe. I made this pie and it turned out delicious. The only thing is that my filling cracked at the end of baking. How did you get yours to turn out nice looking.
Sometimes that's just what happens with pies, especially when the filling is creamy like this pie. Most of the time it happens when the pie overcooks, so try to pull it out of the oven a little sooner. The filling should still jiggle a little when you shake the pan a bit.
Hi Olga. Quick question:do you used canned sweetened condensed milk right out of the can or do you cook it first? I'm looking forward to trying this recipe. So far I haven't been disappointed with any of your recipes I've tried. Thanks!
Hi Simona,
Dulce de leche is condensed milk that is already cooked. It is sold that way. If you can't find it, you can cook condensed milk. If it wasn't cooked, I would have written "condensed milk" in the list of ingredients.
I Kneaded it and it just crumbled up. So i added water. And made it into a disk, though it was a lil wet. Put back in the fridge and hope its fine. 🙂
I try to add water at the stage when I am still mixing it in the processor, since it's very hard to distribute it evenly when you're already kneading it, and you risk adding too much water and over mixing the dough. You just have to learn to be able to see the consistency that you are looking for and it's vey easy to form it into a disc if you mix it correctly the first time.
Hello Olga!Did you make your own whipped cream?
If so, how did you make it?
Yes, I made my own whipped cream.
It's very simple. In a chilled bowl and chilled whisk attachment, mix heavy cream (whipping cream) and as much powdered sugar as you like and a dash of vanilla until soft peaks form.
So i made the crust and for some reason it feels like it was too much flour. No? Mine didnt quite turn into a disk. Its been in fridge for an hour now and if i pick at the dough, it falls a part on some spots. And taste buttery, right? Im leaving it overnight in fridge. Its not too much flour? I dont want to ruin the pie. 🙁
Knead it on the surface a few times, and it should come together, but if it doesn't just add a bit more ice water to the mixture. Pie dough is one of those things that is very easy to adjust.
Thanks Olga!
Yes, I let it set for 30 minutes before adding the pumpkin mixture. The pie is in the oven right now, it smells delicious but definitely not as pretty as yours because the pumpkin portion got mixed up with the cream cheese layer. I'm just wondering why my cream cheese/dolche de leche mixture turned out not as firm as yours.. I guess I'll have to try making this pie one more time to understand what I did wrong 🙂
Thanks again Olya!!!
Olga, I'm a huge fan of your cooking! I've used quite a few recipe ideas from your site and just feel very thankful that I can find so many of favorite russian dishes here. I have a question regarding this pie recipe though: I made my own dolce de leche and when I mixed it with cream cheese, the consistency became sort of liquid-y, not at all like yours in the picture. Do you think my pie is ruined or should I continue with the rest of the process?
thanks in advance! Happy Thanksgiving!!!
Hi Marina,
Did you let the pie with the cream cheese layer set in the refrigerator for 30 minutes first?
I think it should still be ok, even if it is soft:). The pumpkin may run a little into the cheesecake filling, but that shouldn't have any effect on the taste of the pie.
Olga,
I'm a huge fan of your cooking! You have such a creative imagination! One question though regarding this pie recipe - I made my own dolce de leche and when I mixed it with cream cheese the consistency became very liquid-y, not at all like yours in the picture. Is that ok or will it ruin my pie?
I'm making this for my families Thanksgiving dessert, I'm super excited to taste it!!! 🙂
That's great, Renee! Enjoy and Happy Thanksgiving.
pie crust sounds great. very creative!
Thanks, Dina:).
Gorgeous pie!
Thank you, Snow:).
This has to be the best looking pie I've ever seen!
Wow! Thanks for such a compliment, Marina. Coming from a Baking Queen like yourself, it is especially meaningful:).
Sorry for another silly questioned, but when you say dulce de lache, do you mean cooked condanced milk? Thank you!
Yes. It's also sold as dulce de leche, or you can make your own.