
It's so easy to make homemade ricotta cheese with just 2 ingredients, milk and lemon juice. You can use the stove or the Instant Pot and get creamy, tender ricotta cheese with just a few simple steps.
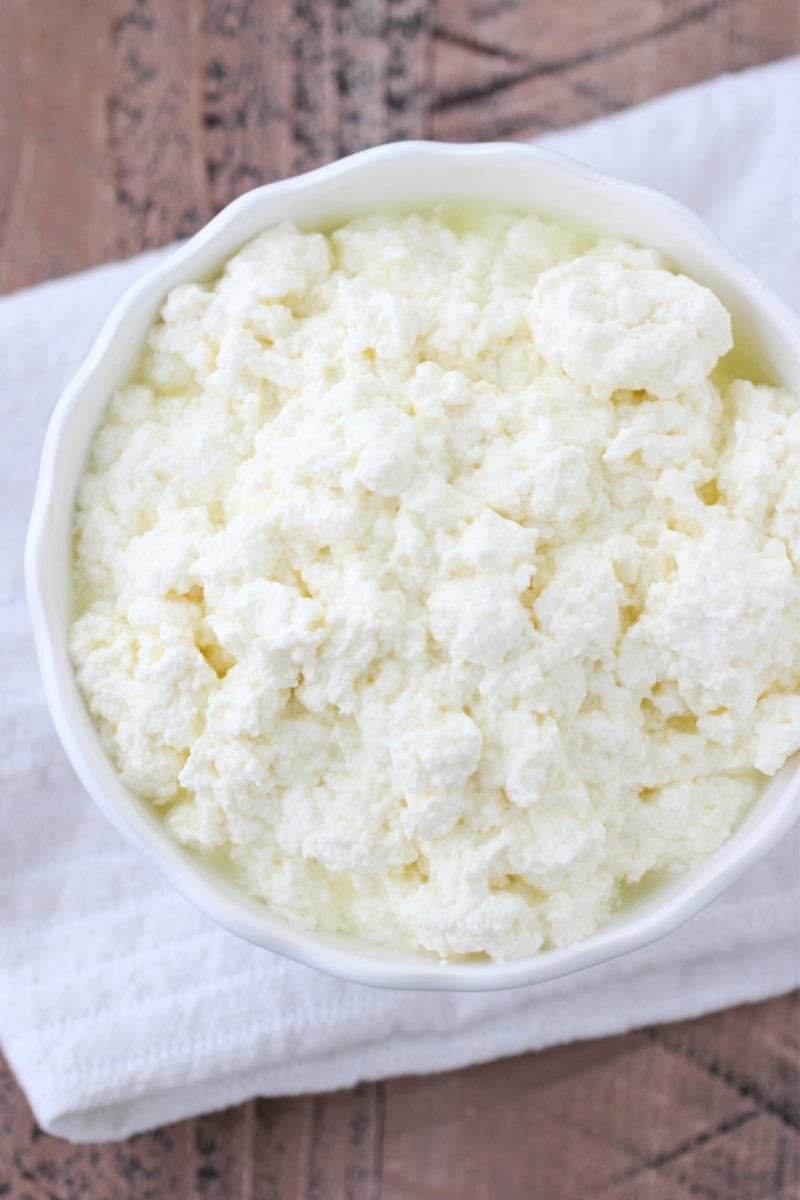
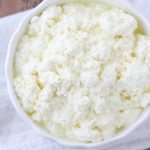
Homemade ricotta cheese is the easiest cheese to make in your own kitchen. Ricotta cheese is a soft cheese that is made by curdling milk with something acidic. I like using lemon juice, but vinegar works just as well. Then, simply drain out the whey and you have soft, delicate and creamy ricotta cheese. It beats store-bought by a mile and is so much more economical too.
Not only is it a fantastic snack - my boys love it with fresh berries or jam, but there are so many ways other ways to enjoy it - cheese blintzes, as fillings in chocolate shortbread bars, yeast breads, pastries, vareniki (Russian ravioli, both sweet and savory), lasagna. I also use it interchangeably with farmer's cheese, which is really popular in the Slavic cuisine.
For years, I made ricotta on the stovetop, but since getting my Instant Pot, I have started making it there. The "Yogurt" setting makes it even easier, because you don't have to worry about the milk scorching or boiling over. I will include both methods in this recipe.
Video of How to Make Ricotta Cheese
Ingredients:
- 1 gallon of whole milk
- I highly recommend using whole milk for ricotta. Even though ricotta will still work with reduced fat milk, you will get a smaller yield and the ricotta will not be as creamy.
- I have not tried using dairy free milk to make yogurt, so I don't know if you can use almond milk, coconut milk, etc.
- ½ cup lemon juice (about 3 lemons)
- Instead of lemon juice, you can use distilled white vinegar.
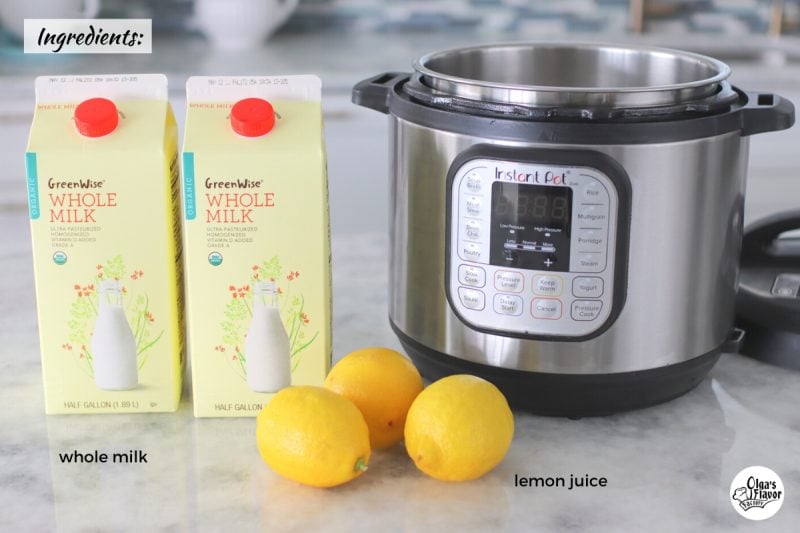
Homemade Ricotta Cheese in the Instant Pot
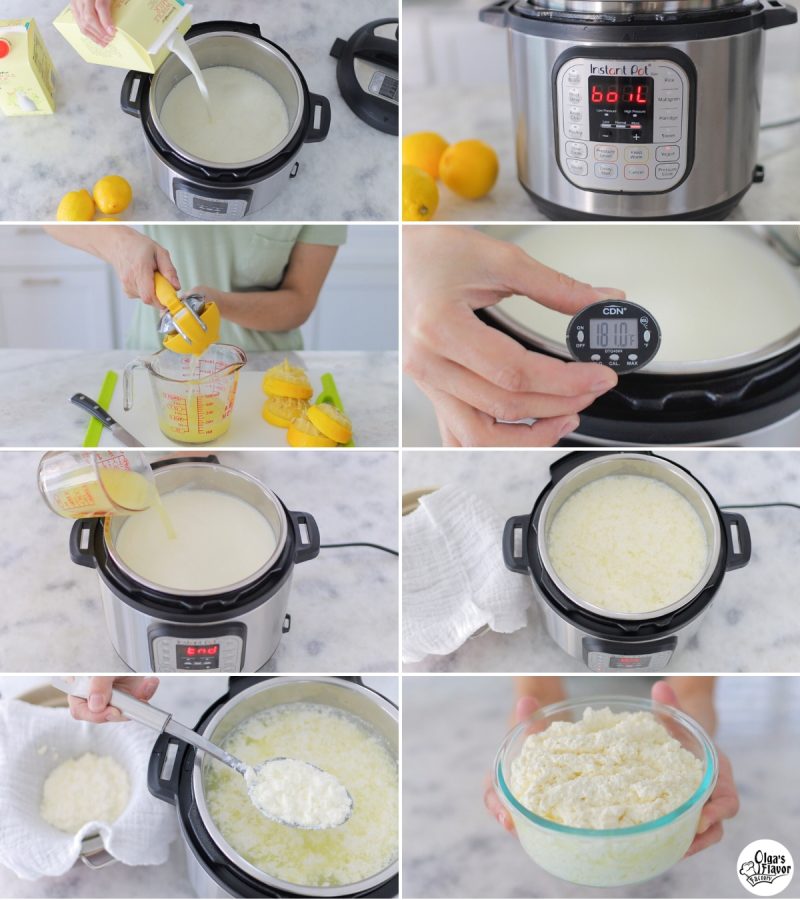
- Bring the milk to a boil. Pour the milk into the Instant Pot and set it to the "Yogurt" setting, adjusting it to "boil".
- Meanwhile, squeeze the juice out of the lemons.
- The Instant Pot will beep and turn off when the milk has reaches 180-185 degrees Fahrenheit.
- Add the lemon juice to the boiled milk, stir gently to combine, then let it stand for 5-10 minutes.
- While the milk + lemon juice is standing, DON'T mix it anymore.
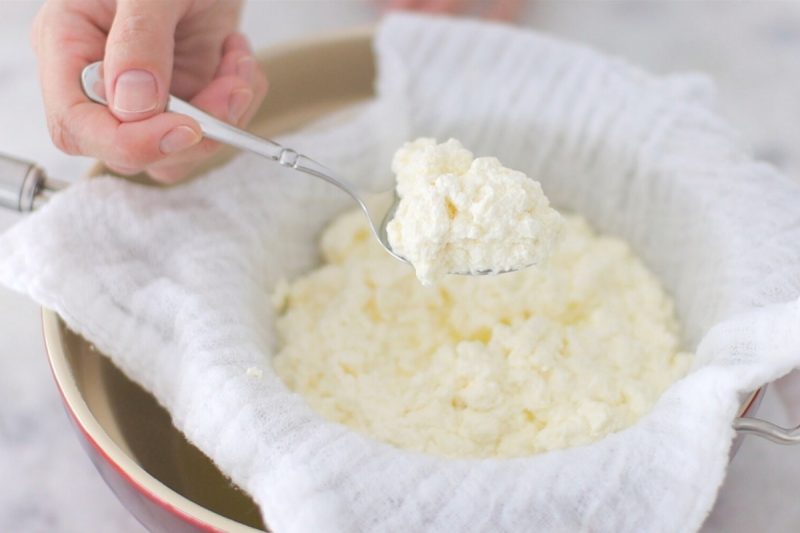
- Place a fine mesh sieve or a colander over a large bowl. Put a cheesecloth over the sieve.
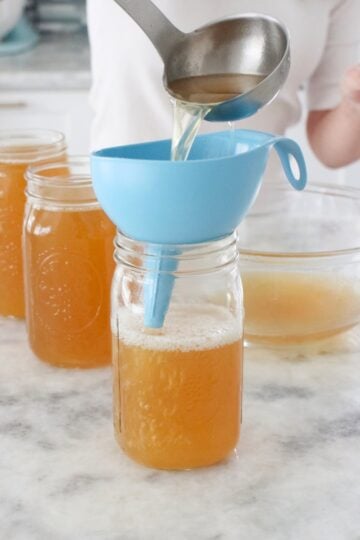
- Gently start scooping out the curds, transferring the cheese to the cheesecloth lined sieve. Continue gently scooping out the cheese curds until they are all in the cheesecloth. Pour out the strained out whey, either discarding it or saving it for another use.
- Let sit, undisturbed, until whey has drained from edges of cheese but center is still somewhat moist, about 5-10 minutes.
- Transfer the cheese to a storage container, retaining some of the whey that was left in the center.
- Store the ricotta cheese in the refrigerator in an airtight container for 7-10 days.
- If you want the cheese to have a dryer texture, more like farmer's cheese, let it drain for a longer period of time, up to a few hours in the refrigerator.
Helpful Tips and Frequently Asked Questions
Use a good quality large pot with a thick bottom, otherwise the milk is scorch and burn. Pour the milk into a large pot and heat the milk over medium-low heat until it reaches 180-185 degrees Fahrenheit, about 10-15 minutes. The milk will look frothy. Stir it frequently and keep it under strict supervision; you don’t want the milk to scorch or boil over.
Turn off the heat and pour in the lemon juice. Proceed with the rest of the instructions.
Yes, you can use 2 % milk, however, you will have a lot more whey and a smaller yield of ricotta. The ricotta will also be less creamy.
I store the whey in glass mason jars in my refrigerator and then add it to smoothies, crepe batter, bread dough and more. It's really easy; just substitute the whey for the amount of liquid in your recipe.
1. Add more lemon juice. Let it stand for 5 more minutes.
2. If the milk still hasn't curdled, place it back on low heat for just 1-3 minutes and that should do the trick.
The whey and the ricotta curds should should separate and the whey should become translucent, not milky white.
I have this 6 quart Instant Pot model. *(affiliate link). The boil setting on the "Yogurt" function makes boiling milk so easy. I can turn it on, walk away and not worry about the milk running over or scorching. It turns off when it reaches 180-185 degrees Fahrenheit. You don't need to cover the Instant Pot with the sealing ring, since we're not bringing anything to pressure. I have this lid* that I bought separately that I use.
Recipes Using Ricotta Cheese
- Ricotta Pancakes
- Ricotta Crumb Bars
- Ricotta Cheesecake Bars With Peaches
- Chocolate Shortbread Bars With Ricotta Filling
- Cheese Blintzes
- Chocolate Ricotta Cheesecake
Homemade Ricotta Cheese in the Instant Pot
Homemade Ricotta cheese is so creamy, rich and delicious and is made with just 2 ingredients. I love using the Instant Pot to make it because it makes it so convenient and easy.
- Prep Time: 5 mins
- Cook Time: 30 mins
- Total Time: 35 mins
- Yield: 4 cups 1x
- Category: Miscellaneous
Ingredients
- 1 gallon of whole milk
- ½ cup lemon juice (about 3 lemons)
Instructions
- Pour the milk into the Instant Pot and set it to the "Yogurt" setting, adjusting it to "boil".
- While you are waiting for the milk to boil, squeeze the lemon juice. You can use a small sieve to strain out the seeds from the lemon juice.
- When the milk reaches 180-185 degrees Fahrenheit, the Instant Pot will beep and turn off. Slowly pour in the lemon juice, stirring gently in a circular motion. Be careful not to mix it too vigorously, or the cheese will be grainy in texture. Allow it to stand for about 5-10 minutes.
- Place a fine mesh sieve or a colander over a large bowl. Put a cheesecloth over the sieve.
- Gently start scooping out the curds, transferring the cheese to the cheesecloth lined sieve. Continue gently scooping out the cheese curds until they are all in the cheesecloth. Pour out the strained out whey, either discarding it or saving it for another use.
- Let sit, undisturbed, until whey has drained from edges of cheese but center is still somewhat moist, about 5-10 minutes.
- Transfer the cheese to large bowl, retaining some of the whey that was left in the center.
- Store the ricotta cheese in the refrigerator in an airtight container for 7-10 days.
- If you want the cheese to have a dryer texture, more like farmer's cheese, let it drain for a longer period of time, up to a few hours in the refrigerator.
Notes
Stovetop Instructions:
- Pour the milk into a large pot and heat the milk over medium-low heat until it reaches 180-185 degrees Fahrenheit, about 10-15 minutes. The milk will look frothy. Stir it frequently and keep it under strict supervision; you don’t want the milk to scorch or boil over.
- Turn off the heat and pour in the lemon juice. Proceed with the rest of the instructions.


Thank you Olga for this great recipe.I made it already few times over last couple of years and it never fails.
Hi Olga, I've tried to make this recipe twice and it does not turn out using your instructions. First, my milk is not frothy at 180 degrees. I've had to heat it up to at least 200 degrees, if not more, and added vinegar, after already adding about 4 lemons, only at that point, it finally separated all the way. The way I made quick cottage cheese, using vinegar, is, I would heat up milk to almost boiling (frothy) on high heat, and then stir in vinegar quickly-always turned out. My question is, can I heat the milk on high heat, so it doesn't take forever? Does it have to be 180 degrees or do I look for it to be frothy, since it never curds for me at 180degrees? I do like the idea of using lemon instead of vinegar. I just wish I knew why it's not turning out the way you make it. Thanks. I do like to use recipes off your blog. Keep up the good work:)
I'm sorry to hear that it didn't work out for you, Tatiana. I shared the recipe the way I make it and the way it works out for me. The problem with heating the milk on high heat is that it has a tendency to scorch, but if you stir it constantly, it should be ok to heat it on higher heat.
I like using lemon instead of vinegar; if it doesn't curdle right away, you may need to add more lemon juice. Try keeping it on the heat and gently stirring it for a minute or so after you add the lemon juice. I hope that helps.
Also, I've noticed that the milk you use makes a difference in how quickly the milk curdles and how much lemon juice you need to use. (Sometimes, when I use one brand of milk to make buttermilk and add lemon juice, it doesn't curdle unless I use at least twice more lemon juice, and another brand of milk will curdle as soon as that lemon juice hits it.)
Thank you so much for this! I was using a similar recipe but needed to do some troubleshooting and your tips and photos made my cheese a success! I am signed up for your updates and look forward to more recipes. Using my farmer's cheese for my first homemade pierogi for Christmas Eve.
I'm so happy to hear that, Corrine. I'm thrilled that it worked out for you. Homemade pierogi's are awesome.
Hey Olga, i was wondering if i can substitute the lemon juice from lemons for the lemon juice concentrate from the bottle? If so, how much do i need? Thank you
👏👏👏👏👏
My cheese turned out! After I added the lemon juice, only the foam cured. So I heated it again and added lemon juice again. Nothing. THEN... I added 1-2 cups buttermilk and that did the trick!!!
Hi Olga,
How long should i drain it for to make it softer and less drier.
Thanks
Inna
You'll just have to use your judgement, Inna. Look at it, touch it and stop draining it once it's the consistency that you are looking for.
Just want to thank you for this easy recipe. For years I used the method of milk and buttermilk. Unfortunately last 3 attempts I ruined it. (Maybe cause my placenta brain ) today I followed your recipe and I love it. It's ready in one day and so good.
Sirniki are my favorite!
Thank you for posting your recipes online. I use your recipes to make yummy things. Your Farmer's Cheese recipe is awesome. God Bless you and your entire household.
You're welcome, Tanya! I'm so glad that you are enjoying the recipes. Thank you for taking time to write.
Thanks for the recipe Olga! Question: Do you have any tips on what to do so the bottom of the pot doesn't burn?
Also, do you warm it up on low or on medium heat? And when exactly to take if off if i don't have thermometer to check if it's 185 degrees or not. Thanks a lot!
First of all, you need to use a good quality pot, that has a heavy bottom. If the pot is thin, it will burn no matter how careful you are.
The temperature of the heat depends on your stove and your pot. You will need to adjust the heat depending on that. It would be very hard to tell how long to cook the milk without using a thermometer. I've never done it without a thermometer. Instant read thermometers are very inexpensive and I use mine all the time.
Hi olga, could you please recommend a good thermometer?:)
Hi olga, this is interesting, i never heard of lemon being used. I make it with 1 gallon of milk, heat it up just until warm, take it off the heat add 2 cups of buttermilk. and cover and let it stand for 2 days. Then warm it up on low heat for an hour without mixing. and voila. 🙂 takes a bit longer then yours but also super easy. Will have to try your way for sure. There are also different health benefits to the whey, believe it or not it helps heal poison ivy! just apply it to the skin!!!
My Mom used to make farmer's cheese with buttermilk or sour cream. I really like using lemon juice because it's so quick and I usually have lemons on hand.
I like to use the whey to make bread or crepes. I never knew that it was good for poison ivy. That's awesome. Thanks for sharing, Anna.
Hi Olga,
Thank you for the recipe. Could you please leg me know as how much in ml is a gallon of milk.
Thanks.
1 Gallon [Fluid, US] = 3785.41178 Milliliters
1 Gallon [UK] = 4547 Milliliters
Hi I love your recipes and stories but I would like to know if I can halve the recipe as there are just three if us in my household thanks.keep up the great satisfying work olga.
Hi Courtney,
Yes, you can halve the recipe. I'm glad you are enjoying the blog.
There are only the two of us, my husband and myself, and we have no problem using up the farmer's cheese:).
Love making farmer cheese at home as well! whey btw is a great facial cleanser!
Good to know:). I've heard of people washing their face in buttermilk; I guess whey is similar in some way.
How much cheese (weight/ cups) do you get from 1 gallon of milk?
Hi May,
1 quart is equal to approximately 4 cups. However, that is not the exact amount. It depends on the milk that you use how much cheese you will end up with. If you use lighter milk, you will not get as much cheese as when you use whole milk, etc.