
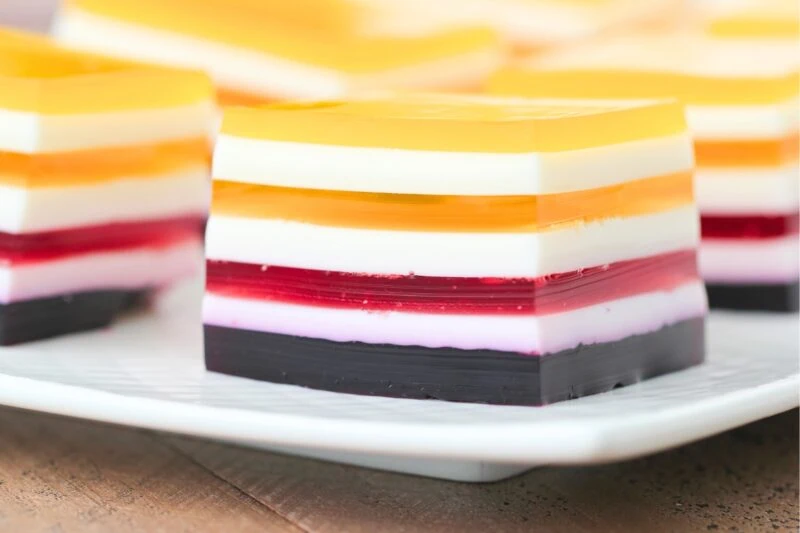
This colorful layered rainbow jello dessert is perfect if you're looking for a fun and healthy treat. Made with juice instead of boxed jello, it’s a healthier option - free from artificial ingredients and dyes, and ideal for kids’ parties and family get-togethers.

Layered Rainbow Jello is the perfect treat for any occasion. This colorful dessert is not only eye-catching but also incredibly fun to make. It’s great for birthday parties, family gatherings, or just as a special treat for your little ones.
There are tons of rainbow jello recipes out there, but this one stands out because it uses fruit juice instead of boxed jello. This way, you can skip all the unnecessary sugars, artificial dyes, and chemicals. The result? A naturally delicious treat with bright, beautiful layers that pop—especially when combined with the creamy, sweetened condensed milk white layers. The addition of unflavored gelatin ensures the jello is firm and delightfully jiggly, just the way it should be.
One of the best things about this recipe is how customizable it is. You can mix and match different juice flavors and colors, and even play around with fun shapes or individual servings.
As a mom, I love knowing that this treat is not only something my kids will enjoy, but it’s also made with wholesome ingredients. The flavors from the fresh juices take it to the next level, making it a hit even with adults—my husband, who’s not usually a jello fan, loves this version. The juice really makes all the difference!
Layered Rainbow Jello Video
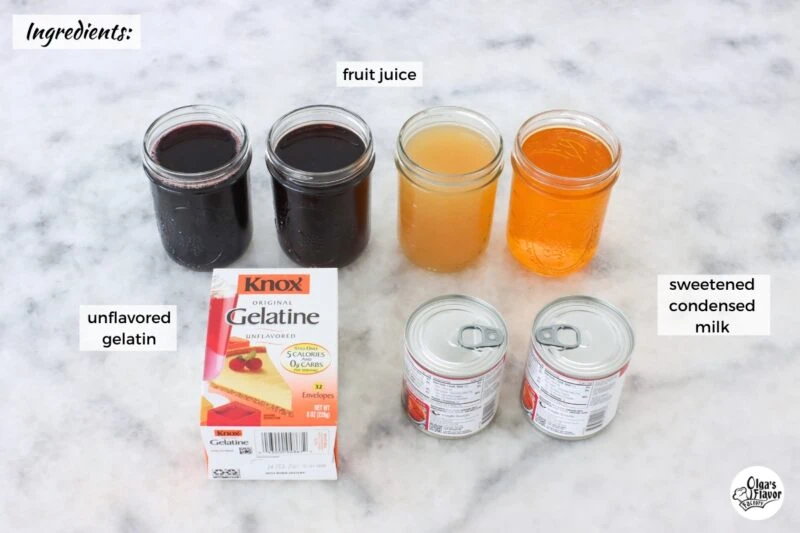
Ingredients
The complete list of ingredients and their exact measurements can be found in the recipe card below.
- fruit juice
- The base of this recipe is fresh fruit juice, which adds natural flavor and vibrant color to the jello layers. You can customize the flavors and colors to suit your preferences, creating a fun, rainbow effect. (More details about with juice to use in the following paragraph)
- unflavored gelatin
- I use Knox unflavored gelatin to ensure the jello has the perfect texture. It’s crucial for giving the dessert its firm, jiggly consistency. Be sure to use unflavored gelatin, as flavored gelatin could change the taste and texture of your layers.
- sweetened condensed milk
- This ingredient is key to creating the rich, creamy white layers in between the colorful jello. Sweetened condensed milk adds a touch of sweetness and helps balance the tartness of the fruit juices.
- water
- Water is used to dissolve the gelatin and help create the perfect consistency for the jello. It is used in the white layers.
What Juice To Use For the Rainbow Jello:
For this recipe, I stuck to 100% natural juices, free from dyes, added sugars, and artificial ingredients. I simply went to the store and picked up a variety of juices in different colors to create a beautiful, vibrant effect. If you’re aiming for a true rainbow with all the colors of the spectrum, you can get creative by adding natural dyes or using ingredients like spinach for green or freeze-dried fruits and veggies for unique colors. You could even experiment with neutral juices, like apple juice, and add colorants as needed. That will require more time and effort.
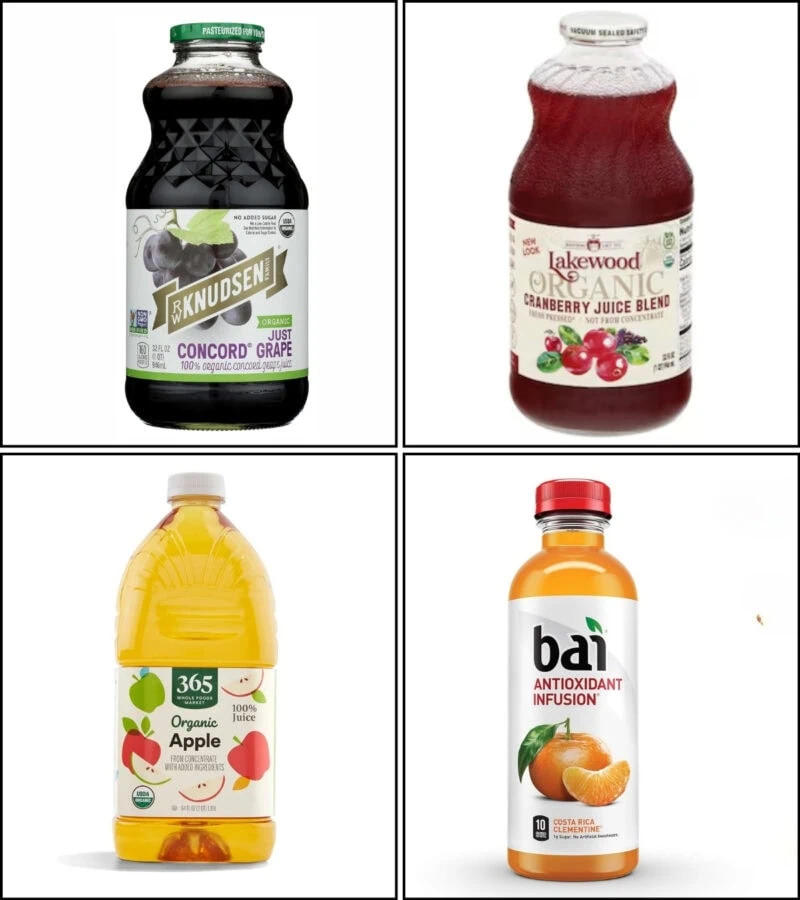
However, I kept it simple and used just four colors to get a fun and colorful jello! Here are the juices I used to create the layers:
- Purple: Grape juice
- Red: Cranberry raspberry juice
- Yellow: Apple juice
- Orange: Clementine flavored beverage that I found in the beverage aisle
Feel free to mix and match juices according to your preference, and have fun with the colors! You can also use kompot, instead of juice, like this Cranberry Raspberry Kompot or Apple Pear Kompot.
Preparing the Colored Rainbow Layers
Here's how to prepare the colorful layers for the layered rainbow jello.
- Prepare Your Pan
- Start by getting your 9x13 inch baking pan ready. A glass Pyrex dish works great for this, but any large, rimmed pan will do.
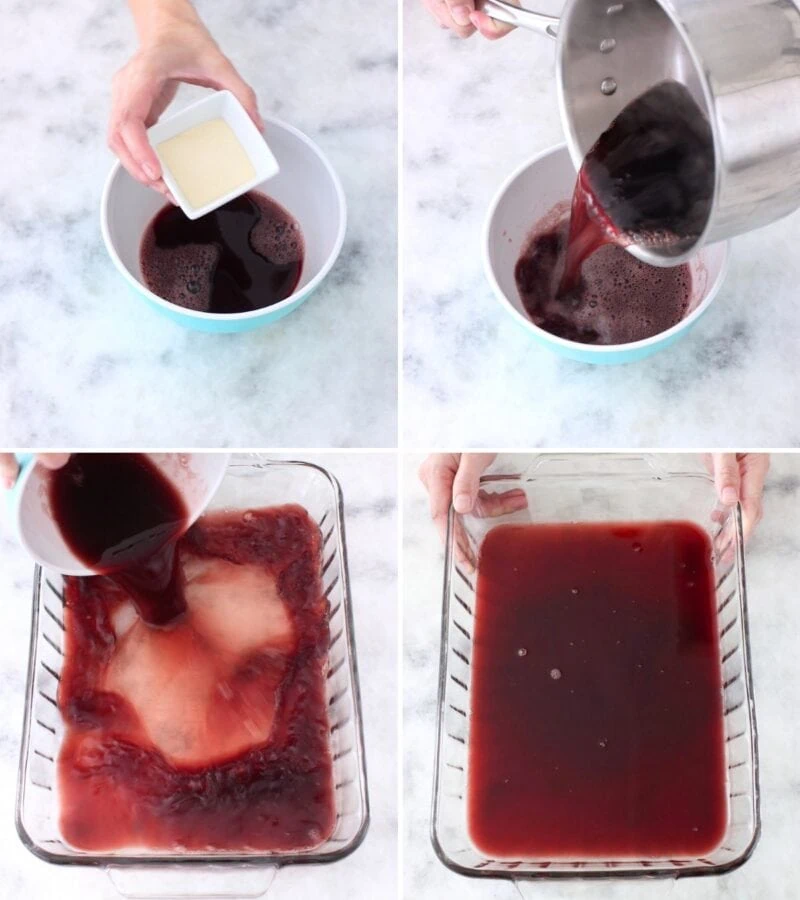
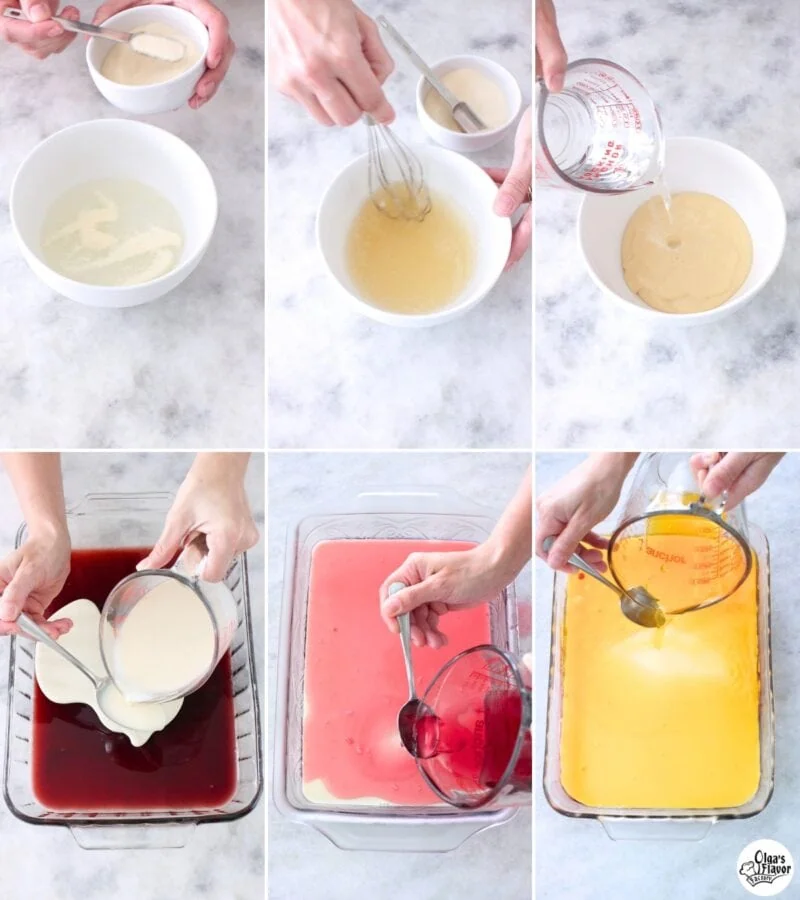
- Bloom the Gelatin
- In a large bowl, pour 1 cup of juice (I used grape as the first bottom layer) and sprinkle 3 ½ teaspoons of unflavored gelatin over the juice.
- Let it sit for about 5 minutes to allow the gelatin to bloom. This helps the gelatin dissolve evenly, ensuring smooth layers.
- Heat the Second Cup of Juice
- Meanwhile, in a small saucepan, heat the second cup of juice until it comes to a boil. Once it’s boiling, pour it over the bloomed gelatin mixture and whisk until the gelatin is completely dissolved.
- Set the First Layer
- Pour the gelatin and juice mixture into your prepared baking pan. Place the pan in the refrigerator and let the first layer set for about 30 minutes. You’ll want the layer to firm up but still have a little jiggle when you touch it.
Timing Between Pouring the Different Layers:
Timing is key when making layered jello! You want to give each layer enough time to set but not let it firm up too much. If you don’t let the layers set long enough, they might mix or bleed together. On the other hand, letting them set for too long could cause the layers to become too firm, and they might separate when you cut the jello. Aim for about 30 minutes between each layer.
Cooling the Hot Liquid Before Pouring Over the Set Layers:
While you are waiting, prepare the next layer. As soon as you pour one layer into the baking sheet and place into the refrigerator, start making the next layer, so it has a chance to cool off a bit, before you pour it over the set layer. If the juice mixture is too hot, it will melt the chilled layer and the colors might mix together. You don't want to mix them too far in advance too, or the juice will start to set.
Preparing the White Layers and Assembling Rainbow Jello
For the white layer, I prepared 1 can of sweetened condensed milk, distributed it among the layers and finished off with another ½ of another sweetened condensed milk, so that it wouldn't set as all the different layers were chilling in the refrigerating.
- Mix ½ cup of water with 5 teaspoons of unflavored gelatin and set aside to bloom for about 5 minutes.
- Meanwhile, boil 1 ¾ cups of water. When the gelatin blooms for 5 minutes, whisk together the bloomed gelatin, 1 (14 oz) can of sweetened condensed milk and the 1 ¾ cups boiling water. Mix until all the gelatin is dissolved.
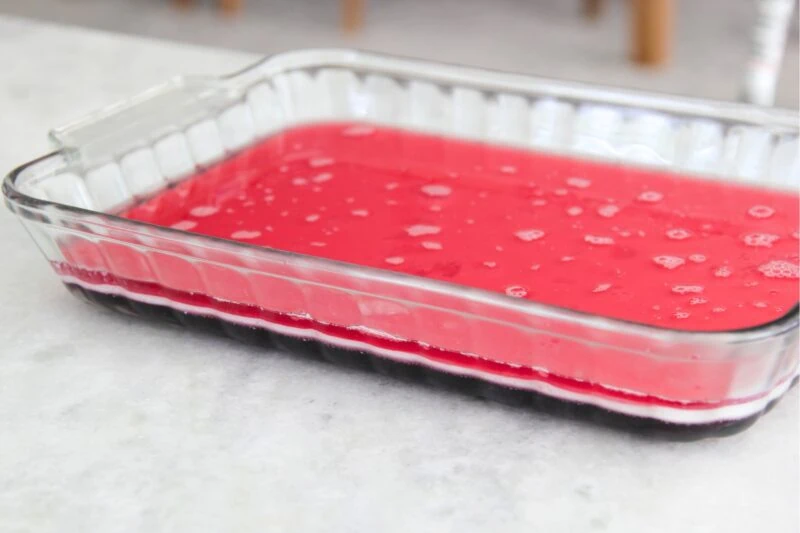
- After the first layer of juice chills for 30 minutes, pour 1 ½ cups of the milk mixture carefully over the chilled layer. Set for 30 minutes.
- Repeat, making the other juice layers, alternating a rainbow color with a white layer.
- When you've used all the white mixture, make another half of a batch.
- Bloom 2 ½ teaspoons of unflavored gelatin in ¼ cup of water, then whisk with ½ (14 oz) can of sweetened condensed milk and ¾ cup of boiling water.
I only used 4 different colors. Here are the juices I used:
- Purple: grape juice
- Red: Cranberry Raspberry juice
- Yellow: Apple Juice
- Orange: Clementine Juice (
- The last top layer I was aiming for Orange, but it turned out another shade of yellow, which was fine with me.
- This was the only one that I had to get creative with. The above 3 juices were really easy. I found a clementine juice beverage by the brand Bai Antioxidant Infusion in the beverage aisle that looked liked it had the least amount of questionable ingredients. Use whichever juice you want or find something in the color that you prefer.)
Helpful Tips and Frequently Asked Questions For Layered Rainbow Jello
When you're pouring the liquid layer over a set layer, pour it over a spoon instead of directly onto the set gelatin. This method helps gently disperse the liquid without disturbing the set layer, preventing any "holes" or cracks from forming.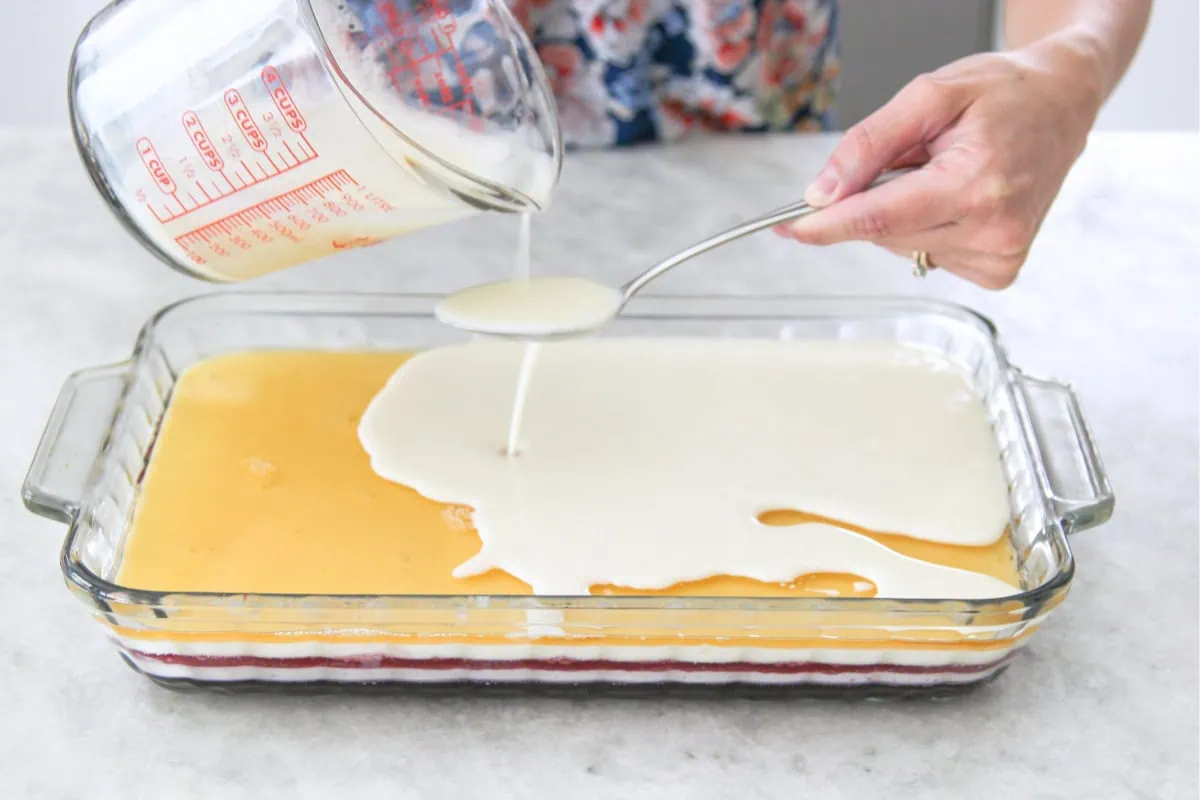
If you're looking to add even more color and layers, simply reduce the amount of the white mixture. Pour about ¾ cup of the white mixture between each colorful layer. You can also opt to use two full cans of sweetened condensed milk for a thicker white layer and more vibrant colors throughout!
Store your beautiful rainbow jello in the fridge until you're ready to serve. You can make it up to 3 days ahead of time, which makes it a great make-ahead dessert for parties or gatherings. If you're making it in advance, be sure to cover it tightly with plastic wrap, aluminum foil, or a lid to prevent it from absorbing any fridge odors or drying out.
Absolutely! If you prefer to use the classic boxed Jello, mix 1 (3 oz) package of Jello with 1 cup of boiling water and 1 teaspoon of unflavored gelatin until fully dissolved. Repeat this for each color layer, alternating with the white layers. For the rainbow effect, the color order is purple, blue, green, yellow, orange, and red.
More Gelatin Desserts You'll Love
If you love this Layered Rainbow Jello, here are some more refreshing and delicious gelatin desserts you’ll want to try next!
- Orange Jello Slices
A fun, kid-friendly treat! These orange jello slices are made by setting jello inside an orange peel and slicing them up for a refreshing, bite-sized dessert. Perfect for parties or a playful snack. - Strawberry Mousse
A light and fluffy dessert with the sweet flavor of fresh strawberries—easy to make and delicious. - Panna Cotta with Blueberries
This creamy Italian dessert pairs beautifully with fresh blueberries (or other fruit and berries) for a decadent, yet simple treat. - Strawberry Pretzel Dessert
A sweet and salty combo that’s impossible to resist! This layered dessert brings together crunchy pretzels, creamy filling, and a sweet strawberry topping using fresh strawberries. - Easy No-Bake Cheesecake
A simple and satisfying cheesecake that doesn’t require any baking. Perfect for busy days when you want a dessert that’s both easy and indulgent.

Layered Rainbow Jello
Ingredients
Rainbow Gelatin Layers
- 8 cups juice, divided (2 cups juice for each layer) 4 different juices total, I used grape, cranberry-raspberry, apple and clementine
- 14 teaspoons unflavored gelatin, (3 ½ teaspoons for each layer)
White Gelatin Layers
- 1 ½ cans sweetened condensed milk divided
- 7 ½ teaspoons unflavored gelatin divided
- water
Instructions
- Prepare your baking dish: Use a 13x9 inch glass Pyrex baking dish (or any similar-sized glass dish) for layering the jello.
- In a large bowl, pour in 1 cup of juice and sprinkle 3 ½ teaspoons of unflavored gelatin over it. Set aside for the gelatin to bloom for about 5 minutes.
- Place the other cup of juice in a small saucepan and bring to a boil. Pour the boiling cup of juice over the bloomed gelatin and juice and whisk to combine until all the gelatin is dissolved.
- Pour this mixed juice mixture into the prepared baking dish and place into the refrigerator to set for about 30 minutes.
- While you are waiting, prepare the next layer. As soon as you pour one layer into the baking sheet and place into the refrigerator, start making the next layer, so it has a chance to cool off a bit, before you pour it over the set layer. If the juice mixture is too hot, it will melt the chilled layer and the colors might mix together. You don't want to mix them too far in advance too, or the juice will start to set.
- For the white layer, I prepared 1 can of sweetened condensed milk, distributed it among the layers and finished off with another ½ of another sweetened condensed milk, so that it wouldn't set as all the different layers were chilling in the refrigerating.
- Mix ½ cup of water with 5 teaspoons of unflavored gelatin and set aside to bloom for about 5 minutes.
- Meanwhile, boil 1 ¾ cups of water. When the gelatin blooms for 5 minutes, whisk together the bloomed gelatin, 1 (14 oz) can of sweetened condensed milk and the 1 ¾ cups boiling water. Mix until all the gelatin is dissolved.
- After the first layer of juice chills for 30 minutes, pour 1 ½ cups of the milk mixture carefully over the chilled layer. Set for 30 minutes.
- Repeat, making the other juice layers, alternating a rainbow color with a white layer.
- When you've used all the white mixture, make another half of a batch. Bloom 2 ½ teaspoons of unflavored gelatin in ¼ cup of water, then whisk with ½ (14 oz) can of sweetened condensed milk and ¾ cup of boiling water.
- Keep the Layered Rainbow Jello Refrigerated until you are ready to serve it.
Notes
- Optional boxed Jello variation: If you prefer to use boxed Jello, simply mix 1 (3 oz) package of Jello with 1 cup boiling water and 1 teaspoon of unflavored gelatin. Repeat the process for each color layer, alternating with the white layers.
- Color order: If you’re using all the colors of the rainbow, layer them in this order: purple, blue, green, yellow, orange, and red.
- Individual servings: For a fun twist, you can make individual portions by layering the jello into small cups or containers instead of using a large baking dish. This is perfect for parties or to control portion sizes!

Although this recipe turned out exactly as pictured here, it was a flop at our house. It's not quite as jiggly as the classic jello texture that we enjoy, it's quite firm. We thoguht the natural juice flavors to be very bold and compete amongst the layers. If I tried it again, I'd add less gelatin to each as well as dilute the juice. We used, concord grape, pomegranate/blueberry, mango and pear.
Thank you for taking the time to share your feedback, Kitti! I’m sorry to hear that the layered rainbow jello didn’t quite hit the mark for your family. The texture can definitely be adjusted by using more or less less gelatin, so I think that’s a great idea for next time. Diluting the juice is also a good way to tone down the bold flavors and let the layers complement each other better, if that's what you prefer. Thanks again for giving it a try, and I hope the next version is more to your liking.
I'm planning on making a version of this for the fourth, using 100% blueberry juice and 100% pomegranate juice for the blue and red layers, respectively. Any idea how much sugar I should add to these juices so it's sweet but still on the healthier side?
Thanks for the inspiration!
Does the recipe call for 1 1/2 cup of condensed milk split between all the white layers or is it 1 1/2 for each layer? I’m a little confused on that part.
I made this today and it turned out just like in Olgas picture! It tastes delicious and the kids love it. I certainly got a good reaction out of them with this one! Thanks Olga! You have many awesome recipes! I made the kiwi/blueberry cake today too. Letting it sit over night before I try it though. It was exciting making it. God bless you!
I'm dying to know how you were able to de-pan the jello so cleanly, and cut it beautifully!
Do you have any tips? I plan to try this
Honestly, it was very easy. I added a lot of gelatin to the Rainbow Jello, which makes it stay together really well and also cuts very easily and stays clean. If there were less gelatin, it would be much messier.
Love this version! More healthy and beautiful. Thank you so much 🤗
So excited to make this version!!
What a beautiful dessert ❤👍 definitely on my list✔
beautiful
It makes my mouth watering! Looks so nice! I definitely have to try it!
Could I use coconut milk instead of condensed milk? I plan to make tropical Jell-O and use tropical fruit juices:) If so, i should not use water, right? TIA!