
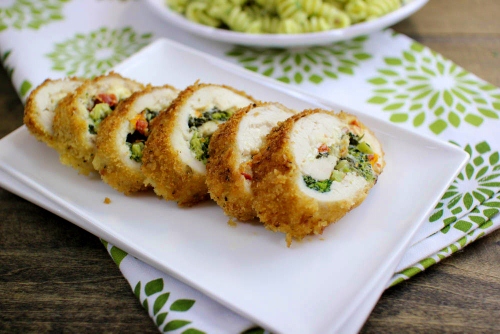
 Uno's Chicago Grill has a Chicken Spinocolli on it's menu. I've eaten it only once, but it was delicious, so I decided to recreate it at home. It really is an impressive chicken dish. The chicken is flattened and stuffed with spinach, broccoli, sun-dried tomatoes and a mixture of cheeses. I love how crunchy it is on the outside and really juicy and flavorful inside.
It's a great option for entertaining. Chicken is a very safe option for serving guests, and the filling is tasty but not too crazy, so it's a dish that most people will like. It looks really pretty too. Chicken Spinocolli is a great make ahead dish. Do most of the prep ahead of time, keep it refrigerated and on busy days, you can pull off a gorgeous, fancy dinner with minimal work.
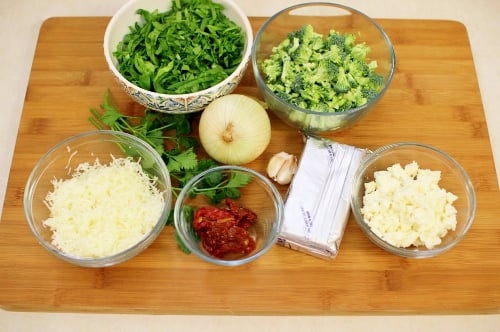
Ingredients:
4 boneless, skinless chicken breasts
salt, pepper
Stuffing:
1 Tablespoon butter
1 onion, chopped
2 garlic cloves, minced
2 cups spinach
2 cups broccoli, chopped
2 Tablespoons white wine
salt, pepper to taste
Cheese Filling:
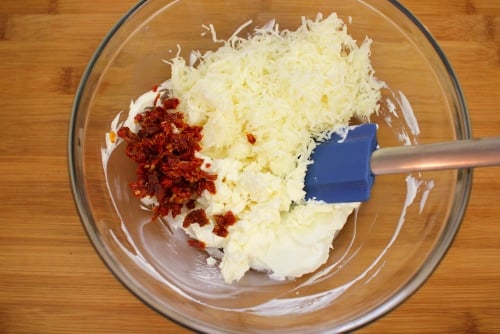
4 oz. cream cheese, softened
¼ cup feta cheese, softened
1 cup finely shredded Mozzarella
4 Tablespoons sun dried tomatoes, minced
salt, pepper to taste
Breading:
½ cup flour
2 eggs, plus 2 Tablespoons water
1 ¼ cups panko bread crumbs
¾ cup oil (vegetable or canola)
Prep:
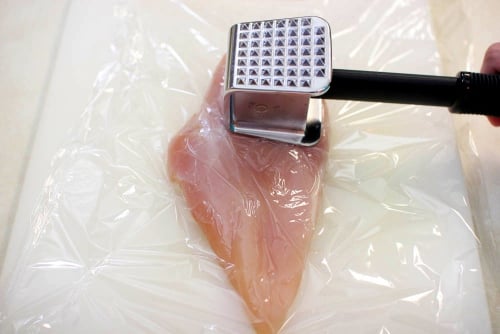
Pound the chicken to an even thickness. Season with salt and pepper on both sides.
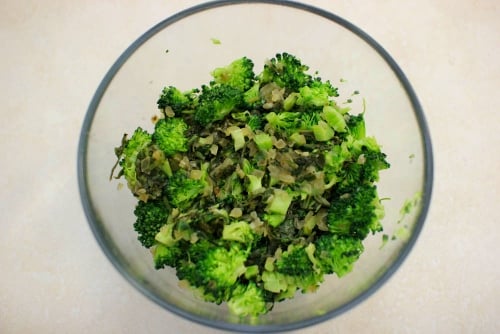
Prep the rest of the ingredients.
 Prepare the Stuffing:
Heat the butter in a skillet on medium high heat until melted. Add the onion, cook for about 5 minutes, add the garlic and cook for another 30 seconds or so. 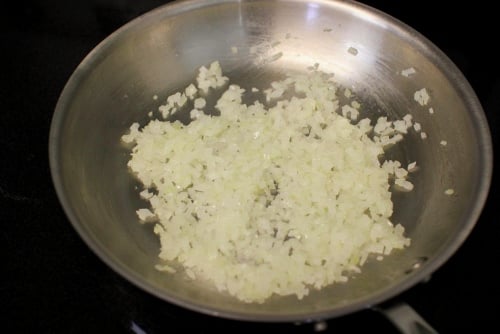 Add the spinach and white wine. Cook for about a minute until the spinach wilts.
You can also use thawed, frozen spinach instead of fresh, but you will only need a small amount, since the spinach is already wilted. Make sure to squeeze out as much liquid as possible from the spinach first, before adding it to the onions. 
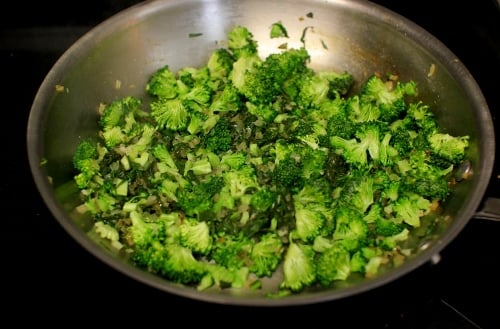
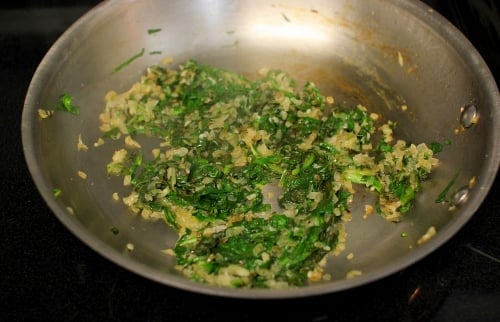 Add the broccoli, season with salt and pepper, cook for about 2 minutes, until the broccoli is slightly softened, but still crunchy. Set aside to cool.
 Prepare the Cheese Filling:
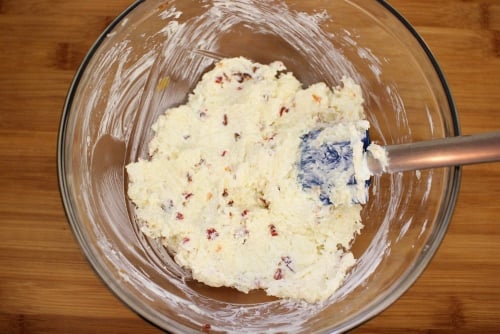
Use a rubber spatula or wooden spoon to mix up the cream cheese. It should be really easy to do because the cream cheese needs to be softened. 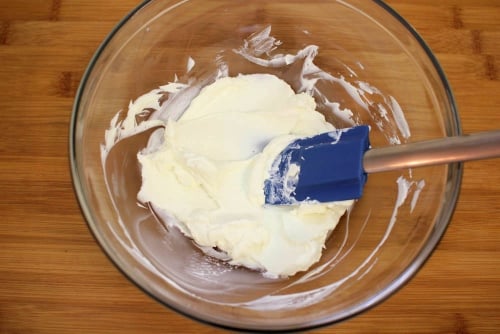 Add the rest of the ingredients. Mix to combine.
 Assembling and Cooking the Chicken:
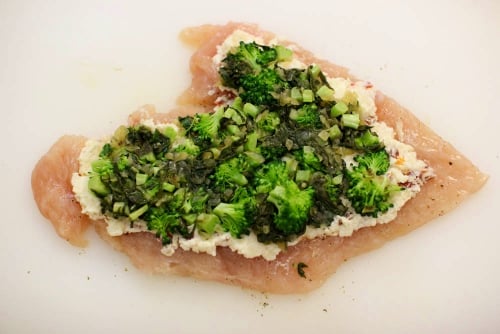
Spread ¼ of the cheese filling on one of the flattened chicken breasts. Spread it out evenly, leaving a border free around the edges. Top with part of the stuffing. 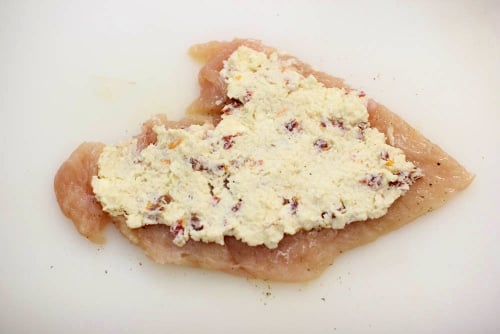
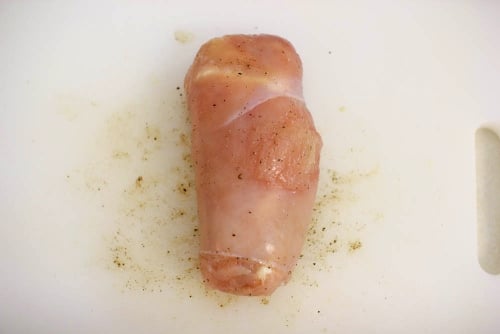
 Roll up the chicken breast tucking in the sides into the center of the rolled chicken.
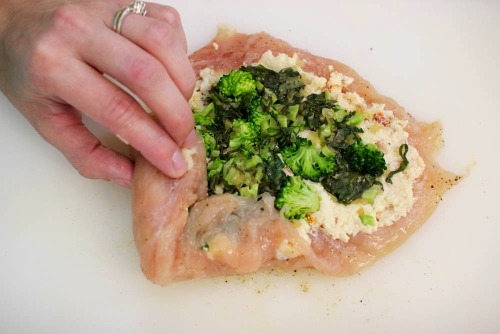
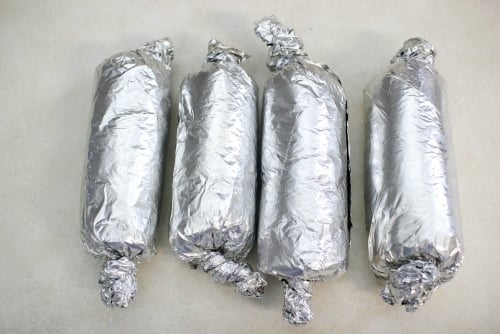
 Fill and stuff the rest of the chicken breasts. Roll up the stuffed chicken breasts tightly inside aluminum foil. Refrigerate for at least 1 hour.
You can prep the chicken up to this point and keep it refrigerated for a day or so before you plan to serve it.
 Preheat the oven to 400 degrees Fahrenheit.
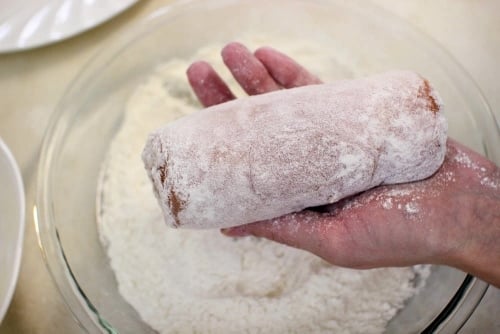
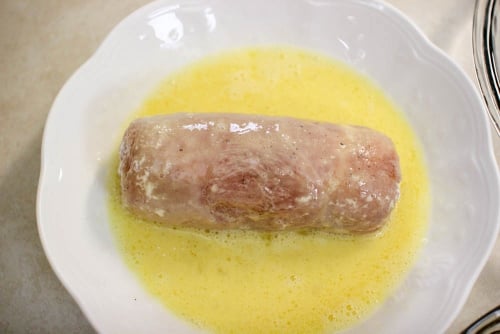
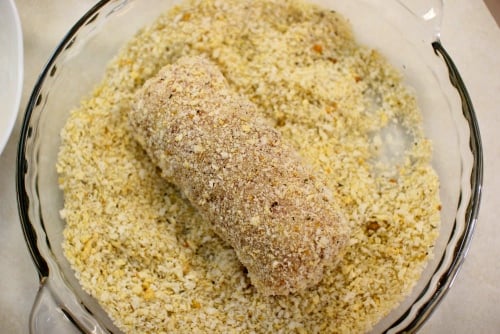
Prep the breading station. Place the flour and breadcrumbs into separate plates. Whisk up the eggs and water in another plate.
Dredge the chicken in the flour, then in the egg wash and then in the breadcrumbs.
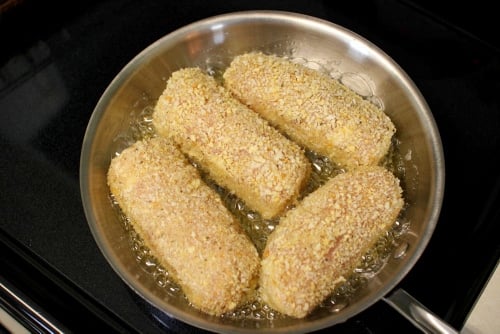
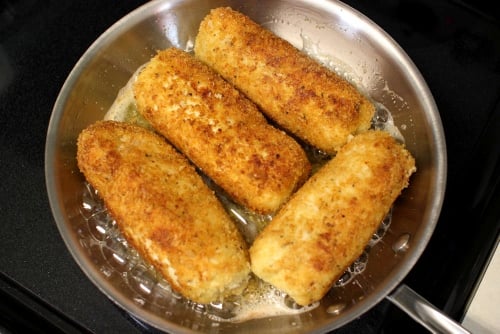
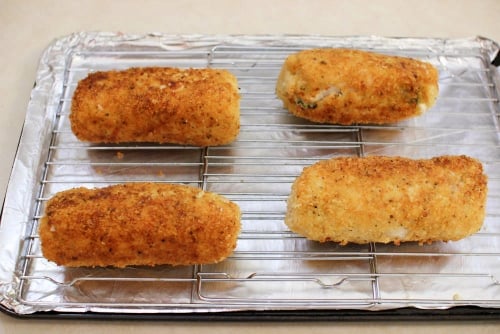
 Heat up ¾ cup oil in a 10 inch skillet on medium high heat, until the oil is hot and shimmering. Add the chicken to the oil and cook for about 1-2 minutes on all 4 sides, until the chicken is golden brown on all sides.
The oil needs to be really hot. You can check it by dropping in a breadcrumb into the oil and it will sizzle if it's ready. If the oil is not hot enough, the chicken will soak in the oil and be really greasy. If you heat the oil up correctly, the chicken will be crisp and not greasy at all.
 Place the chicken on top of a rack on a rimmed baking sheet. Roast in the oven until the chicken reaches 160 degrees Fahrenheit on an instant read thermometer.
Why do you have to fry the chicken and then finish cooking it in the oven?
If you cook the chicken completely on the stovetop, the outside will be burnt by the time the inside of the chicken is cooked through. Frying it on the stove top first gives the chicken a perfect golden, crispy crust. You can bake the chicken completely in the oven, without frying it first. Spritz it a bit with some oil before putting it in the oven. However, you won't get the same beautiful crisp crust in the oven.
 Let the chicken rest for at least 5 minutes, then slice into pieces.

Chicken Spinocolli
Ingredients
- 4 boneless skinless chicken breasts
- salt pepper
Stuffing:
- 1 Tablespoon butter
- 1 onion chopped
- 2 garlic cloves minced
- 2 cups spinach
- 2 cups broccoli chopped
- 2 Tablespoons white wine
- salt pepper to taste
Cheese Filling:
- 4 oz. cream cheese softened
- ¼ cup feta cheese softened
- 1 cup finely shredded Mozzarella
- 4 Tablespoons sun dried tomatoes minced
- salt pepper to taste
Breading:
- ½ cup flour
- 2 eggs plus 2 Tablespoons water
- 1 ¼ cups panko bread crumbs
- ¾ cup oil vegetable or canola for frying
Instructions
Prep:
- Pound the chicken to an even thickness. Season with salt and pepper on both sides. Prep the rest of the ingredients.
Stuffing:
- Heat the butter in a skillet on medium high heat until melted. Add the onion, cook for about 5 minutes, add the garlic and cook for another 30 seconds or so.
- Add the spinach and white wine. Cook for about a minute until the spinach wilts.
- You can also use thawed, frozen spinach instead of fresh, but you will only need a small amount, since the spinach is already wilted. Make sure to squeeze out as much liquid as possible from the spinach first, before adding it to the onions.
- Add the broccoli, season with salt and pepper, cook for about 2 minutes, until the broccoli is slightly softened, but still crunchy. Set aside to cool.
Cheese Filling:
- Use a rubber spatula or wooden spoon to mix up the cream cheese. It should be really easy to do because the cream cheese needs to be softened.
- Add the rest of the ingredients. Mix to combine.
Assembling and Cooking the Chicken:
- Spread ¼ of the cheese filling on one of the flattened chicken breasts. Spread it out evenly, leaving a border free around the edges. Top with part of the stuffing.
- Roll up the chicken breast tucking in the sides into the center of the rolled chicken.
- Roll up the chicken breast tucking in the sides into the center of the rolled chicken.
- Fill and stuff the rest of the chicken breasts. Roll up the stuffed chicken breasts tightly inside aluminum foil. Refrigerate for at least 1 hour.
- Preheat the oven to 400 degrees Fahrenheit.
- Prep the breading station. Place the flour and breadcrumbs into separate plates. Whisk up the eggs and water in another plate.
- Dredge the chicken in the flour, then in the egg wash and then in the breadcrumbs.
- Heat up ¾ cup oil in a 10 inch skillet on medium high heat, until the oil is hot ans shimmering. Add the chicken to the oil and cook for about 1-2 minutes on all 4 sides, until the chicken is golden brown on all sides.
- Place the chicken on top of a rack on a rimmed baking sheet. Roast in the oven until the chicken reaches 160 degrees on an instant read thermometer.
- Let the chicken rest for at least 5 minutes, then slice into pieces.

What an interesting recipe - I must try it!
I hope you enjoy it, Barbara.
Just had it for dinner and it was delicious! I love the "wrapping in foil" trick instead of toothpicks...so awesome!
I'm so glad you enjoyed it, Terri.
I agree:). It makes a much neater presentation.
Is this freezer friendly? or would you not recommend freezing it?
Seems simple, going to try it! What is the temperature of the oven? After fully cooked, can then be frozen?
The oven needs to be 400 degrees Fahrenheit, Cindy. It's specified in the recipe instructions. Yes, you can freeze the chicken after it's cooked.
Hi Olga, can i use chicken broth instead of white wine? Would there be a difference in the taste?
You can use chicken broth, but of course, the flavor will be different, Nadia.
This looks absolutely delicious!! I want to prep it tonight but I wouldn't cook it until Tuesday because my husband is in Pennsylvania for work. Could I freeze it until then?? Or can it be refrigerated until then? Chicken is fresh!
Hi Carly!
The chicken breasts can be filled and rolled in advance, then refrigerated for up to 24 hours.
I don't recommend freezing it.
Just made it tonight and it was soo delicious my husband loved it!! Love your recipes 🙂
Thanks, Carly! I'm glad you enjoyed this chicken dish. Getting a thumbs up from the husband is always a big deal for me too.
Hello Fellow Belarusian!
Olga your recipes look tasty and magical! I live in London and we currently have an amazig heatwave so i decided to make your holodnik, it was perfect for a hot weather 🙂 I have a question, I will be making this luscious chicken roulette but I wanted to know what is a good side dish to go with it? Thanks in advance.
It's always a pleasure to hear from another Belarussian. Holodnik does sound refreshing during our hot summer days.
You can make just about any side dish to go with this chicken - rice, mashed potatoes, pasta. In the summer, I like serving it with Creamy Pesto Pasta.
That's a good idea- ill do the pesto pasta and possibly some cous cous?! Think it may work. Good luck with the baby! Irina
Okay, I just seared them. They looked much better after refrigeration. Stayed together very nicely and were VERY easy to sear. Thank you! They are waiting to be baked 🙂
That's great, Olya. I'm glad it worked out.
Hi Olga, First of all, my 4 year old daughter is on my lap right now and she says "are you going to thank Olga for teaching you how to make the chicken?" So thank you 🙂 I am in the process of making these right now. So far its not looking good 🙁 I beat the breasts as thin as I could without them ripping, but when I rolled them up, it looks terrible! I suspect they were still too thick. I wrapped them in foil and stuck them in the fridge. Hoping they will be and look more stable tomorrow so that I can continue with the process. Plan B is to roll them in the breading and just stick them in the oven 🙁
Hi Olga, I think you forgot to add sundried tomatoes to your ingredients:)
I'm not sure how you missed it, but it's in there. I just checked. 4 Tablespoons of sun dried tomatoes. It's listed in the ingredients for the Cheese Filling.
It's look so delicious!!! I can imagine how great the taste. Definetely I'll try this.
I LOVE YOUR BLOG!!!
Awww... Thanks, Nina.
Love how this looks. You have a wonderful blog and your directions are awesome.
Thanks, Corrinne!
I really appreciate your kind words. I try very hard to make the directions as clear as possible.
Love it:) hey Olga i dont have one of those thermometer yet, need to buy it still:) lol but approx how long do u keep it in the oven after frying? thank you
It's very hard to say, Alena. It depends on how big your chicken is. I would say, about 15 minutes, but it could be more or less. I would really recommend getting a thermometer. They aren't expensive (I got mine for $10-$15) and I use mine all the time. You will be amazed at the difference it will make in the texture of your food.
Your husband is indeed lucky.....he gets restaurant style food at home.
They look so yummy.....I m starving.
Thanks, Shirley!
I'm the blessed one - my husband is incredible. He is a gift from God in my life. Cooking for him is one small way of showing my appreciation.
You both r gift to eachother. God is the perfect matchmaker. I have experience this is my life. My husband is so humble n helping...I know how it feels to blessed...
Olga I like it when u appreciate ur husband....and remember those versus... Who can find a virtuous woman? for her price is far above rubies. The heart of her husband does safely trust in her, so that he shall have no need of spoil. She will do him good and not evil all the days of her life.
Looks Delicious Olga...Will need to try it...Thanks...
Thanks, Olga! I'd love to hear what you think:).