
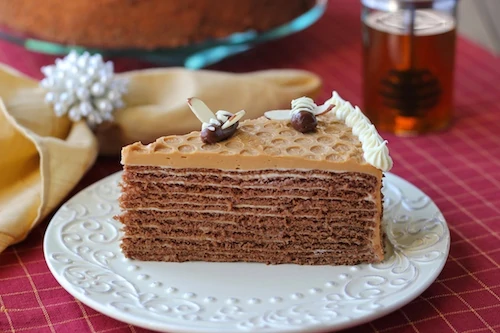
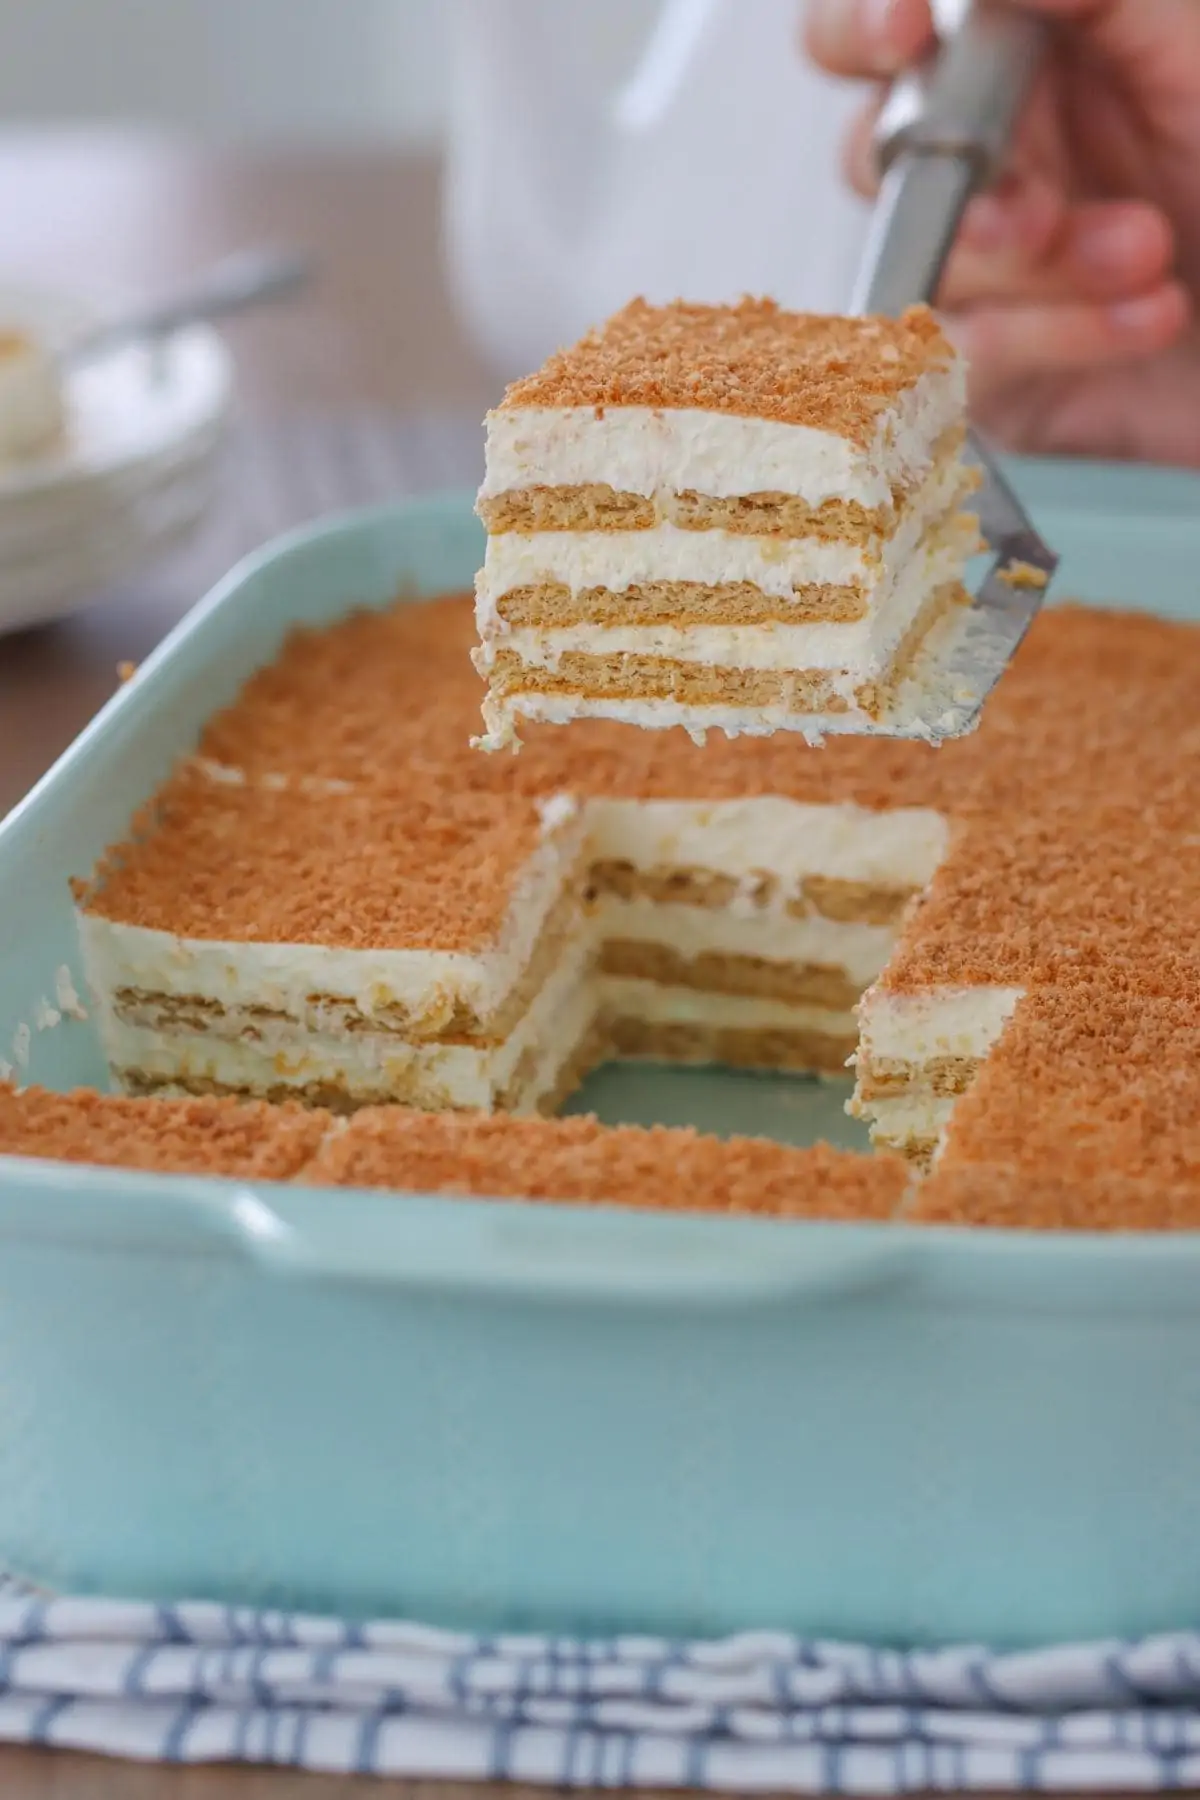
 This is one of my favorite cakes. It's a chocolate-honey layer cake with pastry cream. The thin layers of cake are so soft and tender and paired with the pastry cream, make this a very delicate and tender cake. The topping has a caramel taste and a mousse like textuer. I got the idea to decorate it to look like a honeycomb from a Russian recipe forum and made the bees from the book The Pie and Pastry Bible.
Ingredients:
For the cake:
½ cup milk
3 Tablespoons honey
1 cup sugar
4 Tablespoons butter
2 teaspoons baking soda
4-5 Tablespoons cocoa
1 egg
2 ½ cups flour
Pastry cream:
4 Tablespoons flour
3 Tablespoons cornstarch
2 cups milk
¼-1/3 cup sugar
3 egg yolks
¼ teaspoon salt
2 teaspoons vanilla
2 Tablespoons butter
1 cup heavy cream
For the top of the cake:
½ can of cooked condensed milk, dulce de leche
½ stick butter, softened
¼ cup sour cream
2 Tablespoons water
2 ¼ teaspoons gelatin
For the chocolate-almond bees:
3 oz. semisweet chocolate
⅓ cup heavy cream
1 Tablespoon honey
slivered almonds
1 oz. white chocolate, melted
Instructions:
Preheat the oven to 350 degrees.
In a medium saucepan, heat up the milk, honey, sugar, butter, baking soda and cocoa, just until butter melts and the sugar dissolves. ") Whisk the egg and add a little bit of the heated batter, while whisking. This is called tempering and will keep the egg from curdling.
Whisk the egg and add a little bit of the heated batter, while whisking. This is called tempering and will keep the egg from curdling. ") Add the tempered mixture to the rest of the batter. Add the flour and mix until combined. Allow the dough to cool slightly, just enough that you can handle it, however, you need to work quickly because it won't roll out properly if it's too cold.
Add the tempered mixture to the rest of the batter. Add the flour and mix until combined. Allow the dough to cool slightly, just enough that you can handle it, however, you need to work quickly because it won't roll out properly if it's too cold. ") Roll the dough out very thinly and cut it out into an 8-10 inch circle. I use a lid or the bottom of a springform pan to trace and cut it out with a paring knife. If you have a tart pan, that works the best, actually. Use a fork to poke some holes across the surface of the cake layer.
Roll the dough out very thinly and cut it out into an 8-10 inch circle. I use a lid or the bottom of a springform pan to trace and cut it out with a paring knife. If you have a tart pan, that works the best, actually. Use a fork to poke some holes across the surface of the cake layer. ") A tip about rolling out the dough. This dough is pretty sticky, but if you add too much flour it will have too much gluten and will keep shrinking back when you roll it out. I use a spoon to take out a handful of dough and scrape it off with another spoon right onto a generously floured surface, sprinkle more flour on top and start rolling, adding more flour as needed.
A tip about rolling out the dough. This dough is pretty sticky, but if you add too much flour it will have too much gluten and will keep shrinking back when you roll it out. I use a spoon to take out a handful of dough and scrape it off with another spoon right onto a generously floured surface, sprinkle more flour on top and start rolling, adding more flour as needed.
You will have 10-15 layers of cake, depending on the size of your circles. They are very hard, but will soften when topped with pastry cream.
Line a baking sheet with parchment paper. If you're using a tart pan, sprinkle it with flour. Bake for 4-6 minutes. Take off the baking sheet or tart pan right away. They bake really quickly, so it really doesn't take very long to do all the cake layers. Brush off the flour with a pastry brush. ") To make the pastry cream, whisk the flour and cornstarch in a bowl. Heat up the milk in a saucepan just until it is starting to foam. Meanwhile, whisk the egg yolks with the sugar and then add the flour, cornstarch.
To make the pastry cream, whisk the flour and cornstarch in a bowl. Heat up the milk in a saucepan just until it is starting to foam. Meanwhile, whisk the egg yolks with the sugar and then add the flour, cornstarch. ") Add a little bit of milk to the egg mixture, whisking constantly and gradually adding the rest of the milk.
Add a little bit of milk to the egg mixture, whisking constantly and gradually adding the rest of the milk. ") There you go, tempering again, to make sure the eggs don't curdle. Twice in the same recipe. This doesn't happen very often. Return to the saucepan and cook on medium heat, whisking constantly again until the pastry cream has thickened.
There you go, tempering again, to make sure the eggs don't curdle. Twice in the same recipe. This doesn't happen very often. Return to the saucepan and cook on medium heat, whisking constantly again until the pastry cream has thickened. ") Add the salt, butter, and vanilla, stirring until the butter is melted. Pour into a bowl, cover with plastic wrap, laying right on top of the pastry cream. This will prevent the pastry cream from forming a skin. Refrigerate until completely cool.
Add the salt, butter, and vanilla, stirring until the butter is melted. Pour into a bowl, cover with plastic wrap, laying right on top of the pastry cream. This will prevent the pastry cream from forming a skin. Refrigerate until completely cool. ") In a cold bowl and a cold whisk attachment, whip up the cream.
In a cold bowl and a cold whisk attachment, whip up the cream. ") Fold gently into the pastry cream.
Fold gently into the pastry cream. ") To assemble the cake, top each cake layer with pastry cream, about ⅓ cup.
To assemble the cake, top each cake layer with pastry cream, about ⅓ cup. ") Refrigerate for at least 30 minutes.
Refrigerate for at least 30 minutes.
You will need bubble wrap to create the honeycomb look. Cut out enough bubble wrap to cover the surface of the cake and cut out another strip of bubble wrap to cover the sides of the cake.
When the cake is cool and ready to decorate, mix the condensed milk, butter, and sour cream until smooth. ") Sprinkle the gelatin on top of the water and allow to stand for about 5 minutes.
Sprinkle the gelatin on top of the water and allow to stand for about 5 minutes. ") Heat in the microwave or on the stovetop until dissolved, but do NOT bring to a boil.
Heat in the microwave or on the stovetop until dissolved, but do NOT bring to a boil. ") Pour into the prepared cream and mix to combine. Since it's so hot, it will make the cream very thin in consistency. Working quickly, pour over the cake and spread evenly on the top and the sides. It will thicken within minutes, so you have to work fast. In fact, both Sergi and I were working on this together and we didn't even have time to take a picture. Place the bubble wrap on top of the cake, pressing gently so it adheres completely, forming the little pockets for the honeycombs. Sometimes, I put the bubble wrap only on top of the cake and not the sides. Make crumbs out of some of the cake layer scraps and press it into the sides of the cake. Refrigerate until cool.
Pour into the prepared cream and mix to combine. Since it's so hot, it will make the cream very thin in consistency. Working quickly, pour over the cake and spread evenly on the top and the sides. It will thicken within minutes, so you have to work fast. In fact, both Sergi and I were working on this together and we didn't even have time to take a picture. Place the bubble wrap on top of the cake, pressing gently so it adheres completely, forming the little pockets for the honeycombs. Sometimes, I put the bubble wrap only on top of the cake and not the sides. Make crumbs out of some of the cake layer scraps and press it into the sides of the cake. Refrigerate until cool. ") For the bees, make the ganache. Cut the chocolate.
For the bees, make the ganache. Cut the chocolate. ") In a saucepan, cook the cream, honey, and chocolate until melted. Cool. Form little bees with the chocolate. It's very easy to work with. Press two slivers of almond to each side for wings and pipe out white chocolate on top to create stripes.
In a saucepan, cook the cream, honey, and chocolate until melted. Cool. Form little bees with the chocolate. It's very easy to work with. Press two slivers of almond to each side for wings and pipe out white chocolate on top to create stripes. ") Peel off the bubble wrap from the cake.
Peel off the bubble wrap from the cake. ") Add the bees to the top of the cake. You can pipe a border around the outside of the cake from buttercream. (Recipe not included. I think this post is long enough.) You can bake the cake layers ahead of time and store until you're ready to assemble the cake. You can also make the pastry cream and refrigerate it, just don't add the whipped cream.Instead of the honeycomb topping, you can cover the cake with more pastry cream and decorate it with chocolate shavings or use one of the cake layers, crush it and sprinkle over the cake. Another option is to cover the cake with a chocolate ganache.
Add the bees to the top of the cake. You can pipe a border around the outside of the cake from buttercream. (Recipe not included. I think this post is long enough.) You can bake the cake layers ahead of time and store until you're ready to assemble the cake. You can also make the pastry cream and refrigerate it, just don't add the whipped cream.Instead of the honeycomb topping, you can cover the cake with more pastry cream and decorate it with chocolate shavings or use one of the cake layers, crush it and sprinkle over the cake. Another option is to cover the cake with a chocolate ganache.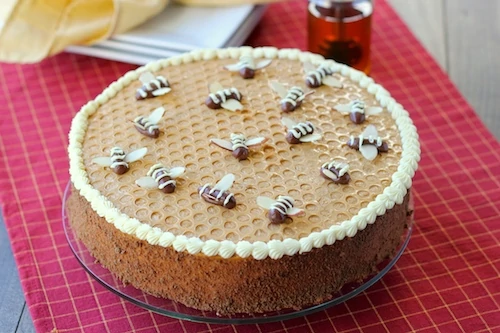
Chocolate Honey Layer Cake - Торт "Спартак"
- Yield: 9 inch round cake 1x
- Category: Sweets
Ingredients
For the cake:
- ½ cup milk
- 3 Tablespoons honey
- 1 cup sugar
- 4 Tablespoons butter
- 2 teaspoons baking soda
- 4-5 Tablespoons cocoa
- 1 egg
- 2 ½ cups flour
Pastry cream:
- 4 Tablespoons flour
- 3 Tablespoons cornstarch
- 2 cups milk
- ¼-⅓ cup sugar
- 3 egg yolks
- ¼ teaspoon salt
- 2 teaspoons vanilla
- 2 Tablespoons butter
- 1 cup heavy cream
For the top of the cake:
- ½ can of cooked condensed milk, dulce de leche
- ½ stick butter, softened
- ¼ cup sour cream
- 2 Tablespoons water
- 2 ¼ teaspoons gelatin
For the chocolate-almond bees:
- 3 oz. semisweet chocolate
- ⅓ cup heavy cream
- 1 Tablespoon honey
- slivered almonds
- 1 oz. white chocolate, melted
Instructions
- Preheat the oven to 350 degrees.
- In a medium saucepan, heat up the milk, honey, sugar, butter, baking soda, and cocoa, just until butter melts and the sugar dissolves.
- Whisk the egg and add a little bit of the heated batter, while whisking. This is called tempering and will keep the egg from curdling.
- Add the tempered mixture to the rest of the batter. Add the flour and mix until combined. Allow the dough to cool slightly, just enough that you can handle it, however, you need to work quickly because it won't roll out properly if it's too cold.
- Roll the dough out very thinly and cut it out into an 8-10 inch circle. I use a lid or the bottom of a springform pan to trace and cut it out with a paring knife. If you have a tart pan, that works the best, actually. Use a fork to poke some holes across the surface of the cake layer.
- A tip about rolling out the dough. This dough is pretty sticky, but if you add too much flour it will have too much gluten and will keep shrinking back when you roll it out. I use a spoon to take out a handful of dough and scrape it off with another spoon right onto a generously floured surface, sprinkle more flour on top and start rolling, adding more flour as needed.
- You will have 10-15 layers of cake, depending on the size of your circles. They are very hard but will soften when topped with pastry cream.
- Line a baking sheet with parchment paper. If you're using a tart pan, sprinkle it with flour. Bake for 4-6 minutes. Take off the baking sheet or tart pan right away. They bake really quickly, so it really doesn't take very long to do all the cake layers. Brush off the flour with a pastry brush.
- To make the pastry cream, whisk the flour and cornstarch in a bowl. Heat up the milk in a saucepan just until it is starting to foam. Meanwhile, whisk the egg yolks with the sugar and then add the flour, cornstarch.
- Add a little bit of milk to the egg mixture, whisking constantly and gradually adding the rest of the milk. There you go, tempering again, to make sure the eggs don't curdle. Twice in the same recipe. Return to the saucepan and cook on medium heat, whisking constantly again until the pastry cream has thickened.
- Add the salt, butter, and vanilla, stirring until the butter is melted. Pour into a bowl, cover with plastic wrap, laying right on top of the pastry cream. This will prevent the pastry cream from forming a skin. Refrigerate until completely cool.
- In a cold bowl and a cold whisk attachment, whip up the cream. Fold gently into the pastry cream.
- To assemble the cake, top each cake layer with pastry cream, about ⅓ cup. Refrigerate for at least 30 minutes.
- You will need bubble wrap to create the honeycomb look. Cut out enough bubble wrap to cover the surface of the cake and cut out another strip of bubble wrap to cover the sides of the cake.
- When the cake is cool and ready to decorate, mix the condensed milk, butter, and sour cream until smooth.
- Sprinkle the gelatin on top of the water and allow to stand for about 5 minutes.
- Heat in the microwave or on the stovetop until dissolved, but do NOT bring to a boil.
- Pour into the prepared cream and mix to combine. Since it's so hot, it will make the cream very thin in consistency. Working quickly, pour over the cake and spread evenly on the top and the sides. It will thicken within minutes, so you have to work fast. In fact, both Sergi and I were working on this together and we didn't even have time to take a picture. Place the bubble wrap on top of the cake, pressing gently so it adheres completely, forming the little pockets for the honeycombs. Sometimes, I put the bubble wrap only on top of the cake and not the sides. Make crumbs out of some of the cake layer scraps and press it into the sides of the cake. Refrigerate until cool.
- For the bees, make the ganache. Cut the chocolate.
- In a saucepan, cook the cream, honey, and chocolate until melted. Cool. Form little bees with the chocolate. It's very easy to work with. Press two slivers of almond to each side for wings and pipe out white chocolate on top to create stripes.
- Peel off the bubble wrap from the cake.
- Add the bees to the top of the cake. You can pipe a border around the outside of the cake from buttercream. (Recipe not included. I think this post is long enough.) You can bake the cake layers ahead of time and store until you're ready to assemble the cake. You can also make the pastry cream and refrigerate it, just don't add the whipped cream.Instead of the honeycomb topping, you can cover the cake with more pastry cream and decorate it with chocolate shavings or use one of the cake layers, crush it and sprinkle over the cake. Another option is to cover the cake with a chocolate ganache.
This cake looks amazing. I enjoy reading your Russian dessert recipes. Love your blog too.
Thank you, Jennifer.
Tried this cake and it was delicious 😋 thank u for the recipe😊
I'm so happy you enjoyed it, Svetlana.
Looks amazing, want to make medovik like this.
I was wondering would the bubble wrap work on medovik? Or is the cream much lighter and wont stiffen, I make my cream for medovik based on sour cream...
Hi Olga.
No, the bubble wrap will not work if you use regular frosting using cream cheese.
It is necessary to use gelatin to make the bubble wrap work, which will cause the dulce de leche frosting to set, form the indentations and then after it sets, be able to peel the bubble wrap off, forming the pretty honeycomb design. Without the gelatin, it will not set and you will just have a messy cake.
Hi olga i made this cake yesterday. Overall it turned out well and our guests enjoyed it very much. But few questions.
1) the pastry cream i followed the directions exactly but it didnt look as runny as yours to spread easily was too thick and so was little more difficult to spread and had so lumps in it, any idea what could have gone wrong?
2) did you spray your bubble wrap? I think mine was too runny so the center part of the top of the cake made the honeycomb look well but the rest was peeling parts of the cake off and was too sticky..and also the sides were too thin because it was dripping.
3) how did you get that dark color in the final product? Mine stayed that same whiteish color as well the bubble wrap was put on.
If the pastry cream was too thin, you need to cook it a little bit longer.
No, I did not spray the bubble wrap. I've never had any issues with taking it off. I'm not sure what you can do to avoid that.
What kind of dulce de leche or cooked sweetened condensed milk did you use? The color completely depends on the dulce de leche/cooked condensed milk. It shouldn't have been runny at all. If you cooked it yourself, you may have needed to cook it longer.
How much dough to roll for each layer ? How thick is each one ?
Can I use an ice cream scoop for equal portions ?
Hi Bill.
You won't be able to use a scoop since the dough is still and a bit sticky. You can divide the dough into 10-15 balls and roll each one out. They need to be very thin, but it won't be too big of a difference if they are slightly thinner or thicker. The thinner cake layers will bake faster.
The best cake ever! Thank you for the recipe!!! I followed every step except bubble wrap texture and bees:) sooo delicious! Looked great with that jello top! Will give a try on other cakes as well.
Hi Olga! I recently made your classic Medovik, fell in love with it, and so now want to make the chocolate version.
A question though: I notice in this recipe, you barely heat up the wet ingredients for the cake layers before adding flour, unlike the Medovik recipe where you cook them until they essentially caramelize. Is there a particular reason for this difference? What do you think would happen if I were to cook the wet ingredients until they doubled like the Medovik's (omitting the cocoa to be added afterward with the flour)? Do you think it would alter the consistency of the cake layers, like affecting "tenderness" for instance? Or would it just affect the flavor?
Thank you for the recipe. I tried making the top cream and it didn't work out. I think next time I will beat the butter first and then add condensed milk and sour cream little by little. The butter hardened and wouldn't beat through all the way and the cream was chunky. 🙁
It sounds like the butter wasn't soft enough, Julie. Try to soften it to room temperature before mixing it next time.
Hi Olga. Congrats on your little treasure. I wish you all the best!
I finally made the spartak cake and i am in love. I doubled the recipe and had 10 layer birthday cake. Replaced the cream with sour crem-condensed milk- whipped cream combination to make it a bit lighter. I was wondering if you ever tried reducing the sugar in the batter. I know you are always trying to do that where possible.
Thank you, HB. We are loving every minute with our precious baby boy.
I'm so glad you enjoyed the cake. The recipes I have posted here on my blog already have less sugar than normal. I have just enough sugar in the recipe that I like. Of course, you can adjust it to how you like it though.
Mmmmm this is my favorite cake! Can you post a printer friendly ingredient list?
I'll try to get to it as soon as I get a chance, Julia.
Thanks!!! ☺
Have you ever used this honeycomb gelatin mixture ontop of another kind of cake? i'm just curious if it would work for a softer cake like spice cake
Yes, Regina, you can certainly use it on other cakes as well. I'm pretty sure it will work too. This cake is actually really tender too.
Yes Elona I agree. So I just used other ingredients. It worked better!
I tried making this cake. Top cream never completely set. Bee mixture was so runny it's impossible to make bees out of it. 🙁
I'm sorry to hear that it didn't work out for you, Elona.
HI OLGA, I JUST CAME ACROSS YOUR WEBSITE AND I CAN'T WAIT TO TRY ALL YOUR RECIPES. THEY ALL LOOK GREAT AND DELICIOUS. MY HUSBAND IS ARMENIAN AND MY MOTHER-IN-LAW USED TO PREPARE RUSSIAN CAKES WHICH I ADORED, BUT NEVER HAD A CHANCE TO TRY, MAYBE BECAUSE I WAS AFRAID TO FAIL IT. YOUR RECIPES SEEMS EASY SPECIALLY WITH THE ILLUSTRATIONS STEP BY STEP. YOU ARE VERY CREATIVE PERSON. GOD BLESS YOU AND YOUR FAMILY. I LOVE YOUR WEBSITE AND IT IS A KEEPER. THANK YOU FOR GENEROSITY.
Thank you, Sona.
I'm glad you stopped by. I hope you'll find many recipes that your family can enjoy:).
Don't be afraid to try making Russian cakes; it's much easier than it looks. Hopefully the step by step recipes with photos will be a help for you.
God bless you too.
Olga: Sorry, I saw the baking time . I did not read it correctly.
4 to 6 min.