
Soft sugar cookies that are perfect to be used with your cookie cutters, no matter what the holiday or occasion. These cookies are tender and soft but keep their shape so well as they bake. The tangy sour cream icing pairs nicely with the buttery cookies. This recipe gives you and your kids the chance to become artists.

I've been on the hunt for the perfect soft cut-out sugar cookie recipe ever since my boys were old enough to hold cookie cutters in their chubby little hands. There's something so special about baking these cookies together – it's the kind of fun, messy activity that makes great memories. After years of experimenting and testing (we're talking more than five!), I'm thrilled to finally share this recipe with you.
Over the years, I turned my kitchen into a cookie lab, testing countless variations to find the right balance. With such a simple recipe, there's no room for error – it has to be just right. I wanted these cookies to hold their shape perfectly, without spreading or puffing up too much, and, of course, to be soft and tender, staying that way for days! (Is that too much to ask for?) The icing went through its own round of testing too, making sure it complemented the cookies just right. I'm so excited for you to give this recipe a try!
Why should you try this recipe?
- These cookies are buttery, delicious and SOFT. If you're going to put in effort of making homemade cookies, they'd better taste great:).
- They are also really easy to make. You can make both the cookie dough as well as cut out the different shapes with your children. The cookies dough only takes a few minutes to prepare. Everyone who has ever attempted to bake with children knows that the simpler the recipe, the better the experience for everyone.
- They keep their shape after baking! This is really important for a cut out cookie recipe. You want your cookies to come out as close as possible to the cookie cutter shape that you picked out, not puff out into a shapeless blob in the oven.
- The sour cream icing is so unique and easy to work with. I love the tangy, creamy and sweet flavor of this icing. The sour cream cuts through all the sugar making it much less cloying.

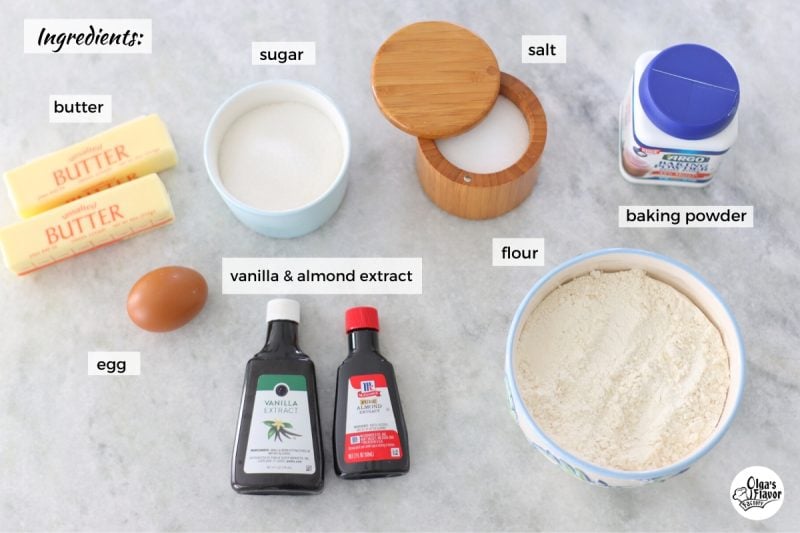
Ingredients:
(Scroll to the bottom of the page for the printable recipe with all the measurements.)
Cookie Dough:
- butter - it's very important for the butter to be at room temperature before you make the cookie dough.
- sugar - I use white granulated sugar.
- egg - I use large eggs in baking. The egg also needs to be at room temperature.
- vanilla extract/almond extract - in most sugar cookies, both or one or the other is used to flavor the cookies. You can use both or just one, it's completely up to you and what flavor you prefer.
- all purpose flour
- salt - a bit of salt is great in most baked goods.
- baking powder -
- This is an optional ingredient. If you don't over bake your cookies and chill the dough before rolling, you don't need to use it.
Icing:
- sour cream
- cream cheese - the cream cheese must be softened to room temperature, or it won't mix in evenly
- powdered/confectioner's sugar
- any food coloring that you want
How To Make Cut Out Sugar Cookies:
- Make the cookie dough.
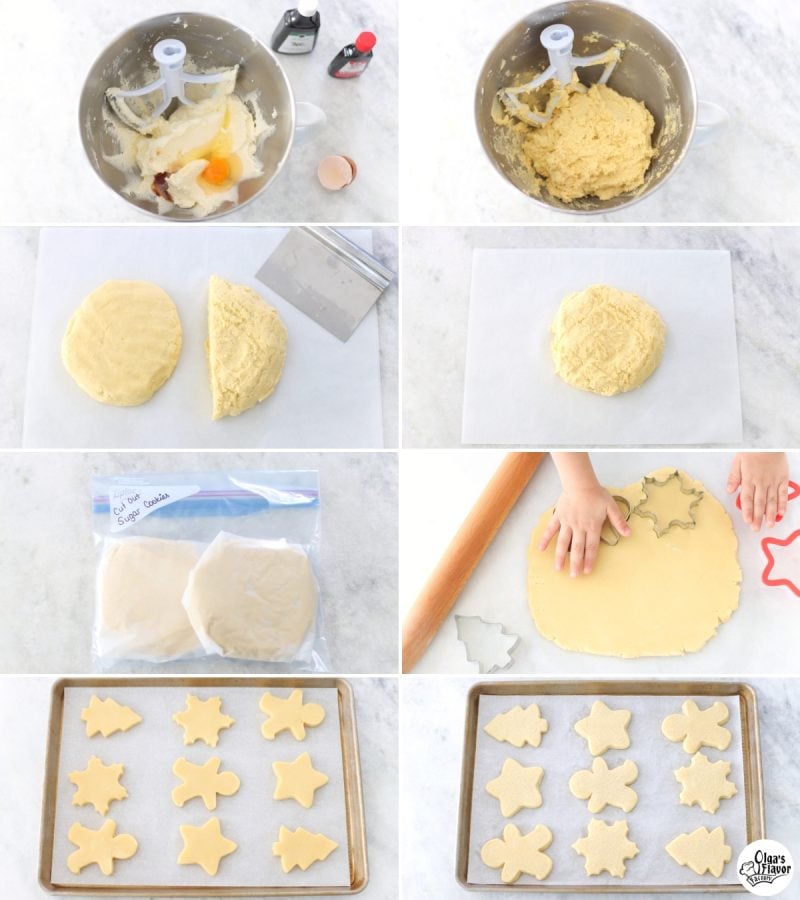
- Cream the butter and sugar until pale yellow and fluffy, about 5 minutes. (Use a hand mixer or a stand mixer with a paddle attachment.)
- Add the egg and the vanilla/almond extract. Mix until combined.
- Mix the flour, salt and baking powder, in a separate bowl to combine.
- Add half of the dry ingredients to the cookie dough mixture, slowly mixing to combine, starting at low speed and mix just until most of the flour is incorporated. Add the remaining dry ingredients and repeat, being careful not to overmix the dough.
- Chill the cookie dough for at least an hour.
- You can also make it up a day in advance or even freeze it for up to 3 months.
- Roll out the cookie dough.
- Try not to use too much additional flour. Roll out the dough on parchment paper or even between two sheets of parchment paper. I try to make the cookies about ½" thick.
- Work with part of the dough at a time, so the rest of it stays chilled.
- Save the scraps of cookie dough and roll out more cookies, but first, chill the dough until firm.
- Any time you use cookie dough that is too warm, the cookies will spread out more. Also, try to get as many shapes as you can from one rolling. Place the cookies cutters as close to the edges and to each other as possible. The more times that you re-roll the dough, the less tender the cookies become.
- Bake the cookies, being careful not to over bake them, for smaller cookies, 8-10 minutes and 10-12 for larger cookies.
- They should still look pale when you take them out of the oven. The edges will be set, the top of the cookies should be a matte finish. The cookies should not be melted and gooey, but still look soft. You might think they aren't finished baking.
How to Make Sour Cream Icing:
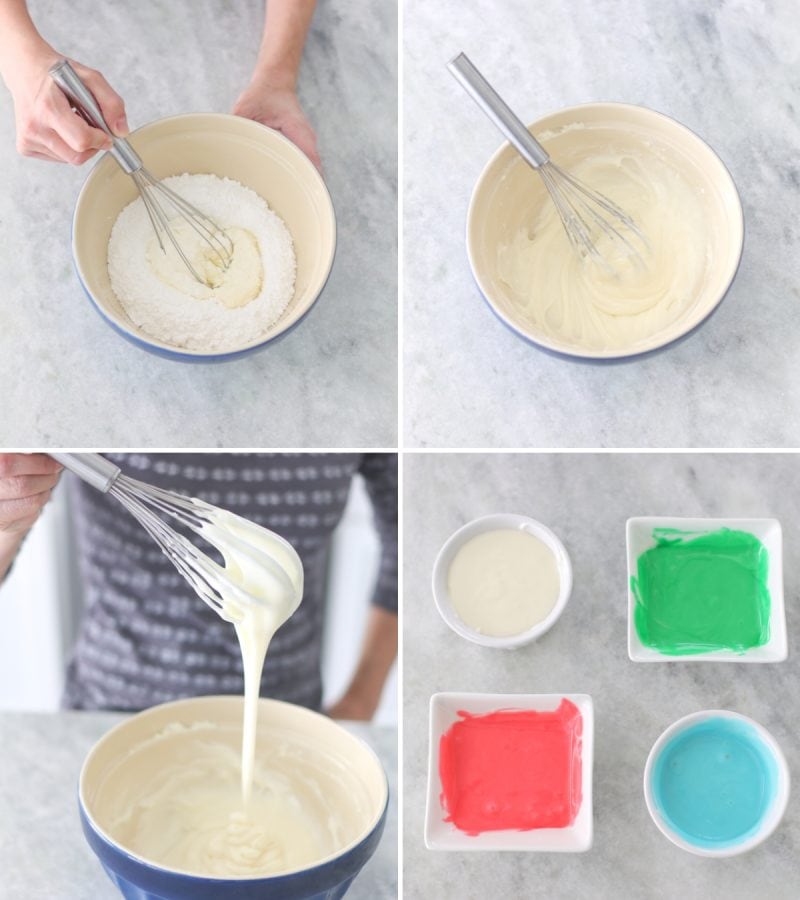
- Use a whisk to combine all the ingredients in a large bowl.
- Start by whisking the cream cheese and sour cream together until smooth. Then, slowly add the powdered sugar, a little bit at a time until you have mixed it all in. The icing should have a smooth consistency.
- If you mix all the ingredients at once, at first it may seem as if there is too much sugar. Take your time and it eventually will come together. You can use a mixer to make the icing. In that case, definitely make sure to add the sugar in small parts. Otherwise you will have powdered sugar all over your kitchen.
- Divide the icing into as many colors as you want to add and add your food coloring of choice.
Decorating the Cut Out Sugar Cookies
- Cool the cookies before icing. Most of the time, I simply let my children ice the cookies any which way they want to.
- If you want to make the cookies as neat as possible, transfer the icing into pastry bags. Then, cut out a small hole in the corner and pipe it out on the cookies.
- Go around the cookies first with the icing and then fill in after you traced the edges all around. This will keep them neat and will keep excess icing from dripping from the sides.
- If you want to add sprinkles, add them while the icing is still runny so it adheres to it. Otherwise it will roll off.
If you want to stack the cookies later, make sure the icing completely dries first. That takes hours, so I usually leave them overnight to dry and then stack. Otherwise, my boys just enjoy them right away.

Storing and Freezing Sugar Cookies
Store the baked and iced cookies at room temperature for up to a week.
Storing the Cookie Dough:
Store the cookie dough for 3-5 days in the refrigerator. You can also freeze it for up to 3 months. Make sure to wrap the cookie dough in multiple layers. This way, it will stay as fresh as possible, to prevent freezer burn or any aromas from getting absorbed.
Freezing Cookies:
The baked cookies can also be frozen. I recommend icing them after. There's a chance the icing will get wet and smear. Store the cookies in multiple layers of parchment paper, aluminum foil, freezer ziptop bags or airtight containers for 1-2 months.
Thaw at room temperature. I like to remove it from the packaging and wrap it in a clean kitchen towel or paper towel. This helps to keep it from drying out and from any condensation making the cookies soggy.

Helpful Tips and Frequently Asked Questions
Butter and sugar mixed together until they are airy and fluffy create an emulsion. This later results in the cookies being tender and soft. If you use butter that is too soft, the cookies will spread out too much when they are baking.
Make sure to mix them long enough. Most people don't beat the butter long enough. Time yourself, if you have to, 3-5 minutes for sure. This will pay off when you're baking the cookies. All that air in the dough will expand and create a soft cookie.
I tried making cookies both with baking powder and without to compare the texture of the cookies. I also wanted to see the way they spread out and puffed out while baking.
With the baking powder, the cookies tended to spread out and puff out more.
However, the cookies that were chilled in advance, baked while still cold and then NOT overbaked, were great. I didn't notice a difference in the softness of the cookies at all. The cookie shapes stayed more sharp and less puffed out. I personally don't think they need any baking powder, but you decide.
Chilled dough will be easier to work with. Also, you'll get nice clean lines around your cookies and they won't expand and puff out too much when baking.
Adding too much flour will result in cookies that are too dense and hard. Mixing the flour too long will also make the cookies dense.
The thinner the cookies, the less soft they will be. I try to make the cookies about ½" inch.
More Fun Recipes To Make With Your Kids
- Chocolate Salami
- Soft Farmer's Cheese Cookies
- Brown Butter Chocolate Chip Cookie Bars
- Split Second Cookies (Shortbread Cookies with jam)

How To Make Soft Cut Out Sugar Cookies Video
Soft Cut Out Sugar Cookies

Soft sugar cookies that are perfect to be used with your cookie cutters, no matter what the holiday or occasion. These cookies are tender and soft but keep their shape so well as they bake. The tangy sour cream icing pairs nicely with the buttery cookies and gives you and your kids the chance to become artists.
- Prep Time: 1 hour
- Cook Time: 8-10 min
- Total Time: 0 hours
- Yield: 15-20 cookies 1x
Ingredients
Cookie Dough
1 cup butter, room temperature
¾ cup granulated sugar
1 egg, room temperature
1 - 2 teaspoons vanilla and/or almond extract, you can use both or 1 of each
2 ½ cups all purpose flour
¼ teaspoon baking powder, optional (read note in recipe description about baking powder)
¼ teaspoon salt
Sour Cream Icing
⅓ cup sour cream, room temperature
2 oz cream cheese, room temperature
2 ½ cup powdered/confectioner's sugar
any food coloring that you want to use
sprinkles and other fun cookie decorations
Instructions
Cookie Dough:
- In a large bowl, using a stand mixer with a paddle attachment or a hand mixer, cream the butter and sugar until pale yellow and fluffy, about 5 minutes.
- Add the egg and the vanilla/almond extract. Mix until combined.
- Mix the flour, salt and baking powder, in a separate bowl to combine.
- Add half of the dry ingredients to the cookie dough mixture, slowly mixing to combine, starting at low speed and mix just until most of the flour is incorporated. Add the remaining dry ingredients and repeat, being careful not to overmix the dough.
- Use a rubber spatula to scrape down the sides and bottom of the bowl and finish mixing the dough.
- Divide the dough in half and form them both into disc shaped. Wrap in parchment paper and chill at least for an hour. You can make the dough up to several days in advance and store in the refrigerator or freeze the dough up to 3 months in advance.
Making and Baking the Cookies:
- Preheat the oven to 350 degrees Fahrenheit.
- Line 2 rimmed baking sheets with parchment paper.
- Working with half of the dough at a time and keeping the other half in the refrigerator, roll out the cookie dough on parchment paper to prevent using any extra flour. Roll the dough to about ½" thickness and cut out as many cookies as possible, placing the cookies cutters as close to the edges and to each other as possible to reduce how many time you re-roll the dough. Transfer the cookies to the prepared baking sheet.
- Bake in the preheated oven for 8-10 minutes for small/medium sided cookies and 10-12 minutes for large cookies.
- Chill the dough until firm before re-rolling. I recommend baking the cookies one baking sheet at a time for the best results. If you already cut out the other cookies, store them in the refrigerator, if you are waiting for the oven to be free. The cookies should still be cold when placing them into the oven, otherwise they will spread and puff out more.
- You should have about 20-22 cookies that are small/medium in size and about 18 is you use large cookie cutters.
Sour Cream Icing:
- In a large bowl, combine the sour cream and cream cheese. They should be really soft and easily whisk together smoothly. Add the powdered sugar in increments, until it is all incorporated and you have a smooth icing.
- Divide the icing into as many colors as you want to use and add the food coloring of your choice.
- Cool the cookies before icing them. Top with sprinkles while the icing is still wet.
- If you want to stack the cookies, let them dry completely first, which can take a few hours.
Notes
Baking Powder Note:
I tried making cookies both with baking powder and without and compared the texture of the cookies and the way they spread out and puffed out while baking.
With the baking powder, the cookies tended to spread out and puff out more. This is why I ended up using only ¼ teaspoon. If you want extra insurance to make sure your cookies are tender, you can add the baking powder.
However, in the cookies that were chilled perfectly in advance, baked while still cold and then NOT overbaked, I didn't notice a difference in the softness of the cookies at all and the cookie shapes stayed more sharp and less puffed out. I personally don't think they need any baking powder, but you decide.

Going to try this recipe for our Christmas cookies! Do the cookies need to be refrigerated after icing or are they safe to be stored in an air tight container at room temperature?
I hope you gave these cookies a try, Shay. We store the cookies at room temperature.
For the icing, have you ever tried using squeeze bottles instead of bags? I’m wondering if that will be better/less messier for kids.
Fantastic recipe, used both almond and vanilla essence, the sour cream + cream cheese frosting is so flavorful and turns the cookie into an outstanding version of a regular sugar cookie. It is fun to watch friends/family almost instantaneously reach for more. Perfect recipe and instructions (not to overbake). Applause and thank you!
Hi Randi,
Thank you so much for your wonderful feedback! I’m thrilled to hear you enjoyed the cookies and the frosting. The combination of almond and vanilla is such a great touch, and I’m so glad the recipe worked out perfectly for you. It’s always fun to watch everyone go back for seconds (or thirds)! I really appreciate your kind words about the recipe and instructions. It means a lot to know that it turned out just right for you.
Happy baking and thanks again!
The yummiest sugar cookies I’ve ever made! This is truly the best sugar cookie recipe! Thank you so much for sharing this! 🙂
Thank you, thank you! 🙏 I’m so grateful that this recipe has become a favorite of yours! It makes me smile knowing you’re enjoying it so much. 😊
Does this icing dry so that it doesn’t smear? Also if it does how long does that take?
Yes, it should dry and not smear. I have never timed it, so I'm not sure exactly.