
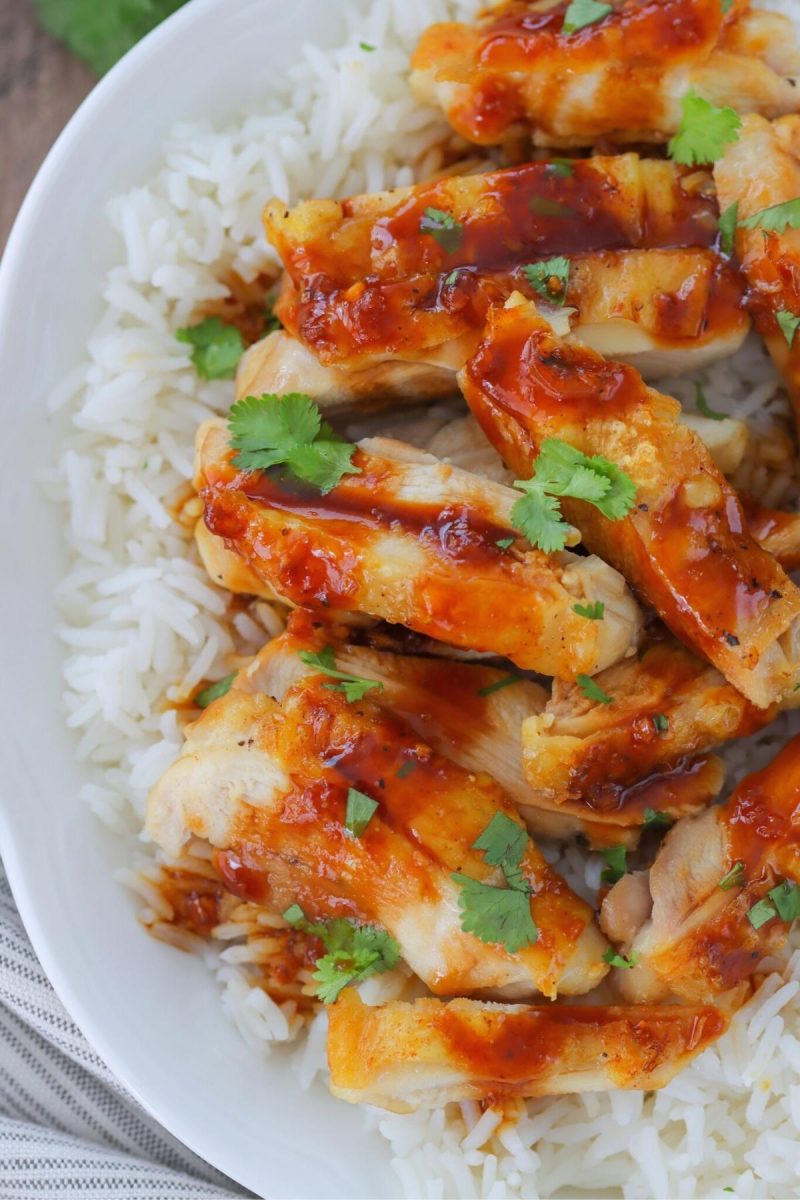
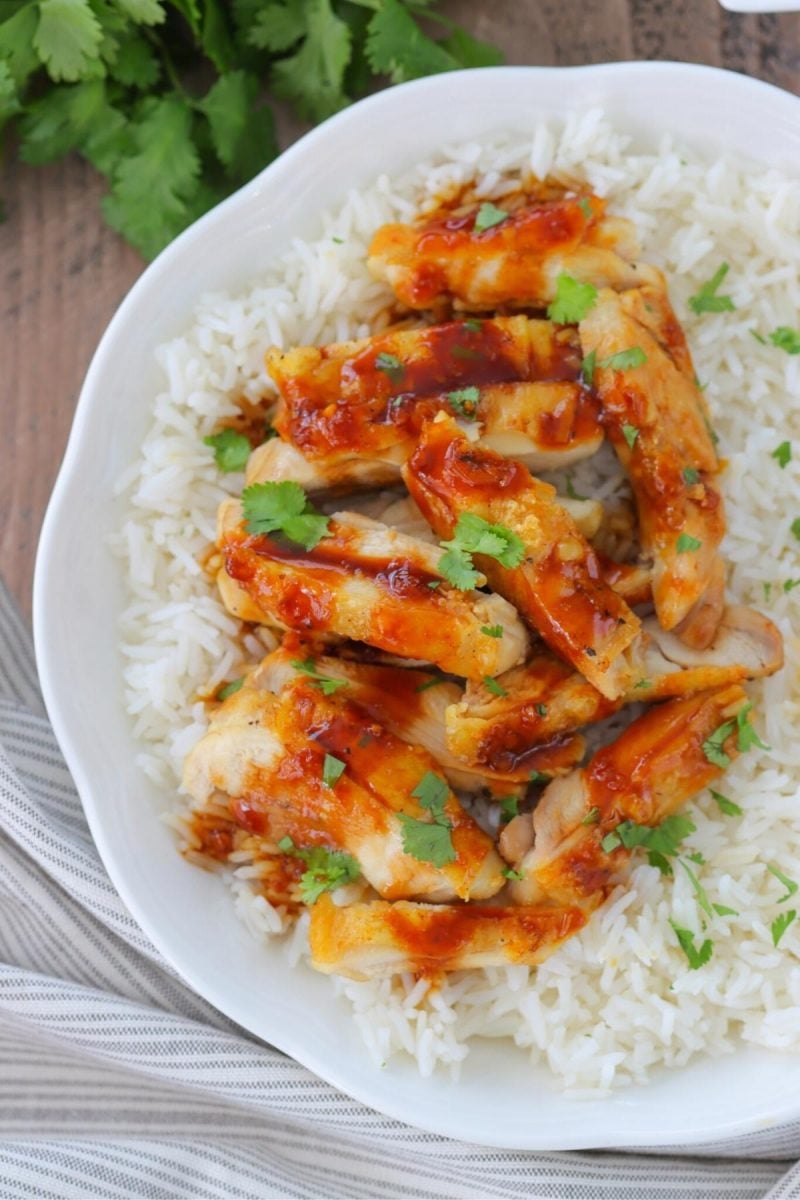
Use your oven to make this delicious baked teriyaki chicken. The chicken is golden and crisp on the outside and so juicy on the inside. The homemade teriyaki sauce pairs so well with the chicken. It's delightfully sweet and salty, coating the chicken and soaking into the rice or noodles that you serve with it.
Baked Teriyaki Chicken is an outstanding recipe for any day of the week. Besides prepping the chicken, the process is really easy and takes no time to put together. Using the broiler to cook the chicken gives it a bit of a delicious charred flavor, and since it cooks so quickly on high heat, the chicken doesn't dry out.
This popular Japanese dish is so succulent and tasty, you'll be licking your fingers. The juicy chicken with golden crisp skin is served with a homemade teriyaki sauce, which is potent and flavorful, but also light. I love how crisp and crunchy the skin is, but the meat inside is perfectly tender. It's so good with a bowl of rice or noodles to soak up the sauce.
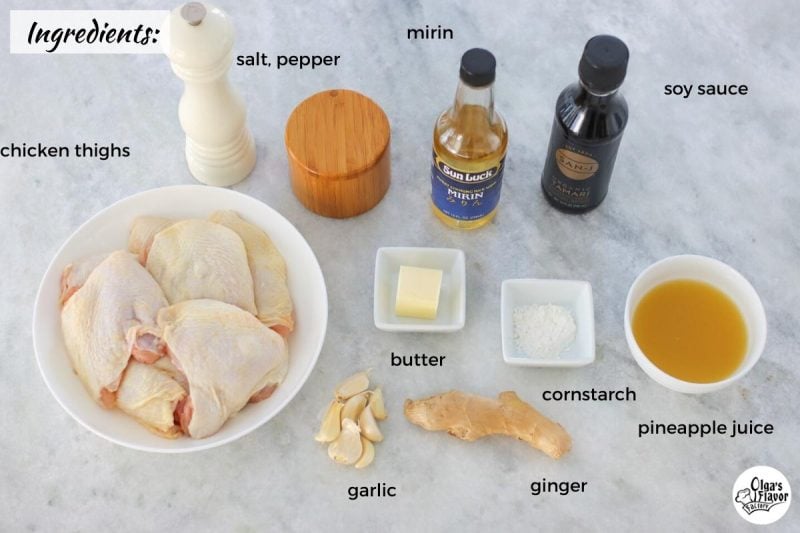
Ingredients:
- chicken thighs (boneless thighs with the skin ON)
- salt, ground black pepper
- butter (to brush on the chicken)
- garlic (to flavor the chicken)
Teriyaki Sauce:
- soy sauce ( I like using tamari, since it usually has less sodium, isn't as salty and I like the flavor)
- pineapple juice (instead of the pineapple juice, you can use brown sugar)
- ginger (fresh ginger is best, but you can also use dry ground ginger in a pinch, just use less)
- garlic
- mirin - this is a type of rice wine, it's sweet and adds a wonderful flavor and acidity. I use it a lot in Asian recipes, especially stir fry sauces.
- If you don't have mirin, you can substitute it with dry sherry, sweet marsala wine. You can also use dry wine wine, white or red wine vinegar.
- cornstarch - to thicken the sauce
- fresh cilantro and/or green onion - for serving, optional
What is Teriyaki Chicken?
Teriyaki is a Japanese cooking method where the meat is grilled or broiled and then served with a teriyaki sauce - sweet, salty and a bit tart. The sauce is made with soy, mirin and sugar.
Instead of sugar, I decided to use pineapple juice, which is sweet and tart. I think it complements the rest of the ingredients really nicely. Ginger and garlic add more flavor to the sauce and the cornstarch thickens it up to make a beautiful glaze to coat the chicken.
How To Make Baked Teriyaki Chicken
Prep and Bake the Chicken
This is an excellent way of preparing chicken thighs that I found on America's Test Kitchen. Instead of Teriyaki sauce, you can serve it with Barbecue Sauce, Buffalo Wing sauce, Alfredo sauce, etc. It's absolutely delicious served without any sauce at all, so try it out.
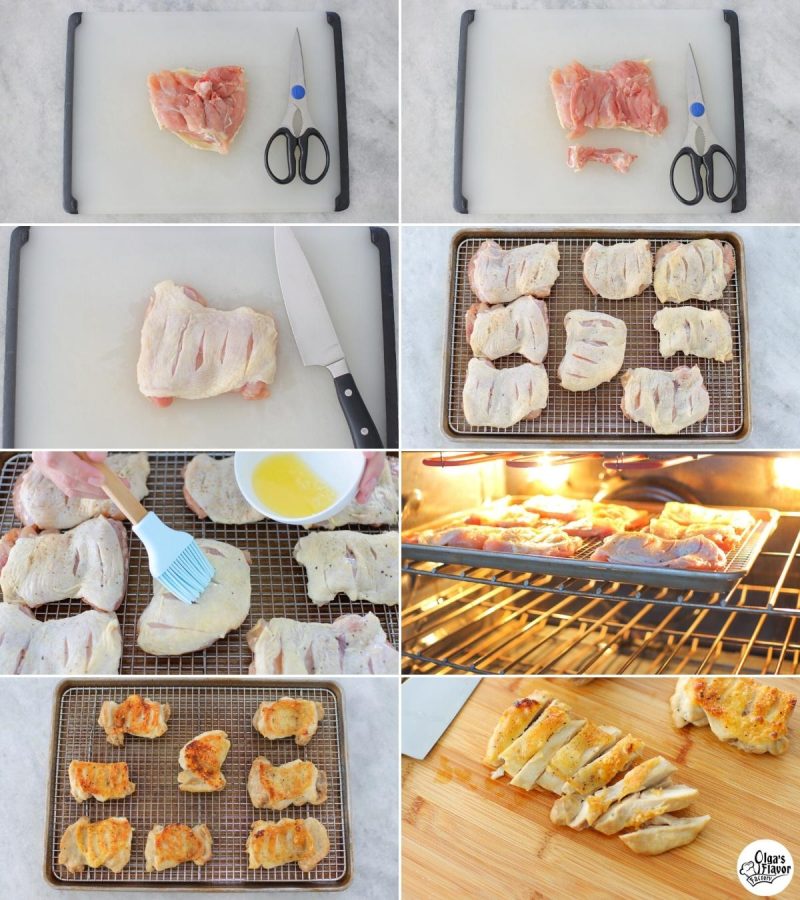
- Before you start, preheat the oven. The oven rack should be 6-8 inches from the broiler element at the top of the oven. Line a rimmed baking sheet with foil (for easy clean up) and place a wire rack on top of the baking sheet.
- Debone the chicken thighs. Remove any excess fat and skin.
- Make a few diagonal slices in the across the chicken skin. Don't cut it too deeply. The slashes will help to make the skin extra crispy. This will give the heat more access to the fat under the skin and cook it out. If you leave it in one piece, the skin will be flabbier and less crisp.
- Season the chicken with salt and pepper on both sides. Place the chicken thighs on the prepared baking sheet, on top of the wire rack, tucking all the meat underneath the skin.
- Add minced garlic to the melted butter and brush it on the chicken skin. Be careful not to get any of the garlic on the chicken skin, otherwise it will burn.
- Bake the chicken for 10-15 minutes, under the broiler, until the chicken is golden brown.
The broiler setting uses a really high heat, so the chicken can burn easily, especially if you use smaller and thinner chicken thighs. Watch the chicken closely.
If the chicken skin gets golden and crisp too quickly, move the sheet pan to a lower shelf in the oven, so the chicken can keep cooking until it reaches 170-175 degrees Fahrenheit.
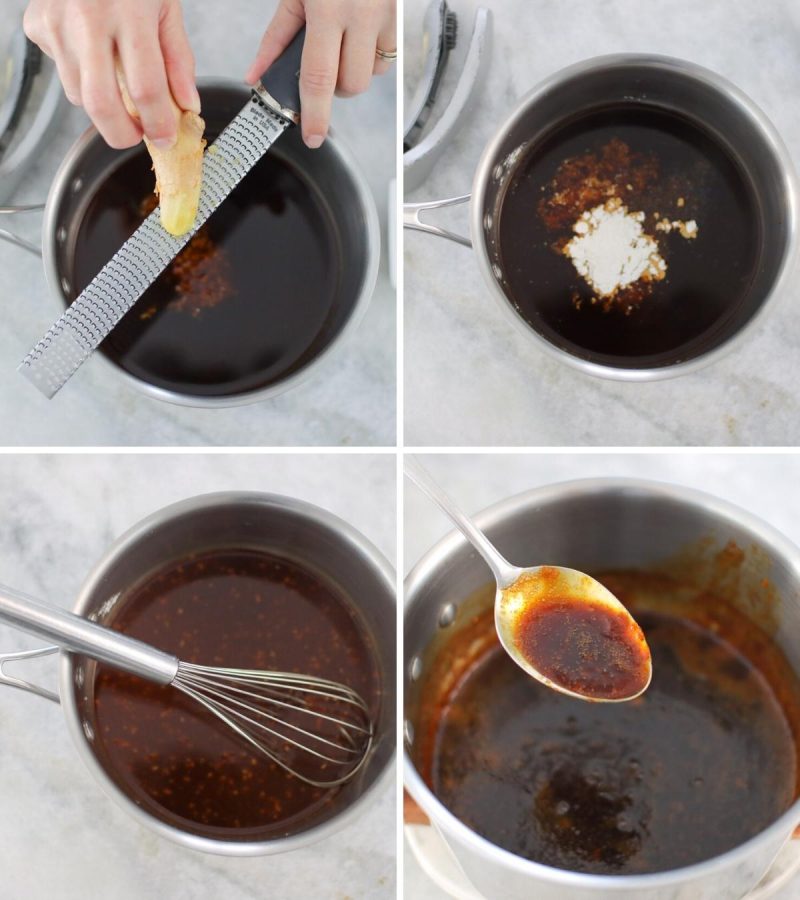
Make the Sauce
- In a small saucepan or a skillet, combine all the ingredients for the sauce. Whisk it all together until smooth.
- Bring to a boil, then reduce the heat to medium and simmer for 3-5 minutes. The teriyaki sauce should have a syrupy consistency.
Serve the Baked Chicken Teriyaki
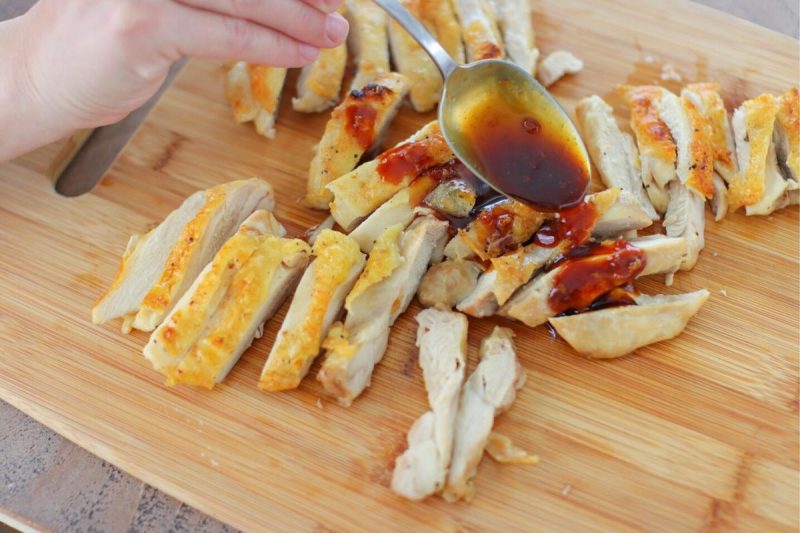
When the chicken is done, cut it into slices. Spoon the teriyaki sauce over the chicken and serve extra sauce on the side.
Helpful Tips and Frequently Asked Questions:
Chicken thighs are much juicier than chicken breast and are also much less likely to overcook. I highly recommend using chicken thighs for this recipe.
However, you can also use chicken breast. Don't use the broiler setting for cooking the chicken, though. Roast the chicken breast (I recommend using bone in, skin one chicken breast) until it reaches 165 degrees Fahrenheit. Slice the chicken and serve with the sauce.
Using chicken thighs with the skin on it helps to protect the chicken meat on the inside, to keep it extra juicy. The chicken will be more dry if you cook chicken without the skin.
The chicken skin also gives the chicken a wonderful crisp element, which just won't happen if you use boneless skinless chicken thighs. Removing the bone allows the chicken to cook faster and it will be much easier to slice later.
If you use boneless skinless chicken thighs, you won't have the crispness and you may need to cook the chicken a few minutes less.
Yes, you can use dry sherry or sweet marsala wine, which are also a bit sweet, like mirin. They will give the sauce a different flavor but will also work.
You can also use white wine or white wine vinegar, red wine or red wine vinegar as well. Since they are more tart, use less in the sauce, or add 1-2 teaspoons of sugar.
Pineapple juice is my addition to this sauce. Most other recipes use brown sugar, which works great for this recipe. Use brown sugar instead.
I think the pineapple juice helps to round out the sauce better, giving it a more complex and interesting flavor. It's slightly less sweet and also the tartness balances out the saltiness of the soy sauce.
The broil setting in the oven is at the heating element at the top of the oven, applying high temps to the top of dishes for quick, high-heat cooking.
This is a great way to replicate grilling in the oven, where high heat is focused on one side of food at a time.
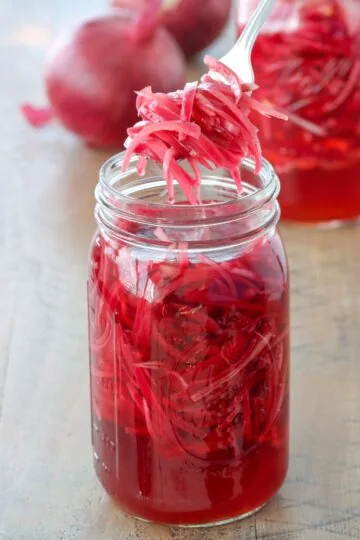
Serving Ideas:
- Perfectly Fluffy Long Grain White Rice
- Garlic Green Beans
- Strawberry Spinach Salad
- Crunchy Cabbage Cucumber Salad
Baked Teriyaki Chicken

Use your oven to make this delicious baked teriyaki chicken. The chicken is golden and crisp on the outside and so juicy on the inside. The homemade teriyaki sauce pairs so well with the chicken. It's delightfully sweet, salty and glossy.
- Prep Time: 25 mins
- Cook Time: 15 mins
- Total Time: 40 minutes
- Yield: 4-6 servings 1x
- Category: Entree
Ingredients
- 8 bone-in, skin-on chicken thighs, trimmed, boned, and skin slashed
- salt, pepper
- 2 Tablespoons butter, melted
- 1-2 garlic cloves, minced
Teriyaki Sauce:
- ½ cup soy sauce
- ½ cup pineapple juice
- ½ teaspoon grated or minced fresh ginger
- 2-4 garlic clove, minced
- 2 Tablespoons mirin
- 2 teaspoons cornstarch
- fresh cilantro and green onions, sliced, optional for serving
Instructions
- Preheat the broiler in your oven and place the oven rack 6-8 inches from the broiler. Line a rimmed baking sheet with aluminum foil and place a wire rack inside the baking sheet.
- Debone the chicken thighs and trim them from extra fat, etc.
- Make a few diagonal slashes across the skin with a sharp knife, being careful not to cut into the meat.
- Season the chicken on both sides with salt and pepper. Place the chicken thighs on the prepared baking sheet, on top of the wire rack. Tuck all the meat underneath the skin.
- Melt 2 Tablespoon of butter. Add 1-2 minced garlic cloves to the melted butter. Brush the butter on the chicken skin, being careful not to get any of the garlic on the chicken skin, otherwise it will burn. Bake the chicken for 10-15 minutes, until the chicken is golden brown. (If the chicken is starting to get too brown, move the baking sheet to a lower shelf in the oven.)
- While the chicken is in the oven, combine all the ingredients for the sauce in a skillet or small saucepan. Whisk it all together.
- Bring to a boil, reduce the heat to medium and simmer for 3-5 minutes, until the teriyaki sauce has a syrupy consistency.
- When the chicken is done, cut it into slices. Spoon the teriyaki sauce over the chicken and serve extra sauce on the side.
This recipe was originally published on February 18, 2013. I have updated the photos and clarified the instructions to make it even more easy to follow.


Great video about your nursing experience!
I'm going to have my 16 year old daughter watch it. Hopefully it will inspire her to pursue a nursing career.
Thank-you Olga!
Keep those videos coming!
-Eric
I have made this several times in the past without the mirin and today I used it...wow, so delicious! Totally changed the dish. It's the perfect teriyaki flavor!!!
I'm so glad you enjoyed it, Tanya. The mirin is the surprise secret ingredient:).
Hi Olga!
My oven also requires an oven temp for broiling. What should the temp be?
I usually use 500 degrees Fahrenheit.
What can I substitute for the wine?
There is no wine in this recipe.
Loved this recipe! I did thighs and breasts. Hubby loves how tender and juicy everything came out. Served it alongside with your Babka recipe to celebrate my newest kitchen addition: a le creuset dutch oven! Loved how easy this was. Will be keeping this recipe in my favorites for those days where I don't have 2+ hours to prepare dinner. Thankyou for all of your recipes and for sharing your stories! Greatly encouraged to see what God is doing in your family's life.
I'm so glad you enjoyed it, Tanya. I love recipes like this one that are so easy to make.
Thank you for taking the time to write. I really appreciate the feedback. I'm so happy that you are enjoying the website.
Hi Olga! I had this recipe on my to-make list for a while & finally made it last night for dinner. It was delicious! I'll have to cook the thighs on a rack next time (didn't have one) because they did omit a lot of liquid but it didn't change the outcome very much. One of my daughters drowned her rice and chicken in the Teriyaki sauce, it was really good. And I learned a new skill, thanks to you - de-boning chicken thighs. Was not hard at all! I'll definitely be making this again. Thank you 🙂
That's wonderful, Julia! I'm thrilled that you and your family enjoyed the recipe:).
Olga, this was so good! I just made this dish for a baby shower and everyone loved it! Will probably be making it for Christmas now :-). The deboning process took longer than I thought, so Ill just have to prep in advance. But the chicken and sauce were fabuloso!!!! Thanks for the recipe 🙂
I agree, deboning can be a little tedious, but the actual cooking is a breeze and it tastes so much better than take out.
I tried making this recipe last week and it turned out so so good my husband loved it! Thank you so much for such an awesome recipe!!
Hi Olga! I love all your pictures! Just wondering what greens you add to your cooked rice? Looks beautiful 😉
Thanks, lanchik7!
I added parsley to the rice. I made regular rice pilaf, but added onions and garlic first and parsley at the end. My favorite way to serve rice.
what can I use instead of mirin,
Hi Veronika,
Mirin is a sweet rice wine, so you could probably use another kind of wine, red or white.
Thanks for the recipe. I made it and liked it a lot.
Hi Olga! I always buy skinless, boneless chicken, and have a bunch in my freezer. Won't work for this recipe? Maybe I can cover the chicken so it doesn't burn? Any suggestions? thanks
Hi Liliya,
I wouldn't recommend using skinless chicken thighs for this recipe. You can cook the chicken thighs in a skillet and then use the Teriyaki sauce to pour over the chicken. Without the skin, the chicken will be too dry if you broil it.
My oven requires temp set for broil. What should the temp. be?
hi Olga does the oven stay on broil setting the whole time?
Yes, Ani. The oven is on broil the whole time. Since the chicken is 6-8 inches away, it doesn't burn right away, but still has enough heat to cook through very quickly.