
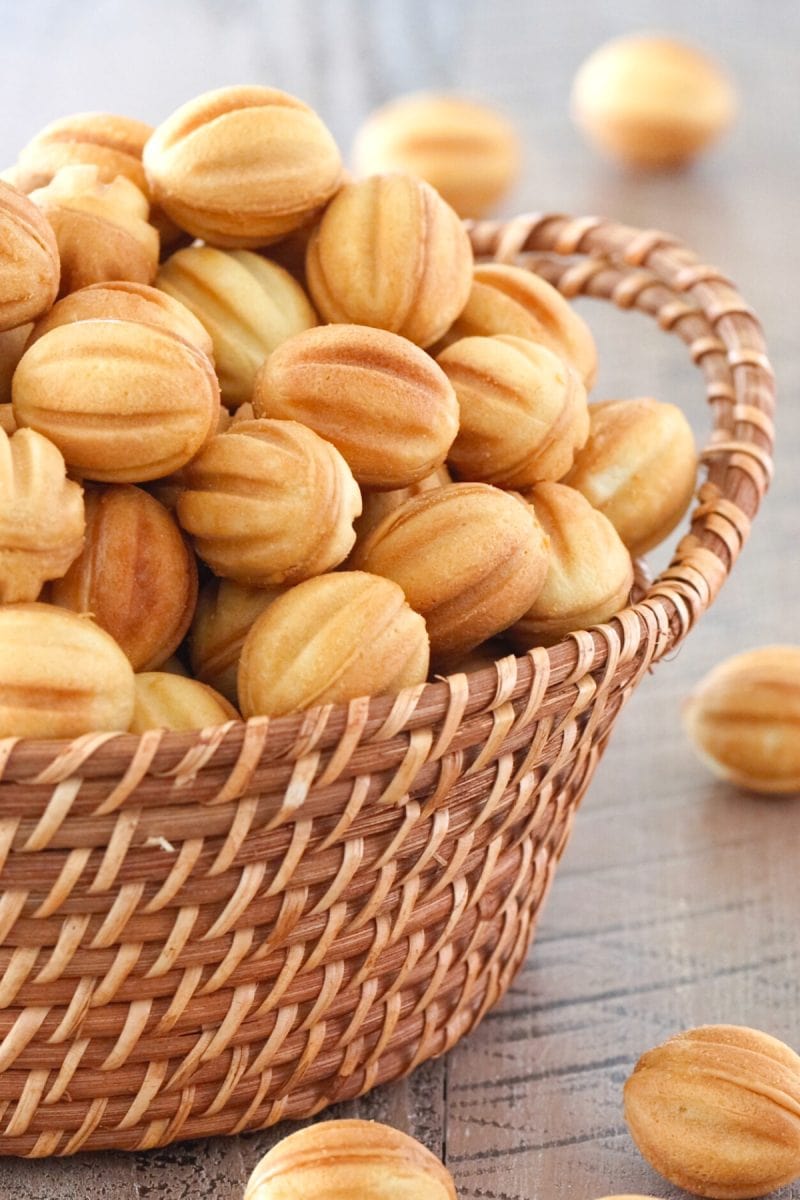
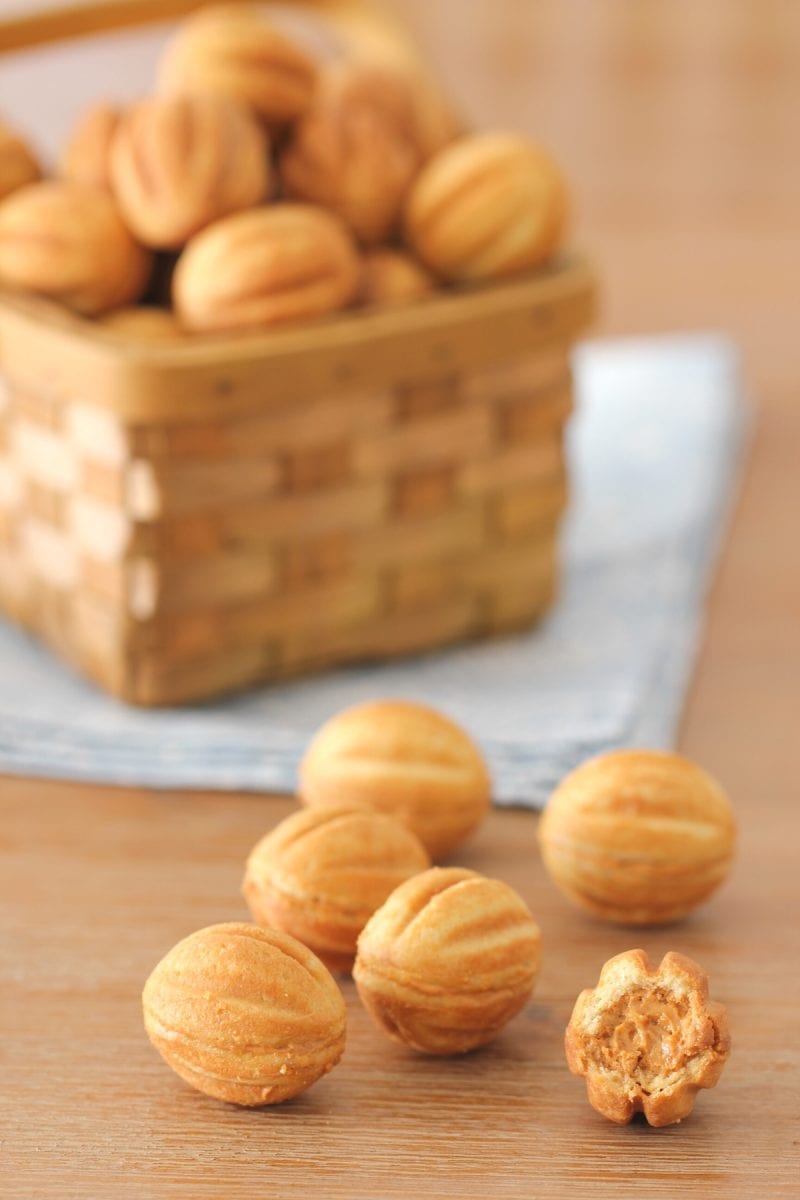
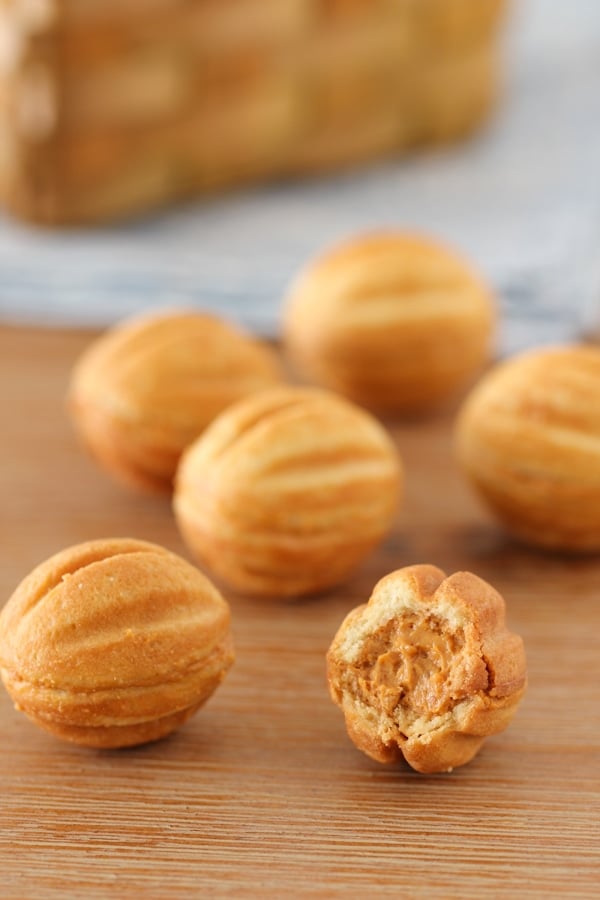
Oreshki are an iconic Soviet walnut shaped cookies, made by cooking them in a special skillet. The crisp, golden exterior of the cookies hold a very creamy, caramely filling made with dulce de leche.
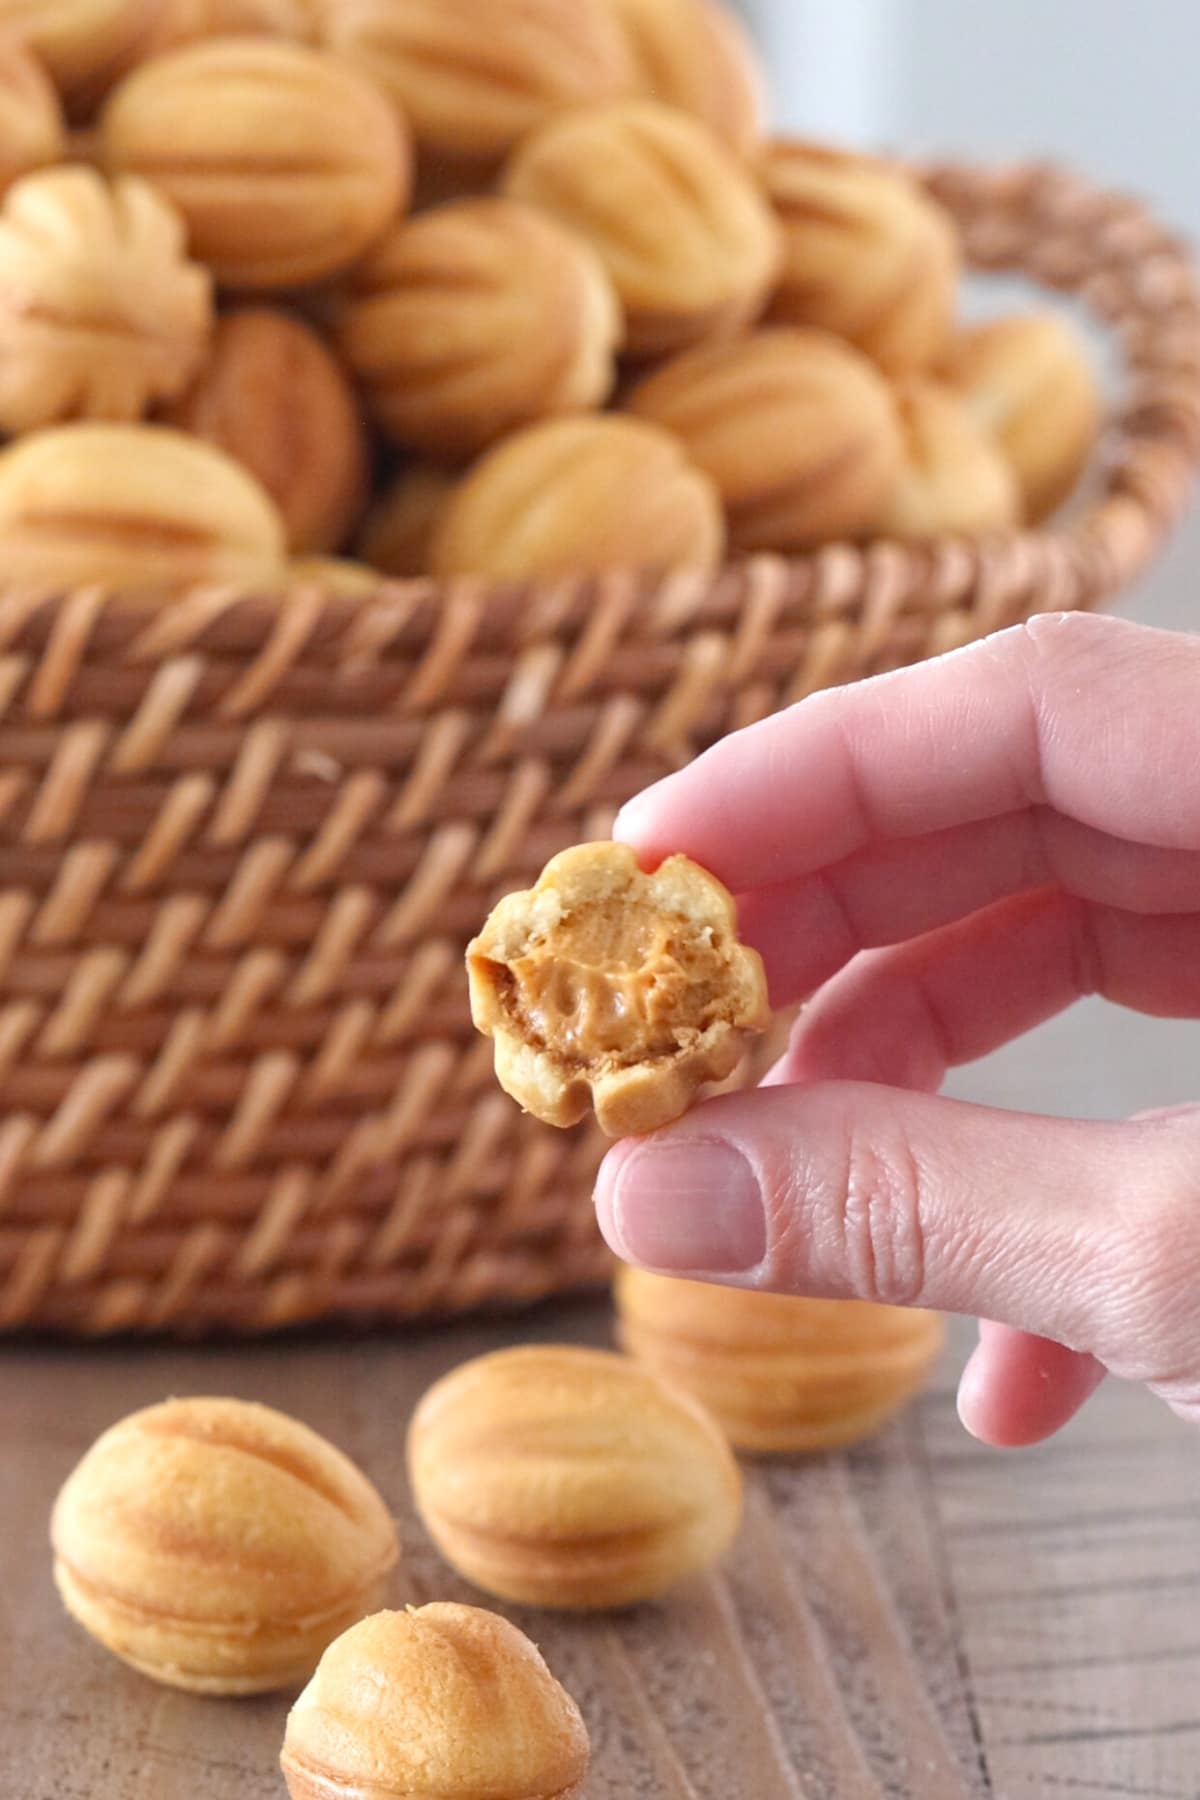
Oreshki, these beautiful, walnut shaped Soviet cookies, are one of the most classic Slavic desserts. They are an iconic Russian treat, especially during holidays, weddings and other special occasions. I can remember watching my Mom making them in our small Belarusian home. I would sit at the kitchen table, keeping her company as she would spend hours making these special but very tedious desserts.
The crisp, golden exterior of the cookies hold a very creamy, dulce de leche filling. Slavic people love using cooked condensed milk in lots of desserts and in Oreshki, it is definitely the star. You can use the excess cookie crumbs or crushed nuts in the filling, for added flavor and crunch.
Oreshki are a labor or love and always the sign that this is a holiday or special occasion. They are wonderful to give as gift - so pretty and delicious. You can make them in advance and they even freeze really well.
How to make Oreshki Video
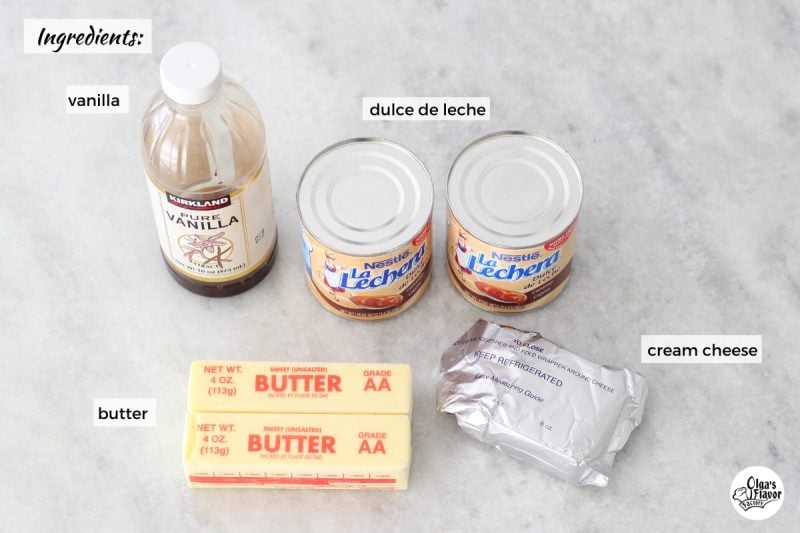
Ingredients:
(Scroll down to the bottom of the page for the Printable Recipe with measurements)
Cookies:
- eggs (large), room temperature
- granulated sugar
- melted butter
- sour cream
- mayonnaise
- this may seem like a strange ingredient for cookies, but the combination of sour cream + mayonnaise gives the cookies the iconic texture and flavor
- baking soda dissolved in vinegar
- all purpose flour

Filling:
- dulce de leche (cooked condensed milk)
- butter, softened to room temperature
- cream cheese, optional (also softened to room temperature)
- not in the original recipe, but I like the addition for more flavor and texture, but it's not necessary
- vanilla extract
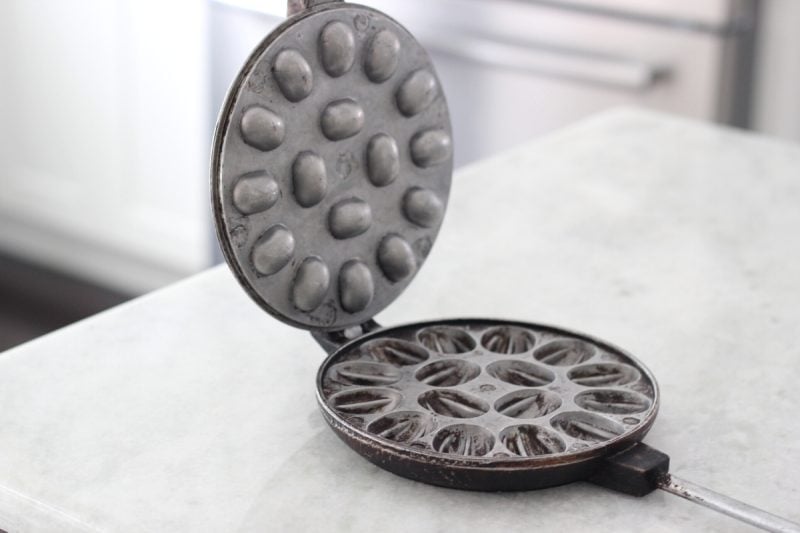
Oreshnitsa - the skillet needed to make oreshki
Oreshki require a special skillet, called the oreshnitsa, to cook them. The one I use is my mom's that she brought from Belarus and it's older than I am. It's extra special and still works just as well. There are also electric oreshki makers. I have an in depth review and comparison of both. The recipe is the same for both.
- Here's a similar design to the original Slavic version, although I haven't used it myself:
- Classic Stovetop Oreshnitsa (affiliate link)
- If you would prefer the electric oreshnitsa, here is the one I have and reviewed:
- Electric Oreshnitsa (affiliate link)
- Oreshnitsa Comparison and Review
How To Make Oreshki
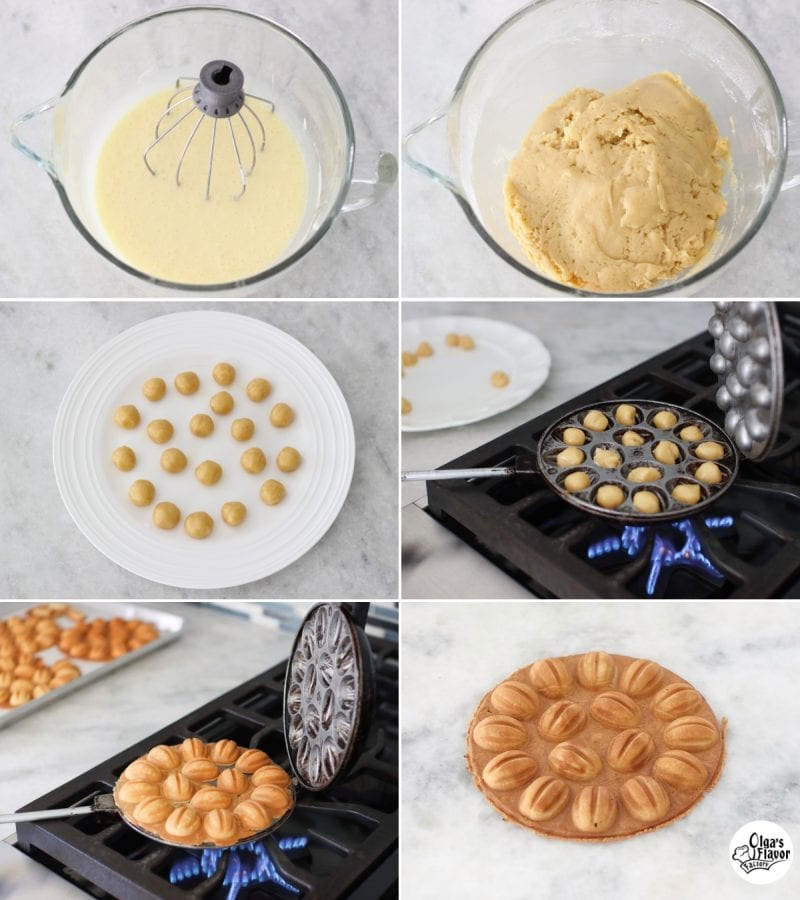
- Make the cookie dough.
- Mix the eggs with the sugar until pale yellow and fluffy, about 5 minutes. (Use a hand held mixer or a stand mixer.)
- Add the melted butter, mayonnaise, sour cream until evenly mixed.
- Next, add the baking soda dissolved in vinegar and mix again until combined.
- Lastly, Add the flour and mix, starting on low speed and gradually increasing the speed to medium, until all the flour is incorporated. The dough should be really soft but not stick to your hands. Add a few tablespoons more if it needs it, up to ¼ of a cup. However, don't add too much flour, or the cookies will be too hard. Keep in mind that the dough will get thicker the longer it stands.
- Shape little balls from the prepared cookie batter, about ½ - ¾ of a teaspoon of batter for each walnut shape. (slightly more than ½ teaspoon for the stovetop oreshnitsa and slightly less than ¾ teaspoon for the electric oreshnitsa)
- Don't make them any bigger, because the excess batter will ooze out of the skillet.
- It's very helpful to shape a lot of the cookie balls before you start cooking them.
- You may want to cover them with plastic wrap so they don't dry out.
- Heat the oreshnitsa on medium heat on the stove until hot or preheat the electric oreshnitsa.
- Cook the Oreshki.
- Quickly place a cookie ball into each of the cookie wells, close the lid and tightly hold the two ends, squeezing them as tight as you can. Immediately wipe away any leaking butter or any cookie dough that comes out from the sides, if you have any.
- Cook each side until golden on both sides, flipping the griddle over halfway through. The time really depends on the type of griddle you are using, on your stove and the heat that you use. I cooked mine for only 1 - 1 ½ minutes per side, but you might need to cook them longer, up to 3 minutes per side.
- The cookie batter will spread when you're squeezing the two sides together and that's a good thing, since it makes sure that the entire walnut shape is completely covered and you will also use all the leftover cookie scraps in the filling.
- Cook all the cookies, making sure to lay them flat while they are cooling.
Assembling Oreshki
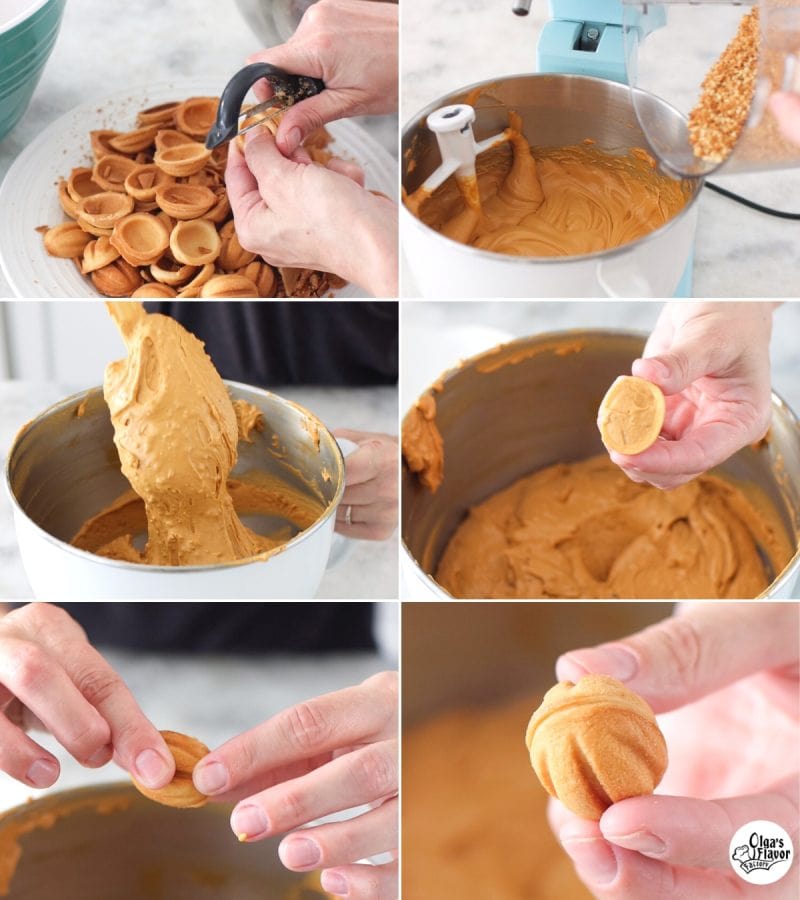
- Break off each of the walnut shaped cookies and remove the excess to make a neat shape. I like using a vegetable peeler to go around the edges of the cookies. Set aside all the scraps. Crush all the cookie scraps into small crumbs, using a ziplock bag and a rolling pin, or a food processor.
- Make the dulce de leche filling.
- In a large bowl, using a stand mixer or a hand held mixer, combine the dulce de leche, butter, cream cheese and vanilla extract until evenly mixed.
- Add the cookie crumbs to the filling and mix again to combine.
- Instead of the crumbs, you can use crushed nuts, but I prefer the taste and texture of the cookie crumbs.
- Fill and assemble the cookies.
- Fill the inside of two walnut shaped cookies with the filling and place two of the cookies, filling side down, toward each other, gently squeezing, and scrape off the excess filling with a small paring knife.
- Continue to fill the cookies, gently squeezing the two halves of the cookies together. You should have a total of about 120-140 oreshki. (If you measure out the dough balls perfectly and don't have any dough coming out of the skillet, you can even get up to 146 filled cookies.)
Storing the Cookies
Store the cookies in an airtight container at room temperature. You can serve them immediately, but they will stay fresh for at least 1 week. (With this recipe, they should stay crisp even at room temperature.)
- If you want the Oreshki to be as crisp as possible, store them in the refrigerator.
- You can freeze the cooked, filled and assembled Oreshki in an airtight container for up to 3 months.
Helpful Tips and Frequently Asked Questions
It is normal for some butter to leak out of the oreshnitsa. The dough contains a lot of butter and some sour cream and mayonnaise, so as the cookies start to bake, it's normal for some butter to leak out.
It's important for each of these ingredients to be there in that amount because this prevents the dough from sticking to the oreshnitsa skillet, but also to give the cookies a golden color and crisp exterior.
As soon as you add the dough and squeeze the two sides together, wipe the butter coming out of the sides and any excess dough before returning it to the stove. The most leaning butter will be in the beginning, so if you clean up the skillet right away, it will be much less messy. 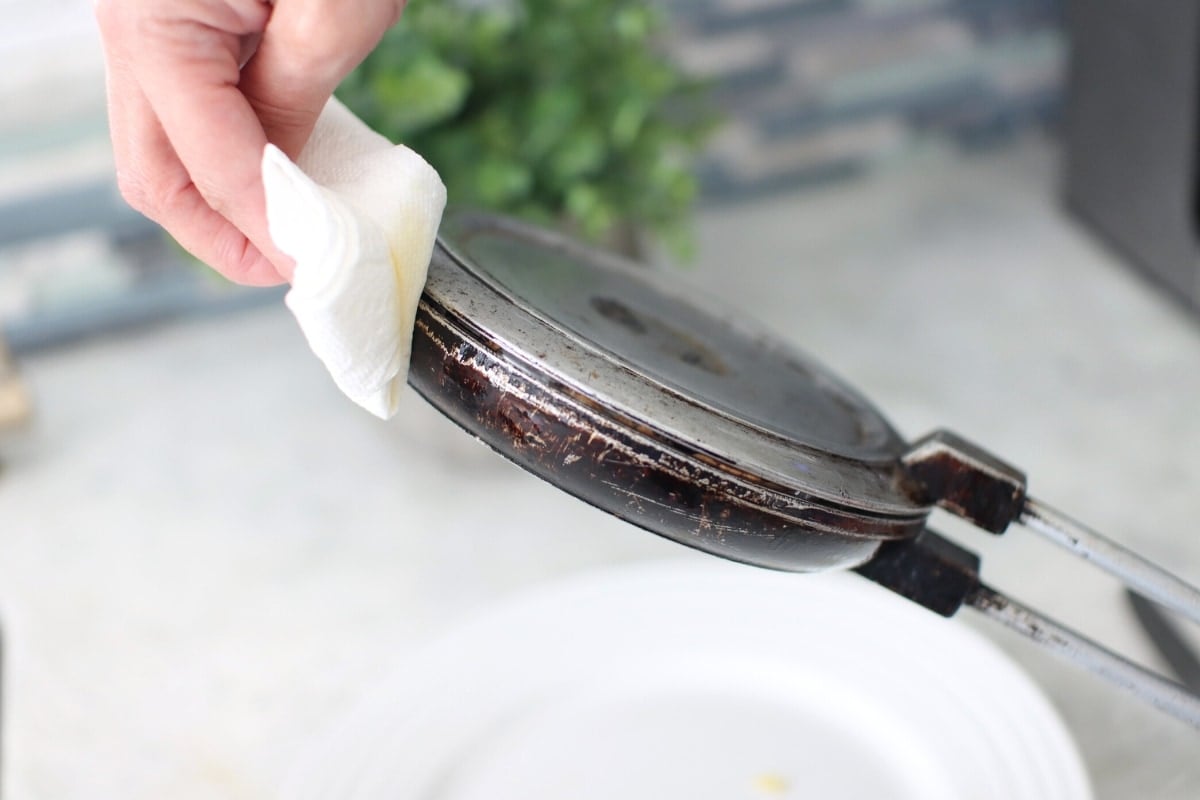
Don't overfill the pan with dough. If you measure out the cookie dough and add the perfect amount, you shouldn't have any excess dough oozing out of the sides.
For the stovetop oreshnitsa, I used slightly more than ½ teaspoon of dough per each walnut cavity and for the electric oreshnitsa, I used slightly less than ¾ teaspoon of dough.
If you do have some dough coming out, scrape it off with a butter knife.
That is why I measure out the dough precisely. It will give you the neatest shape and make sure you don't have any gaps when you fill the cookies.
I also like using the crumbs in the filling, so i want to make sure I have crumbs. Win-win!
Oreshki - Russian Walnut Shaped Cookies

Oreshki are Russian walnut shaped cookies, made by cooking them in a special skillet. The crisp, golden exterior of the cookies hold a very creamy, caramely filling made with dulce de leche.
- Prep Time: 2 hours
- Cook Time: 80 minutes
- Total Time: 3 hours 20 minutes
- Yield: 115 cookies 1x
- Category: Dessert
Ingredients
Cookies:
- 2 large eggs, room temperature
- 1 ½ cups granulated sugar
- 1 cup butter, melted and slightly cooled (16 Tablespoons)
- 3 ½ Tablespoons mayonnaise
- ½ cup sour cream
- 1 teaspoon baking soda dissolved in 1 teaspoon vinegar
- 4 - 4 ¼ cups all purpose flour (start with 4 and only add more if you need to)
Filling:
- 1 ½ (14 oz) cans dulce de leche (cooked condensed milk (21 oz total))
- 1 cup butter (or 16 Tablespoons, room temperature)
- 4 oz cream cheese (room temperature), optional
- 1 teaspoon vanilla extract
Instructions
- Make the cookie dough. In a large bowl, using a stand mixer with a whisk attachment or a hand held mixer, mix the eggs and sugar until pale yellow and fluffy, at least 5 minutes.
- Add the melted butter, mayonnaise, sour cream until evenly mixed. Add the baking soda dissolved in vinegar and mix again until combined.
- Add 4 cups of the flour and mix, (switch to a paddle attachment) starting on low speed and gradually increasing the speed to medium, until all the flour is incorporated. The dough should be really soft but not stick to your hands. Add a few tablespoons more if it needs it, up to ¼ of a cup. Keep in mind that the dough will get thicker as it stands, so don't add too much flour.
- Shape little balls from the prepared cookie batter for each walnut shape. It's very helpful to shape a lot of the cookie balls before you start cooking them. For the stovetop oreshnitsa, I use slightly more than ½ teaspoon of dough and for the electric oreshnitsa, I use slightly less than ¾ teaspoon of dough. (You may want to cover the dough balls with plastic wrap to keep them from drying out.)
- Preheat the oreshnitsa on medium heat until hot or turn on the electric oreshnitsa until it's preheated.
- Quickly place a cookie ball into each of the cookie wells, close the lid and tightly hold the two ends, squeezing them as tight as you can. Cook each side until golden on both sides, flipping the griddle over halfway through. The time really depends on the type of griddle you are using and on your stove. I cooked mine for only 1 - 1 ½ minutes per side, but you might need to cook them longer, up to 3 minutes per side.
- The cookie batter will spread when you're squeezing the two sides together and that's a good thing, since it makes sure that the entire walnut shape is completely covered and you will also use all the leftover cookie scraps in the filling. Wipe the outside of the pan right away, getting rid of any melting butter and scrape off any excess dough too.
- Cook all the cookies, laying them flat too cool off. Then, gently break off each walnut half, and use a vegetable peeler to make the sides smooth and even. Crush all the cookie scraps into small crumbs, using a ziplock bag and a rolling pin, or a food processor.
- For the filling, in a large bowl, using a stand mixer or a hand held mixer, combine the dulce de leche, butter, cream cheese and vanilla extract until evenly combined. Add the cookie crumbs to the filling and mix again to combine. Instead of the crumbs, you can use crushed nuts.
- Fill the inside of two walnut shaped cookies with the filling and place two of the cookies, filling side down, toward each other, gently squeezing, and scrape off the excess filling with a small paring knife.
- Continue to fill the cookies, gently squeezing the two halves of the cookies together. You should have a anywhere from 110-146 cookies total, filled and assembled. It depends on the oreshnitsa that you use and if you have any excess dough wasted if you overfill the oreshnitsa.
- Store the cookies in an airtight container at room temperature. You can serve them immediately, but they will stay fresh for at least 1 week. They get softer as they stand, but still remain crunchy on the outside if you use this recipe.
- To keep them as crunchy as possible, store the filled cookies in the refrigerator. You can also freeze them in an airtight container for up to 3 months.
This recipe was originally published on May 4, 2016. I have added a video to make it even more easy to follow the recipe. The recipe is still exactly the same and has been enjoyed by our family and many readers for years.

I was wondering if the recipe makes 115 cookies or 115 cookies halfs?
Absolutely the best recipe!!! Thank you for pouring your heart into it! Love the oreshki, made it for the first time ever, and I can’t wait for my kids to try it. Best ever.
I'm so happy to hear that you enjoyed this recipe, Iryna. Thank you.
Olga, you state that this recipe makes 115 oreshki. Is that 115 oreshki put together or does it account separate halves so for a total of 58 cookies put together?
Put together, Oksana.
I prefer soft oreshki over crispy. How can I make the oreshki soft? Please advise me.
You need to use a different recipe and use individual molds for the cookies that are baked in the oven instead of the traditional stovetop skillet.
Excellent recipe. I made these for a reception held after a piano concert with a Russian theme. I bought the stove top iron because the size was correct for a 2-bite cooky, while the individual molds were much too large. I will use the individual molds sometime for a stocking stuffer size treat but not for dainty tea cookies. I made the dulce de leche from scratch from Alton Brown’s online recipe with a quart of whole milk, 1-1/2 c sugar, 1 vanilla bean, and 1/2 tsp soda. It takes about 2-1/2 hours of careful simmering but it’s worth the extra time to be sure there are no preservatives or residue of heavy metals that you may have when using canned mills. The Russian pianist at the event shared with me that the finest version of this traditional cooky is when you place a walnut inside.
I'm so happy to hear that you were happy with this recipe, Peggy. What a lot of dedication to make the dulce de leche from scratch - good job! I remember that episode from Good Eats by Alton Brown too:).
Thank you for taking the time to write.
Yum! I also wanted to try the soft version if you have it 🙂
Hello, many thanks for the recipe. Just a few questions. Is there a replacement for the mayonnaise? Also: could I freeze these once they are finished? Would like to make an extra large batch and then have them handy.
Love these! They have the most perfect soft texture and they’re so delicious. Thank you for this recipe! The only one I’ll ever use!
I'm so glad that you enjoyed the Oreshki, Sorina. Thank you for taking the time to write.
These are so delicious. I’ve made them twice already and definitely thinking about a third time haha.. I love that the filling is not super sweet! I do have a question though, are they supposed to be super crunchy? Seems like I have a hard time biting into them so I wonder if it’s because I overbake them? I have an oreshnitsa from nakkitchen.com that goes in the oven and I do about 30-35 min at 375 degrees.
I'm so glad you are happy with this recipe, Lidiya.
The cookies should be crunchy, but definitely not too crunchy to bite into easily, especially after you add the filling. I use the oreshnitsa that you use on the stovetop, so I don't cook them anywhere near that long. When I use the mold that goes into the oven, I actually use a different recipe and I don't bake it that long either.
Do you have that recipe posted somewhere? I would love to try it out! 7 years later and I’m still coming back for this recipe 😋
No, I don't have the other recipe posted. We really like this one best.
This is the best oreshki recipe I found online. Thanks dear. To made oreshki extra soft I also added secret ingredient 2 spoons of VODKA😁
I'm so glad you enjoy the Oreshki recipe, Vicki. Thank you for sharing your tip:).
Is there a way I can make these less crispy? growing up in ukraine I am used to eating the softer ones. I tried these for my parents and they agreed that it is too crunchy. I let them sit in the fridge for a few days and they got a bit less crunchy but they still are not soft. Any suggestions for how I can alter it to make them more soft? The filling is great!
There is a completely different recipe if you want to make them soft. You would also need to use a different mold for the cookies, individual molds that are baked in the oven, not on a skillet, like I use. The skillet contributes to them being really crispy.
I don't have the recipe for the soft cookies posted on my website yet. Maybe I'll post it when I have some time.
Hi,
Ive made ur oreshki, the cookies turned out great, but the filling is a bit runny, followered the recipe to a t, and still runny
I'm not sure why Masha. It's never been runny for me. Maybe the dulce de leche/cooked sweetened condensed milk was a thinner consistency.
Hi. Can I freeze some oreshki shells and defrost in like 2 weeks and then fill them? Please let me know
Oreshki freeze very well. I usually make them ahead of time, fill with cooked condensed milk and freeze until the day of the party. I just take them out an hour before serving.
Hi Olga,
What's the best way to cook condensed milk without having it explode?
I actually haven't cooked condensed milk in years:). We have dulce de leche in all the stores in our area and I use it instead. However, when I was cooking condensed milk before, I poured the condensed milk into a mason jar and cooked it in a slow cooker. Check out natashaskitchen.com for all the details.
Where to get good quality Walnut Cookie Mold in America?
I found mine on ecrater.com:
https://www.ecrater.com/p/42283357/russian-oreshki-oreshnitsa-40-cavity-walnut?keywords=oreshnitsa
It's a bit pricey, but I love that you can make 40 halves at a time and it's for in the oven, not on the stovetop.
Can you use this same recipe for an electric oreshnitsa?