
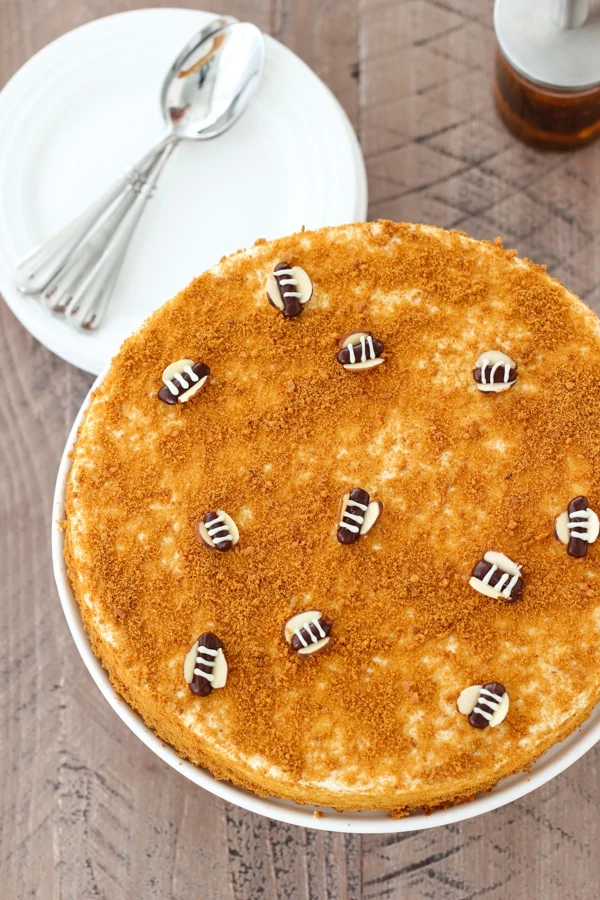
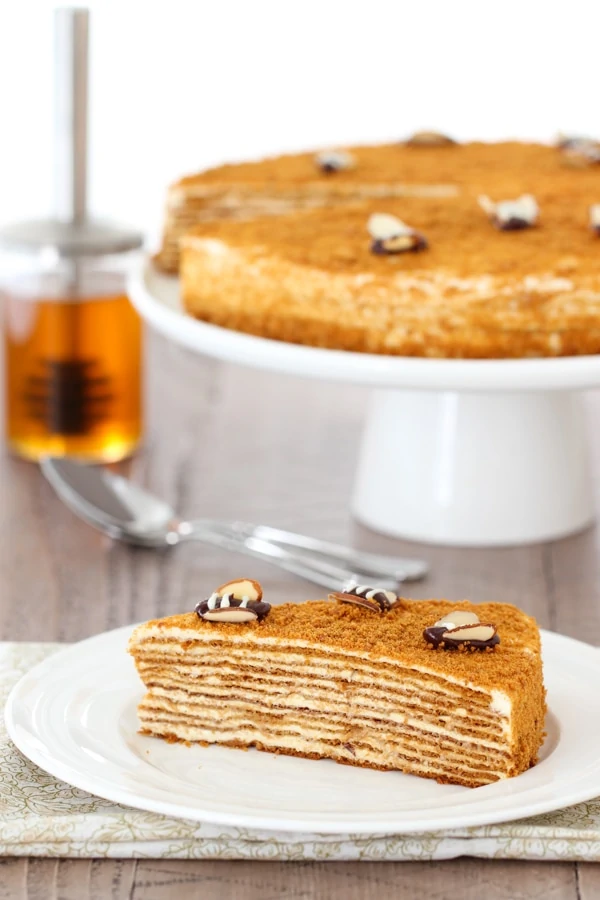
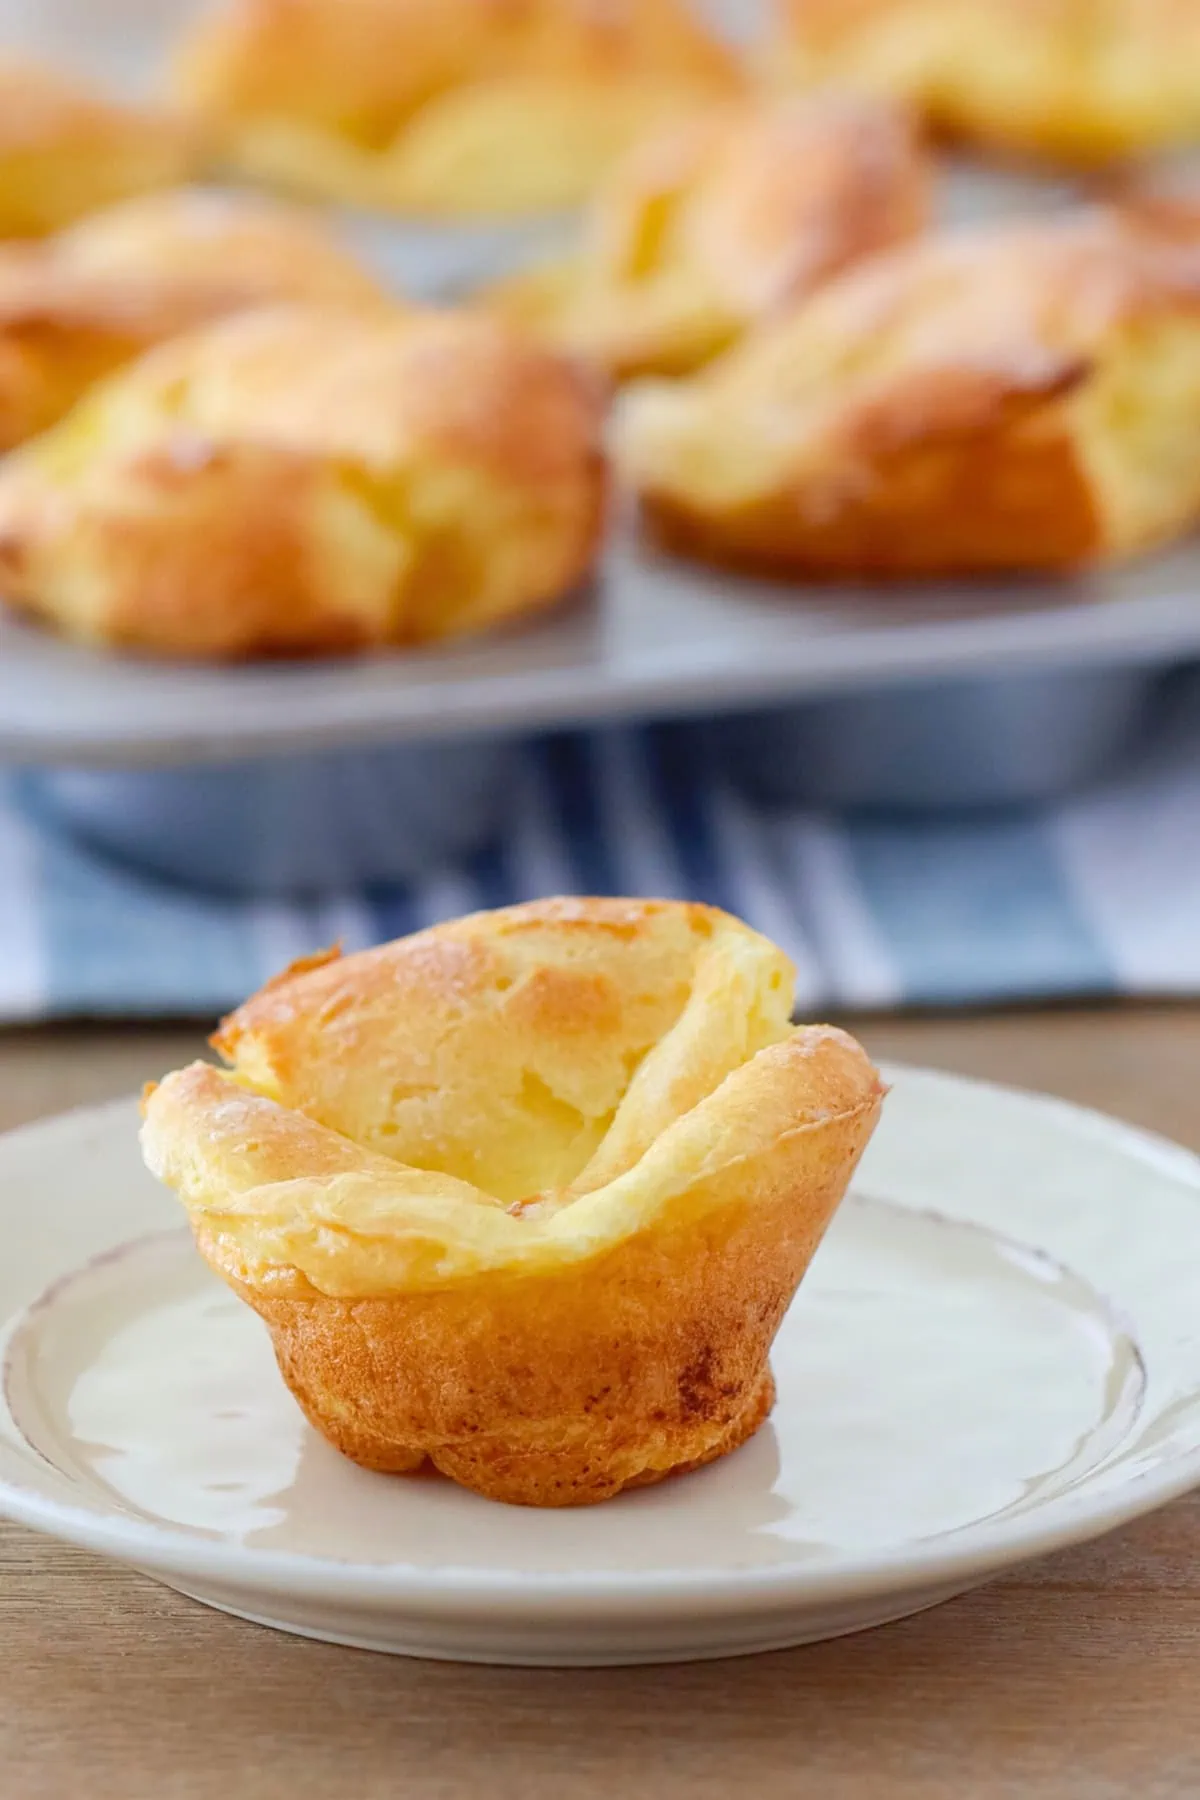
With multiple, thin honey layers and a tangy sour cream frosting, this cake is so tender it just melts in your mouth. It's a classic Russian recipe that has been loved for generations.
Medovik is, hands down, my favorite cake and is totally worth every ounce of effort that it takes to make it. My mom has been making this cake since before I was born. I loved watching her in the kitchen; I was always in awe of how she expertly made beautiful creations right before my very eyes. She made it looks so easy and effortless. As I watched her, it all seemed so magical and I couldn't wait until I made this cake myself.
I was probably about eleven or twelve when I felt confident enough to approach her and plead with her to let me have a try. Mom told me it was a really hard cake to make, really finicky and I wouldn't be able to do it. Well, she didn't forbid me from making it. The next time Mom wasn't home, I rolled up my sleeves and made this cake, from start to finish. When Mom came home, the Medovik was finished and standing proudly as if personifying my victory. (By the way, this is exactly the same thing that happened with Borsch and Napoleon Cake.) Ha ha! I was always a very determined girl:). Love you, Mom!
Instructions:
Making the Cake Layers:
Place the butter and sugar in a large nonstick pot.
If you don't have a nonstick pot, or your pot burns easily, you may wish to use a double boiler. (Just place a metal or glass bowl on top of a pot with about an inch or water in it and keep it simmering, but make sure the bottom on the bowl never touches the simmering water. Add more water if it evaporates.
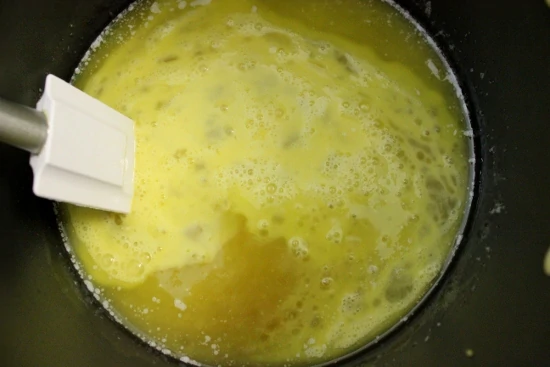
Cook it just until the butter melts but is still barely warm, NOT HOT. Take it off the heat. Add the eggs, baking soda and honey and mix to combine.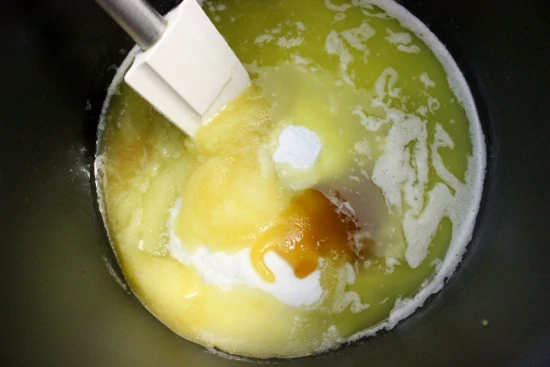
This is important, if you add the eggs to hot butter, it will scramble.
Cook the mixture on medium low heat for about 7 minutes, longer if you're using a double boiler. The batter will puff up and turn a deep caramel color. 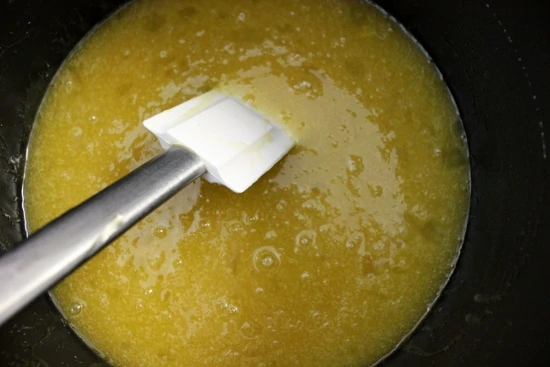
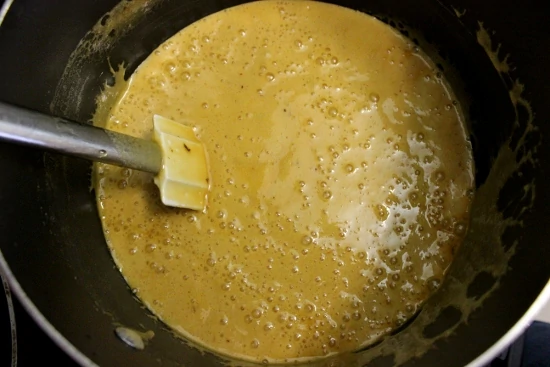 Add the flour and mix quickly with a wooden spoon.
I always add less flour than I need and add more when I'm rolling out the cake layers. If you add too much flour, it will be really hard to roll out.
Preheat the oven to 350 degrees.
On a lightly floured surface, roll out the cake layers.
Take approximately ¼ cup of batter and knead it on your work surface. If it's sticking to your hands and the counter, add more flour. Roll it out thinly into somewhat of a circle. Use the bottom of a cake pan or the bottom of a tart pan to cut around it with a paring knife to make a perfect circle. 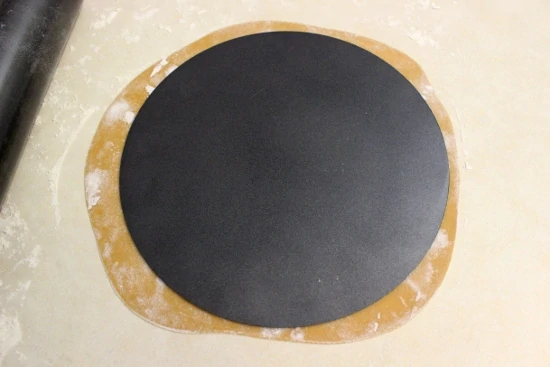
You can save all the scraps just the way you cut them and place them on a baking sheet and then bake. Later, you can crush them into crumbs and sprinkle the sides and top of the cake.
I usually just take the scraps and knead them into the batter as I roll out each new cake layer. It works great.  I use 2 (9 inch) round tart pans to bake the cake layers. If you don't have a tart pan, use a rimmed baking sheet, sprinkled with flour or lined with parchment paper.
Sprinkle the bottom of the tart pan with flour and bake the cake layers for about 4 minutes each. 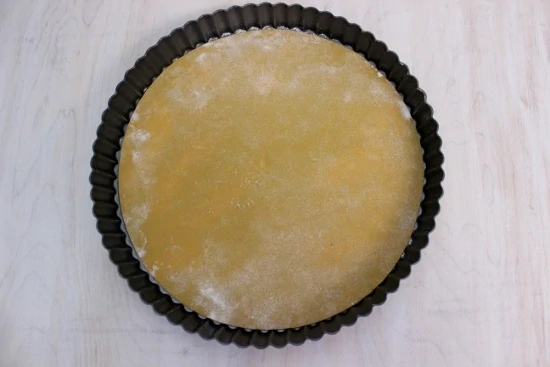
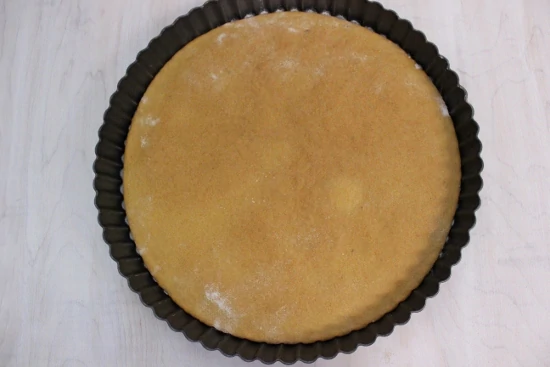 Take them off the tart pan right away. As the cake layers cool, they will become pretty hard. Work quickly; you can roll out the cake layers and set them aside, waiting to be baked.
You want to roll them all out while the batter is still warm. As the batter cools, it becomes harder and harder to roll out.
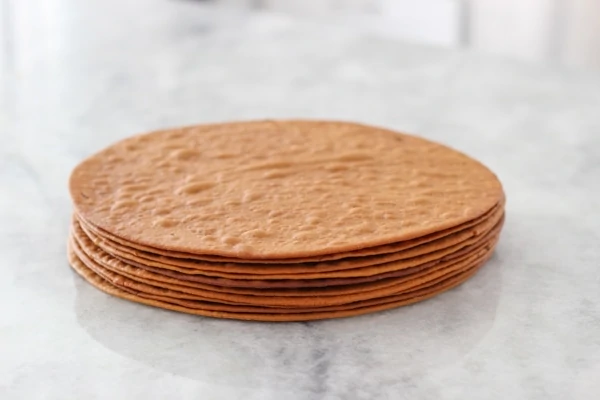
You will end up with about 10-12 layers.
 Making the Frosting:
 Making the Frosting:
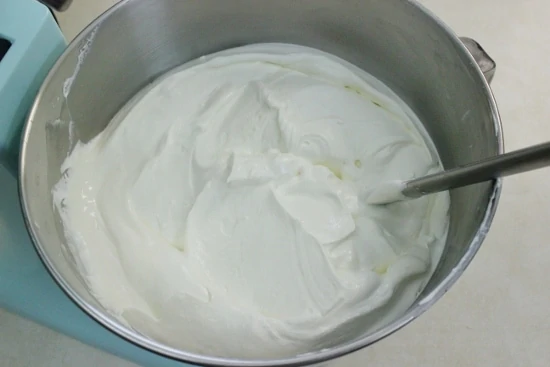
Cream the softened cream cheese and condensed milk in a standing mixer with a paddle attachment or using a hand mixer until it's well combined. 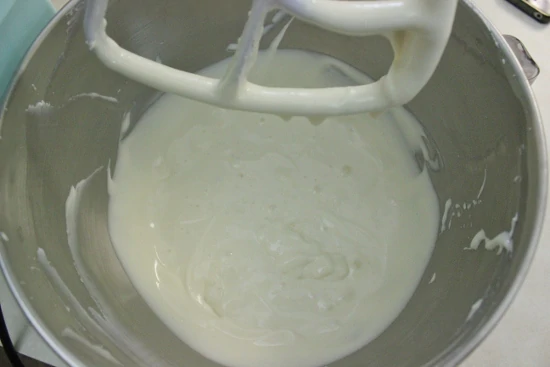 Add the sour cream and vanilla.
 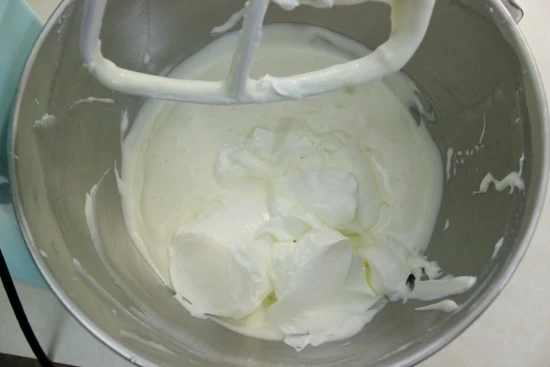 In another chilled bowl, whip the heavy cream with the powdered sugar. Gently fold it into the rest of the frosting.
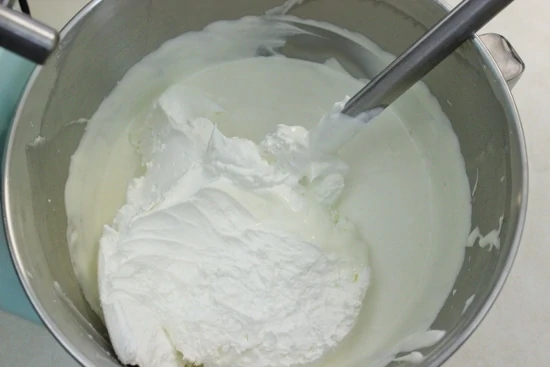
Assembling the Cake:
Dust off any excess flour from the cake layers.
Line your serving plate edges with aluminum foil. Place a dollop of frosting into the center of the plate, just to keep the cake from sliding around.
Top each cake layer with about ¼ cup of frosting and spread it around evenly. 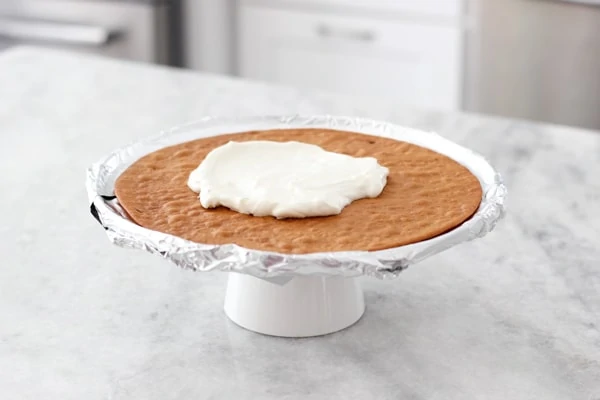
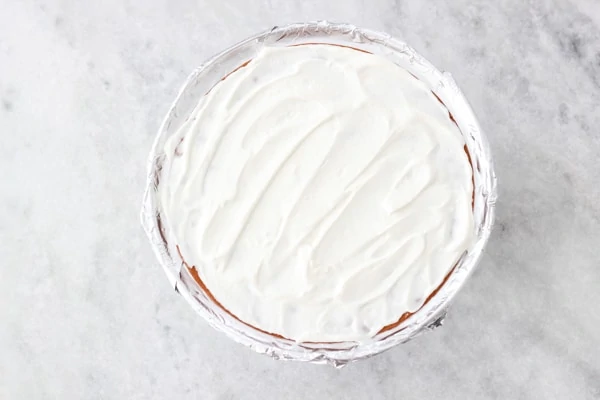 Repeat with all the cake layers. As you place the layers on top of each other, some of the frosting will ooze out of the sides.
 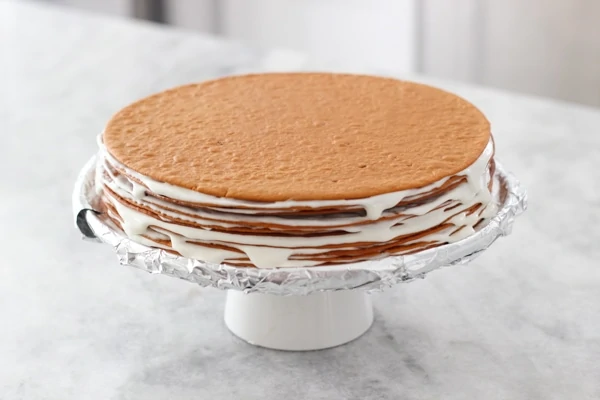 Spread it out evenly over the sides.
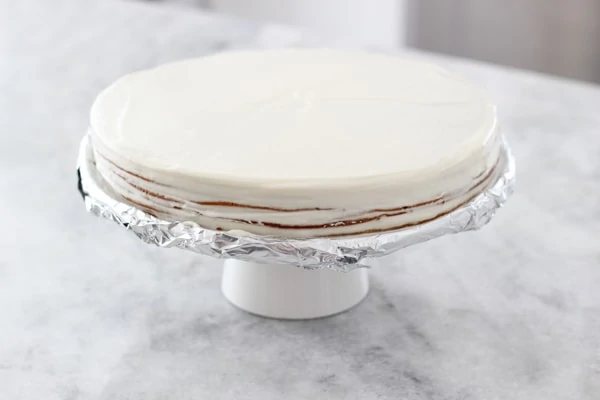
Gently remove the aluminum foil.
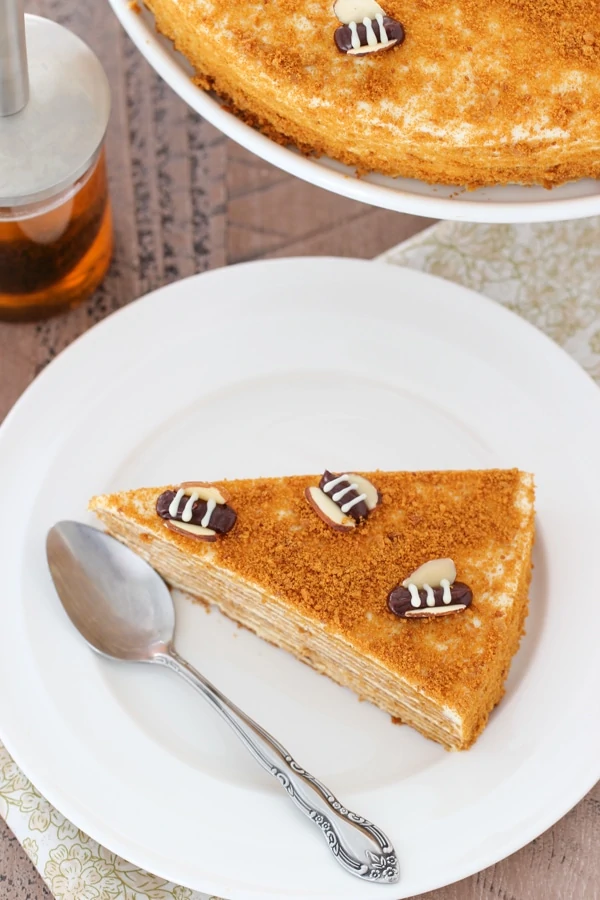
Decorate with crushed cake layer crumbs.
I also make little bees to decorate the cake. Here's the tutorial on how to make the bees.
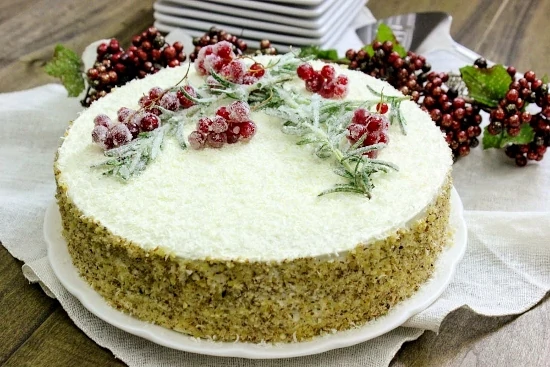
 During the winter, here's a really beautiful way to decorate the cake.
Heat 1 cup water and 1 cup sugar in a small saucepan just until the sugar dissolves. Pour it into a shallow dish. Place about ⅓ - ½ cup of sugar in another shallow dish. Dip the rosemary and the red currants in the sugar syrup and dip it in the sugar. 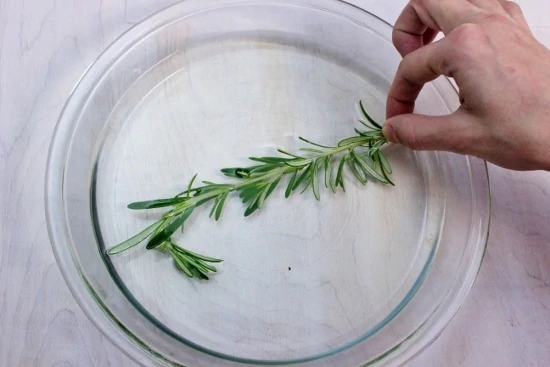
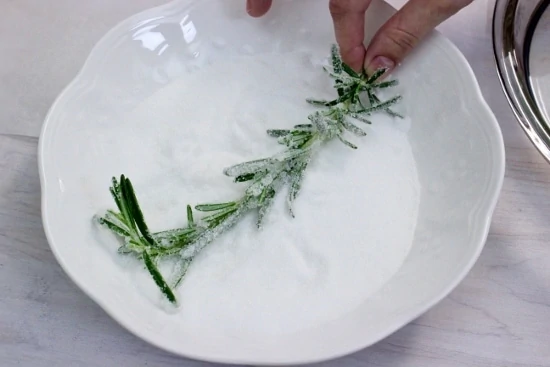
 Place on a parchment paper to dry and then place it on the cake. Now you have a beautiful winter masterpiece.
Medovik - Honey Layer Cake
With multiple, thin honey layers and a tangy sour cream frosting, this cake is so tender it just melts in your mouth. It's a classic Russian recipe that has been loved for generations.
- Prep Time: 120 minutes
- Cook Time: 60 minutes
- Total Time: 540 minutes
- Yield: 1 cake (9 inch round) 1x
- Category: Dessert
Ingredients
Cake:
- ½ cup butter
- ¾ cup sugar
- 2 eggs
- 2 teaspoons baking soda
- ¼ cup honey
- 3 ½ - 4 cups all purpose flour
Frosting:
- ½ package of cream cheese (4 oz total)
- ½ (14 oz) can sweetened condensed milk
- 16 oz sour cream
- 1 teaspoon vanilla
- 1 cup heavy cream
- 2 Tablespoons powdered sugar
Sugared rosemary and currants: (Optional)
- Fresh rosemary
- Red currants or cranberries
- 1 cup water
- 1 cup plus ½ cup sugar
Instructions
Making the cake layers:
- Place the butter and sugar in a large nonstick pot. If you don't have a nonstick pot, or your pot burns easily, you may wish to use a double boiler. (Just place a metal or glass bowl on top of a pot with about an inch or water in it and keep it simmering, but make sure the bottom on the bowl never touches the simmering water. Add more water if it evaporates.
- Cook it just until the butter melts but is still barely warm, NOT HOT.
- Take it off the heat. Add the eggs, baking soda and honey and mix to combine.
- Cook the mixture on medium low heat for about 7 minutes, longer if you're using a double boiler. The batter will almost double in size and will turn a deep caramel color. Take it off the heat.
- Add the flour and mix quickly with a wooden spoon. I always add less flour than I need and add more when I'm rolling out the cake layers. If you add too much flour, it will be really hard to roll out.
- Preheat the oven to 350 degrees.
- On a lightly floured surface, roll out the cake layers.
- Take approximately ¼ cup of batter and knead it on your work surface. If it's sticking to your hands and the counter, add more flour. Roll it out thinly into somewhat of a circle.
- Use the bottom of a cake pan or the bottom of a tart pan to cut a perfect circle. You can save all the scraps just the way you cut them and place them on a baking sheet and then bake. Later, you can crush them into crumbs and sprinkle the sides and top of the cake. I usually just take the scraps and knead them into the batter as I roll out each new cake layer.
- I use 2 (9 incround tart pans to bake the cake layers. If you don't have a tart pan, use a rimmed baking sheet., sprinkled with flour or lined with parchment paper.
- 1Sprinkle the bottom of the tart pan with flour and bake the cake layers for about 4 minutes each.
- Take them off the tart pan right away. As the cake layers cool, they will become pretty hard.
- Working quickly, repeat with the rest of the cake batter. You can roll out the cake layers and set them aside, waiting to be baked. You want to roll them all out while the batter is still warm. As the batter cools, it becomes harder and harder to roll out. You should have approximately 10-12 cake layers.
Making the frosting:
- Cream the softened cream cheese and condensed milk in a standing mixer with a paddle attachment or using a hand mixer until it's well combined.
- Add the sour cream and vanilla and mix to combine.
- In another chilled bowl, whip the heavy cream with the powdered sugar.
- Gently fold it into the rest of the frosting.
Assembling the Cake:
- Dust off any excess flour from the cake layers.
- Line your serving plate edges with aluminum foil.
- Place a dollop of frosting into the center of the plate, just to keep the cake from sliding around.
- Top each cake layer with about ¼ cup of frosting and spread it around evenly.
- Repeat with all the cake layers. As you place the layers on top of each other, some of the frosting will ooze out of the sides. Spread it out evenly over the sides.
- Grate some white chocolate on top of the cake and chopped nuts or crushed cake layer scraps over the sides of the cake.
- Gently remove the aluminum foil.
- Heat 1 cup water and 1 cup sugar in a small saucepan just until the sugar dissolves. Pour it into a shallow dish.
- Place about ⅓ - ½ cup of sugar in another shallow dish.
- Dip the rosemary and the red currants in the sugar syrup and dip it in the sugar.
- Place on a parchment paper to dry and then place it on the cake. Now you have a beautiful winter masterpiece.


Question- recipe says “½ (14 oz) can sweetened condensed milk”.. does this mean 14oz or 7oz total sweetened condensed milk required?
Hi Ruby, you need to use 7 oz of sweetened condensed milk.
My frosting came out runny. Could that happen if I over mixed it when adding sour cream?
Hi Viktoriya. Yes, sometimes that can happen. The classic and original recipe for this cake frosting is actually just sour cream, sugar and vanilla, so it is intended to be on the thinner side, not like a typical buttercream.
This is our family favorite family cake. This is the cake my now 10 year old daughter requests for every birthday! Thank you for sharing your recipe 🙂
I’m so happy to hear that your daughter loves the Medovik cake and that it’s become a birthday tradition, Inna! That’s such a sweet compliment, and it means a lot to me that you’re enjoying the recipe. Thank you for sharing this with me, and I hope you all have many more delicious birthdays ahead! 😊🎂
Delicious and very easy
Merry Christmas, Olga and family!! Please thank your mother for this recipe (thank you so very much for sharing) and for enabling you to become a very accomplished cook at the tender age of 12 (what a feat and talent you were/are). This is possibly my all time favorite cake concoction and I think your recipe is probably the best available on the internet for an English speaking audience (I looked at many posted recipes but none of the others had the finesse of caramelizing the honey/sugar/butter/egg mix to maximize the Maillard reaction for taste). I have made this a number of times, always seeking to improve my skills and the experience. Having found myself sweating profusely to achieve Medovik perfection (not quite there yet), LOL, I wanted to share tips that I have incorporated to my method that might help others. I found the most challenging aspect is getting the cake batter rolled before it cools and hardens. I was racing to roll out each layer within the 4 min time slot while baking the previous layer and this was causing me stress and splitting in my dough circles (which then require time to repair and allowed the remaining dough to cool too much despite keeping it over a pot of warm water). So I now divide my dough into 10 balls as soon as it is cool enough to handle and put the dough pot in. a warm (not hot) oven. I use a 10" tortilla press to quickly press each dough ball as thin as I can (floured parchment under and plastic bag on top) and then pop them back (still on parchment, reusing the bag for the next one) in the warm oven on a baking sheet. Then I take each one out, still warm, and finish rolling from a 6" circle to an approximate 10", adding flour to the dough and parchment as needed. I roll out the edges first as it seems to help to help reduce splitting. When they are all rolled out, I cut the circles and set aside the scraps and it is simple to transfer to a baking tray on the parchment. This cake is so deliciously worthy of making more often that any techniques to reduce the challenge is a bonus. I did achieve the 12 layer one once (without the easier method) and it nearly defeated me, LOL. I also found it harder to stack 12 layers and keep the top layers stable when frosting (possibly more unevenness in rolling so thin) so I am resting content with 10 layers for now. I use buckwheat honey which is a stronger flavor but indescribably good with this recipe and all my family/friends adore it. Blessings to you and yours and best for the New Year!
My hands down, all-time favourite cake! And finally I can make it myself! I have made a few of them already and this recipe is the winner! Thank you, Olga!!!
That's wonderful, Linda! So happy to hear that.
An excellent recipe, thank you! We made a smaller but taller 6 inch cake, so inadvertently ended up with thicker dough layers using the same 1/4 cup of dough measurement. It was still super delicious! If you have any leftovers, consider freezing plastic wrapped slices; they will taste wonderful when defrosted. This cake seems to taste best 2-3 days after assembly, so don't even think about serving it before 24hrs of it sitting in the fridge.
Hey! Is this a hard cake to make for a novice baker?
Yes, I would say this cake is for advanced bakers.
Made this cake, it was very easy to follow instructions. It did take me close to 30min to steam cook the batter. I also used 3 cups of flour and I think will need a bit less next time as the dough was getting very hard as it cooled. I pop it into microwave for 8sec to soften it up so I can roll it out. Cream came out runnier then expected and I had leftovers then I realized I made a mistake of pouring the full can of condensed milk vs half. I’m sure it will be fine. I used the extra cream for my iced coffee topping and I think I am hooked!! Like wow! I may or may not make same mistake next time;) Thank you for great recipe as always:) can’t wait to try it!
Thanks for this recipe!
My cake layers are very dry and hard after putting it in the refrigerator for a day. Would you know what is the problem?
Hi Emily,
Did you use all the frosting. Usually, if the cake layers did not soften, it's because there wasn't enough frosting used.
**Re-posting because the first time I forgot to give this recipe the stars it deserves!!**
I made this for a “Russian Night” with friends. The recipe was labor-intensive, but I followed it and got really great results.
The stovetop method was weird, but it worked! I used a makeshift double-boiler, and it probably took me 25-30 minutes of stirring and cooking to achieve the caramel color I was aiming for. I used around 3 1/2 cups of flour — the lower end of the range in this recipe. While rolling out the dough in batches, I was able to keep the remaining dough pliable by keeping it in the same double-boiler with the heat turned off.
I modified the method for rolling and baking the cookies. First, rather than using flour, I rolled out the dough between two pieces of parchment. That method worked well, and I was glad I used it because it helped me avoid adding too much flour (which might have toughened the dough). After cutting the cookies down to size, I baked them on parchment-lined baking sheets (as opposed to inside a tart/cake pan). Then, right out of the oven, I once again cut them down to size as one would do with gingerbread, reserving the trimmings. This all worked very well.
I ran into some issues with the frosting because it was *so* soupy. No disrespect to Olga — this may have been partially due to the temperature of my cream, which was not very chilled. Or maybe I didn’t fold it gently enough. However, I did think the high ratio of sweetened condensed milk could have been behind the runny consistency, as well. I did manage to get it into the cake, building the cake layers in a plastic wrap-lined springform pan. I didn’t want to even try using that soupy icing for the outer surface of the cake, so I gave it a minimal coating on the top and stuck it in the fridge overnight, inside the springform pan. This actually worked; in the morning, the icing had hardened in the cold and I was able to neatly remove the springform pan and plastic wrap lining.
I had ½ cup of cream and 4 ounces of cream cheese left, and I needed something to finish the top and sides of the cake that was less runny. I whipped the cream cheese with some vanilla, salt, and 1/3 cup powdered sugar. Then I slowly drizzled in my cream and whipped to stiff peaks. This made just the right amount of “frosting” to finish off the outside of the cake neatly, and it was much stiffer than the soupy stuff I’d used the night before.
I finished the cake off with crumbs around the sides (I had just enough from trimming the cookies), slivered almonds around the top perimeter, and little bees made of almonds, chocolate, and sunflower seeds. It looked great and was very well received. One thing I appreciated was that the cake as a whole really wasn’t too sweet, even with all that frosting. My outer layer of tangy “frosting” may have helped the balance, because it was only mildly sweetened. Perhaps I’d also used a light hand with the icing I put between the layers. In any case, it was spot-on.
For next time, I’d follow almost the exact same procedure that I did this time, with perhaps some modifications to the frosting. I’m not a big fan of sweetened condensed milk, and I’d rather avoid this recipe’s method of folding the elements together, especially since for my outer frosting I just beat it all together with good results. That said, what I did this time turned out so well that I might not touch the process. I’d love to make this for the family.
Thank you so much for sharing your experience and taking the time to write, Rosalie. I always appreciate hearing feedback. I'm so glad you enjoyed this recipe.