
One of my favorite features of the Instant Pot is the Yogurt function, allowing you to make homemade yogurt. In this video recipe, I share the traditional method of making yogurt, where you boil the milk first, then add the culture to make creamy, tangy yogurt.
Homemade yogurt is fairly simple to make and has so many health benefits. I have already shared the Cold Start Instant Pot Yogurt recipe and video, but I also wanted to share this traditional method as well. We love yogurt in our family and it's one of those things that I make regularly. Every 1-2 weeks, I make a big batch and we enjoy it in so many ways.
The Cold Start Method is by far the easiest possible way to make yogurt, but it requires ultra filtered and/or ultra pasteurized milk. If you aren't able to buy this milk or would prefer to use regular milk (any milk that you buy at the grocery store), you need to use the traditional method to make yogurt, which I will walk you through in this post.
I will also answer many frequently asked questions about making yogurt that I get asked regularly, as well as how to make yogurt without an Instant Pot. (If you're new to the Instant Pot, I also have a video and blog post for beginners that I think will be very helpful.)
Video of How to Make Instant Pot Yogurt (Traditional Method)
Ingredients For Making Homemade Yogurt
whole milk - I have used different brands of whole milk over the years of making yogurt and they have all worked. I am sharing this recipe because
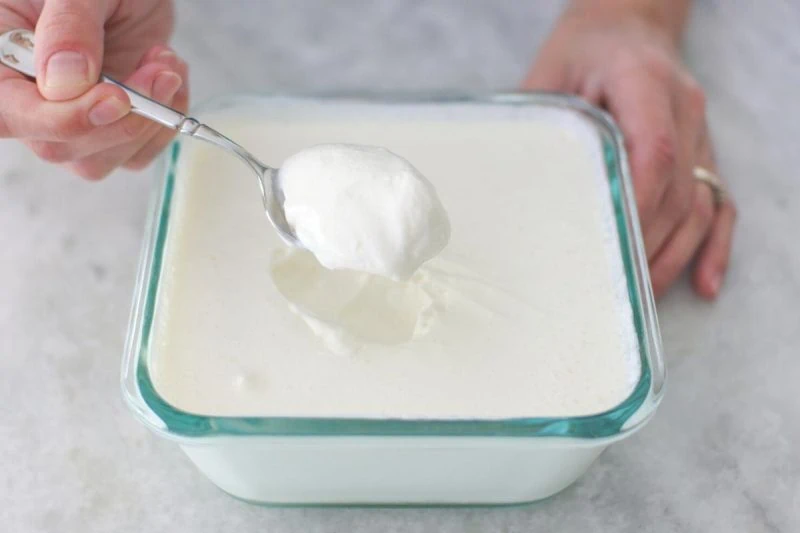
yogurt with live cultures - the easiest way to make yogurt is to use store bought yogurt with live cultures in it. I use whole milk yogurt with no weird ingredients added in, just cultured milk and live and active cultures. (See photo below) You can also buy a yogurt starter (usually a powdered substance.)

Products To Make Yogurt
This is an affiliate link to my Amazon Shop where I've conveniently linked all the products to make yogurt all in one place.
How is Yogurt Made?
I'm fascinated by food science, so I love reading all about it. I don't usually write too much about it here (just secretly devour it on my own for fun, ha ha), but in this case, I think it may help you understand how making yogurt works and answer some questions about the process.
Milk is turned into yogurt when a bacteria is introduced into the milk. This bacteria, the "live cultures" that are found in yogurt, are the good kind of bacteria that is terrific for you gut health. All the probiotics that you want in your diet.
The bacteria ferments that milk, making it thick and tart. During the "incubation time", the live cultures in the yogurt are hanging out in the warm milk (the perfect environment for bacteria to grow) and are changing the lactic sugar in the milk into lactic acid. The longer the incubation time, the more thick and tart the yogurt will be.
Heating and Cooling the Milk For Yogurt
Although this part of the process does take a long time, it's not active hands on work time. You don't have to do anything during this time, just go on with your life:). Heating and then cooling the milk gradually is an important part of the process to give you the correct texture.
Why does the milk need to be heated?
Whey proteins in the milk denature and unravel at 180F, resulting in a stronger gel. If you don't heat the milk, your yogurt may not set.
Why does the milk need to be cooled after heating?
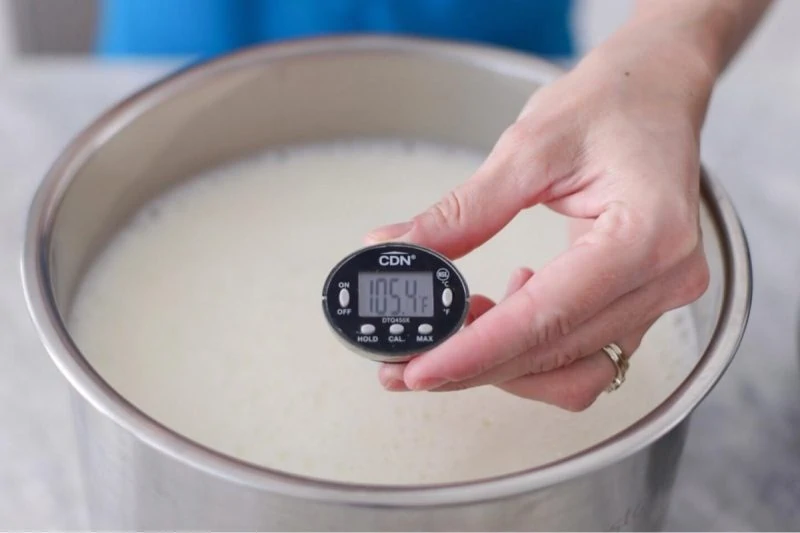
It seems kind of absurd to go to the effort to heat milk up, then have to cool it down. However, you need to get the milk to a high enough temperature to change its structure. BUT, if you add the yogurt to the milk when it's too hot, the live cultures will be killed. The yogurt won't set. The milk needs to be below 115-100 degrees Fahrenheit in order for the live cultures to still be active and start doing their job in the warm milk environment and turn the milk into thick, creamy and tangy yogurt.
Can you Use Reduced Fat or Lowfat Milk To Make Yogurt?
I have used 2 % (Reduced Fat) milk to make yogurt and it did work, however, there is a lot more whey and and it yielded LESS yogurt. The yogurt was also thinner. The fat content of the milk will make your yogurt thicker and creamier.
I have not experimented with making yogurt using dairy free milk alternatives.
How to Make Instant Pot Yogurt Recipe
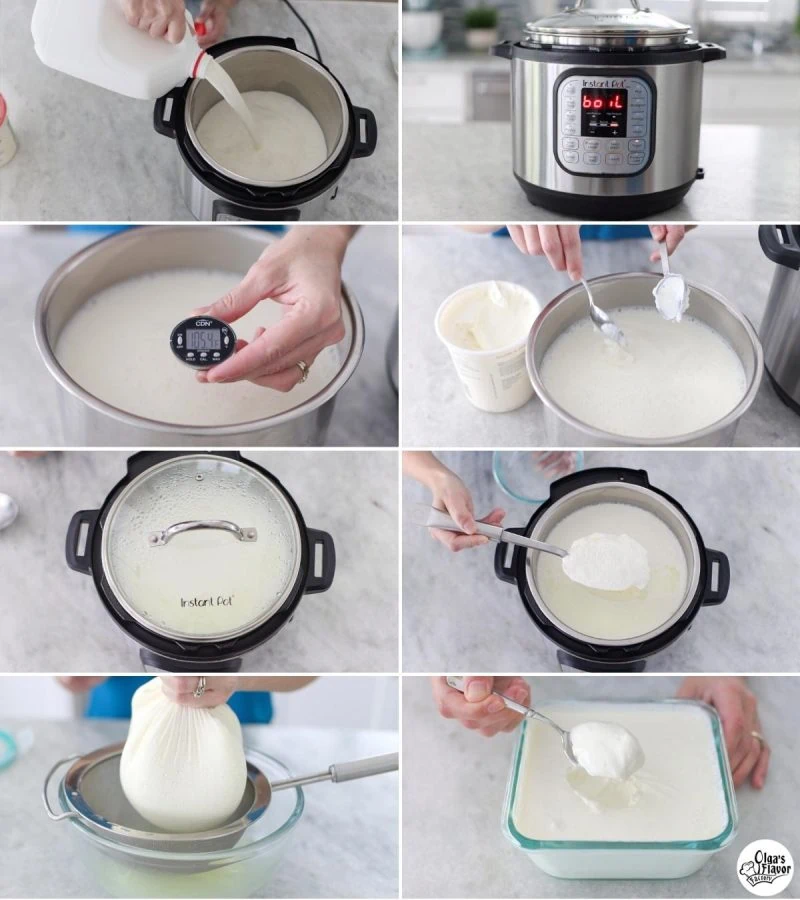
- Boil the milk. Pour the milk into the inner chamber of the Instant Pot. Press the Yogurt button until it says "Boil". Cover the Instant Pot with a lid and wait for it to slowly heat up the milk. (This usually takes about 45 minutes for a gallon of refrigerated milk.) The milk should be 180-190 degrees Fahrenheit.
- Cool the milk until it reaches 105 degrees Fahrenheit. (Anywhere from 100-110 is fine.)
- The most important part to remember is that the milk cannot be hotter than 110 degrees Fahrenheit. If the milk is too hot, it will kill the live cultures in the yogurt and the yogurt will not set.
- Add the yogurt starter or the yogurt with live cultures to the milk and whisk it in until smooth. (Remove the "skin" that forms on top of the milk as it cools.)
- Turn on the Yogurt function again, this time setting the time for a minimum of 8 hours and up to 24 hours. I usually do it overnight, about 10-12 hours. The longer the time, the more tart the yogurt will be. (The Instant Pot does not have to come to pressure for this process, so you can use a glass lid, or just set the valve to "venting".)
- For the best results, let the yogurt cool for about an hour at room temperature, or even place it in the refrigerator, removing the stainless steel pot out of the Instant Pot appliance. As the yogurt cools and rests, it will get thicker and you will have less whey.
- Store the yogurt in the refrigerator. Gently scoop it out of the Instant Pot and transfer to storage containers.
- When using this traditional method to make yogurt, I prefer to strain it. Line a fine mesh sieve with a cheesecloth and scoop out the yogurt into it. Strain out all the excess whey. (You can use the whey to make bread, crepes, add it to smoothies, etc. It's very healthy and full of probiotics.) The more you strain the yogurt, the thicker it will be.
- If your yogurt isn't as smooth as you like, you can whisk it first until it has a smoother consistency or mix it up in a blender, then it will be perfect.
- Store the yogurt in the refrigerator for 7-10 days.
Can You Make Yogurt Without An Instant Pot?
The Instant Pot makes the yogurt process so much easier, since the machine automatically heats the milk to the correct temperature and then keeps the milk at the correct temperature for however long you set the time on the Yogurt setting. But, if you don't have an Instant Pot or your Instant Pot doesn't have the yogurt setting, here's how you can make yogurt.
How to make yogurt without the yogurt button:
- Heat the milk on the stove (or the saute function on the Instant Pot). Use an instant read thermometer to make sure it reaches at least 180 degrees Fahrenheit. You can go as high as 200 degrees Fahrenheit. Heat the milk slowly and gradually so the milk doesn't scorch or boil over. The milk shouldn't come to a rapid boil.
- Cool the milk to 100-110 degrees Fahrenheit, then mix in the yogurt.
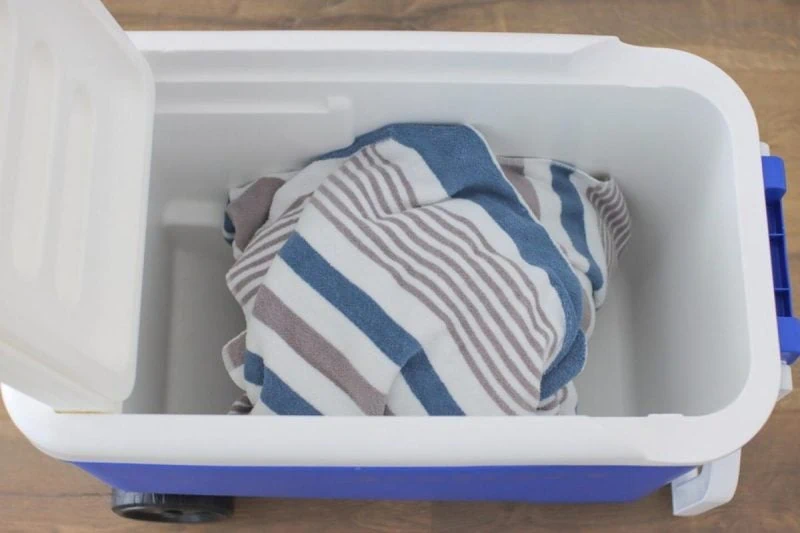
- Keep this milk+ yogurt mixture in a warm environment (around 100 degrees - not any higher) for 12+ hours until the yogurt sets. Here are several options you can use:
- Wrap the pot in a heavy blanket or towel. (If you have a heated blanket, that will work great here.) Place it in a cooler to keep it insulated and keep the heat in as long as possible. (You can transfer the milk+yogurt mixture into glass mason jars to make this part easier.)
- Keep it in a warm oven. Heat up the oven to the lowest setting, then cool until it is 100 degrees, then keep the milk+yogurt mixture in the warm oven until it sets. Keep the oven light on, since it will keep the oven warm.
How to Make Yogurt Thicker and Smoother:
To have thick and creamy yogurt you need: whole milk, a good and active starter, longer incubation time and then strain the yogurt.
Yogurt made with the traditional method usually has more whey than yogurt made using the cold start method. I usually strain it before storing it. This will remove excess whey, making the yogurt much thicker and creamier. You can strain it as long as you need to have the texture that you are looking for. I like my yogurt to have a Greek yogurt consistency.
The yogurt will also get thicker as it chills in the refrigerator.
For Smooth Yogurt: As for the smoothness of the yogurt, one trick that works wonders is to chill the yogurt before you scoop it out for storage. After the incubation time (I do this overnight), either turn it off and let it cool off at room temperature for at least an hour, or take the stainless steel pot out of the actual Instant Pot and put it in the refrigerator for at least an hour. Then gently scoop it out and transfer to storage containers.
If your yogurt isn't smooth and looks curdled, no worries! Whisk it up with a whisk until smooth, or, even better, put it in the blender and it will have an incredibly smooth and luscious texture.
PrintInstant Pot Yogurt (Traditional Method)

This recipe for homemade yogurt uses the traditional method to make yogurt in the Instant Pot using regular whole milk.
- Prep Time: 4 hours
- Cook Time: 8 hours
- Total Time: 12 hours
Ingredients
1 gallon whole milk
4 Tablespoons whole milk yogurt with live cultures
Instructions
- Boil the milk using the Yogurt function (click the button until it says "boil") on the Instant Pot. This should take about 45 minutes. The milk will reach 180-190 degrees Fahrenheit.
- Turn off the Instant Pot. Let milk stand for 10-15 minutes, then remove the inner chamber pot from the Instant Pot and let the milk cool until it reaches 100-110 degrees Fahrenheit. This will take even longer, several hours.
- When the milk has cooled, add the yogurt, whisking to combine until smooth.
- Close the lid and turn on the Yogurt Function again, this time setting it for a minimum of 8 hours and up to 24. I like to do this overnight, setting it for 10-12 hours.
- Let it cool and rest for about an hour before gently scooping the yogurt out and storing the yogurt in the refrigerator.
- For thicker yogurt, strain it through a fine mesh sieve lined with cheesecloth first, to remove excess whey.
- Store the yogurt in the refrigerator for 7-10 days.
Notes
This will make a large amount of yogurt, so you can halve the recipe if you don't need a large amount.
The incubation time will still be the same.


This was incredibly easy and amazingly delicious!! Definitely will be making this recipe often.
I’m so glad you loved it! 😊 It’s great to hear that the recipe was both easy and delicious for you. I hope it continues to be a go-to for you—there’s nothing like homemade yogurt! Thanks so much for your feedback!
Can I use less than 1 gallon of milk with the instant pot yogurt receipe?
Yes, you can halve the recipe. Use half the milk and half the yogurt, but you will still need to incubate the yogurt for the same amount of time.
Close the lid and turn on the Yogurt Function again, this time setting it for a minimum of 8 hours and up to 24.
24 hours? I've read many recipes and haven't seen anyone say to incubate for that long😮 Have you done it before? What does it taste like?
Hi Kylee,
I have never personally incubated yogurt for longer than 12 hours. I really like making yogurt overnight, starting it in the evening, then letting it incubate for 10-12 hours.
I use a starter from my previous batch each time. Is there a point that I need to “refresh” and get a new culture? Thanks for all the detailed information!
I have never counted myself, but I've read that you can reuse it at least 5 times. I have never had my yogurt not set when reusing the batch of yogurt I made, but I am not sure how many times you can use it to start new batches.
Can you still use yogurt as a starter if the ingredient label says "cultured pasteurized organic whole milk, pectin, and Vitamin D"?
I would not recommend it, Emily. If it has pectin in it, it usually is not the yogurt you want to use as a starter. Look for a yogurt that has live cultures in it, such as Lactobacillus bulgaricus and Streptococcus thermophilus.
I used a yogurt with a bit of pectin (Brown Cow Cream Top, from Vermont) and it did make a nice yogurt! If that's helpful. We struggled to find one without, and they're a really good company so risked it.
Thank you for sharing. Great recipe. You mentioned in the video you make farmers cheese in the instant pot. Can you share that recipe please? Thank you
Here's the recipe: Instant Pot Farmer's Cheese/Ricotta Recipe