
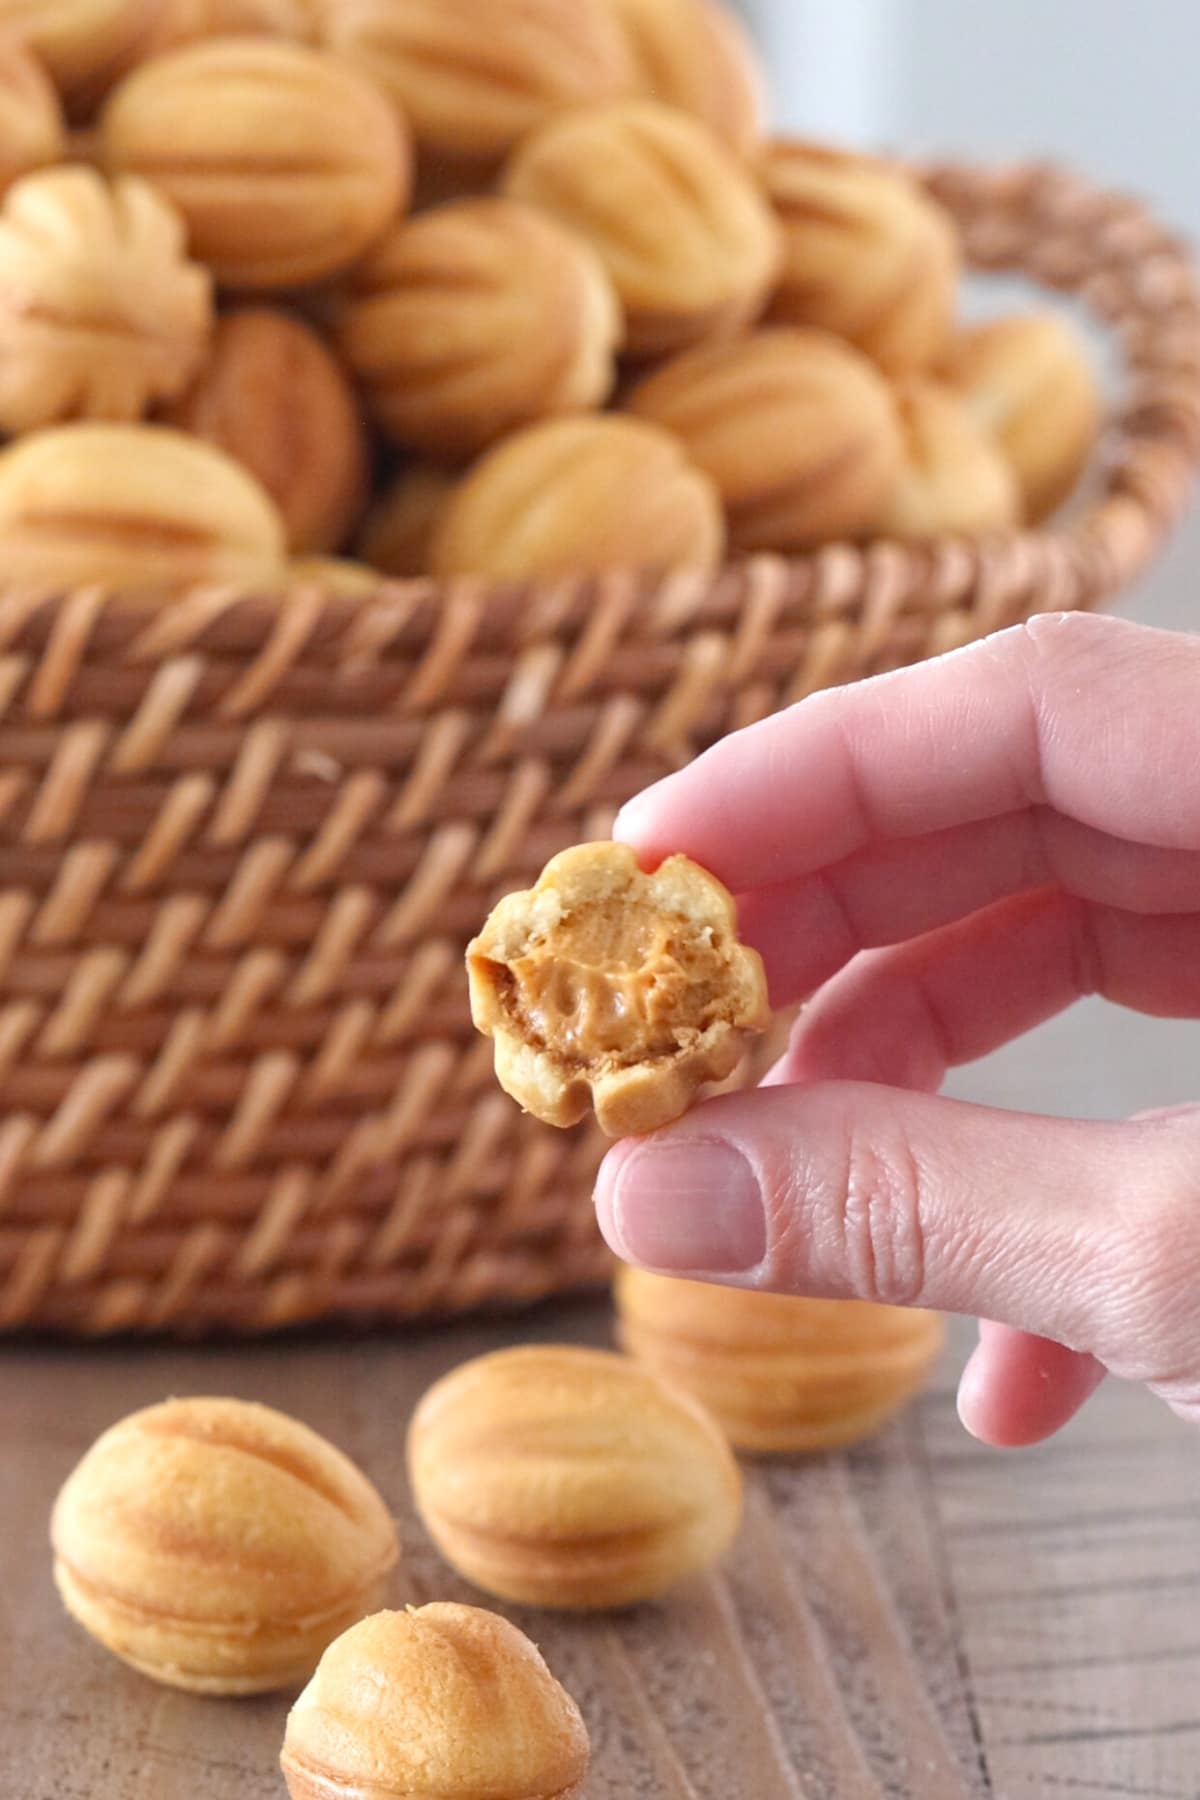
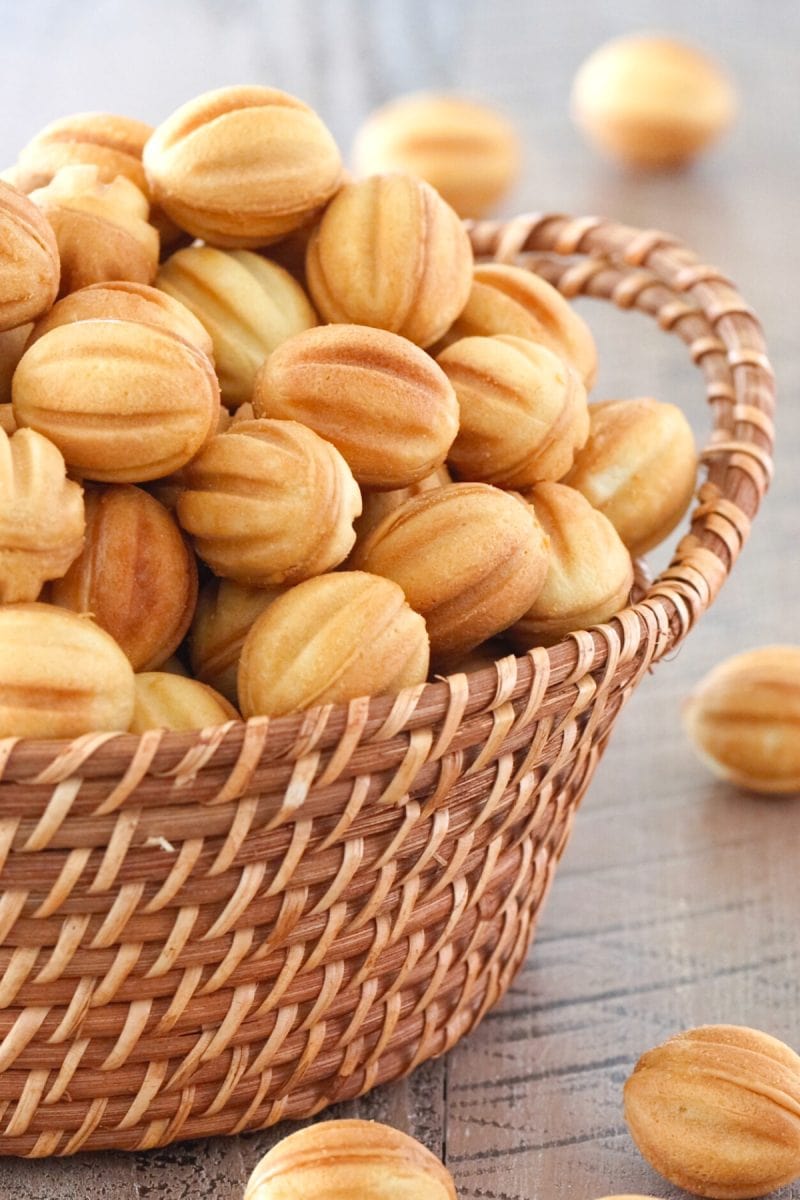
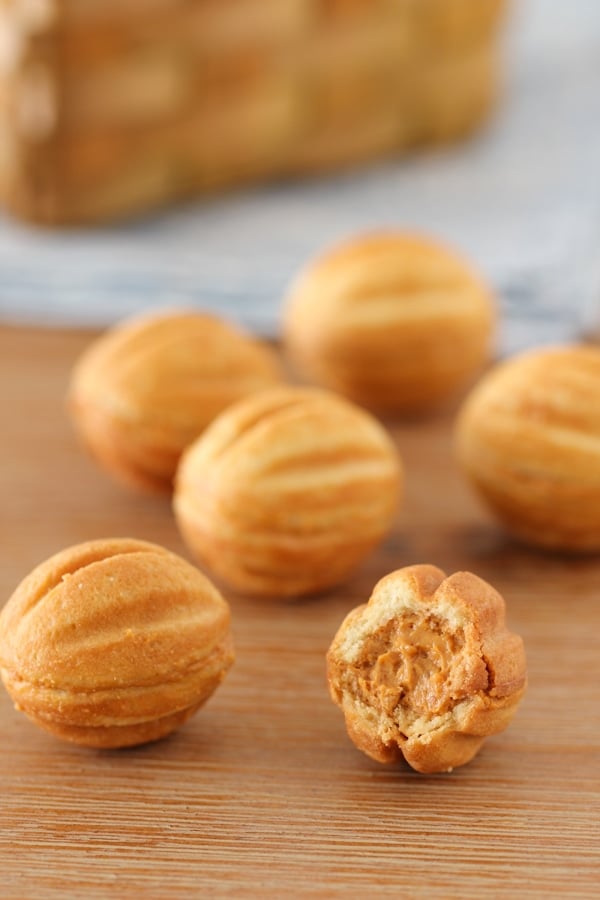
Oreshki are an iconic Soviet walnut shaped cookies, made by cooking them in a special skillet. The crisp, golden exterior of the cookies hold a very creamy, caramely filling made with dulce de leche.
Oreshki, these beautiful, walnut shaped Soviet cookies, are one of the most classic Slavic desserts. They are an iconic Russian treat, especially during holidays, weddings and other special occasions. I can remember watching my Mom making them in our small Belarusian home. I would sit at the kitchen table, keeping her company as she would spend hours making these special but very tedious desserts.
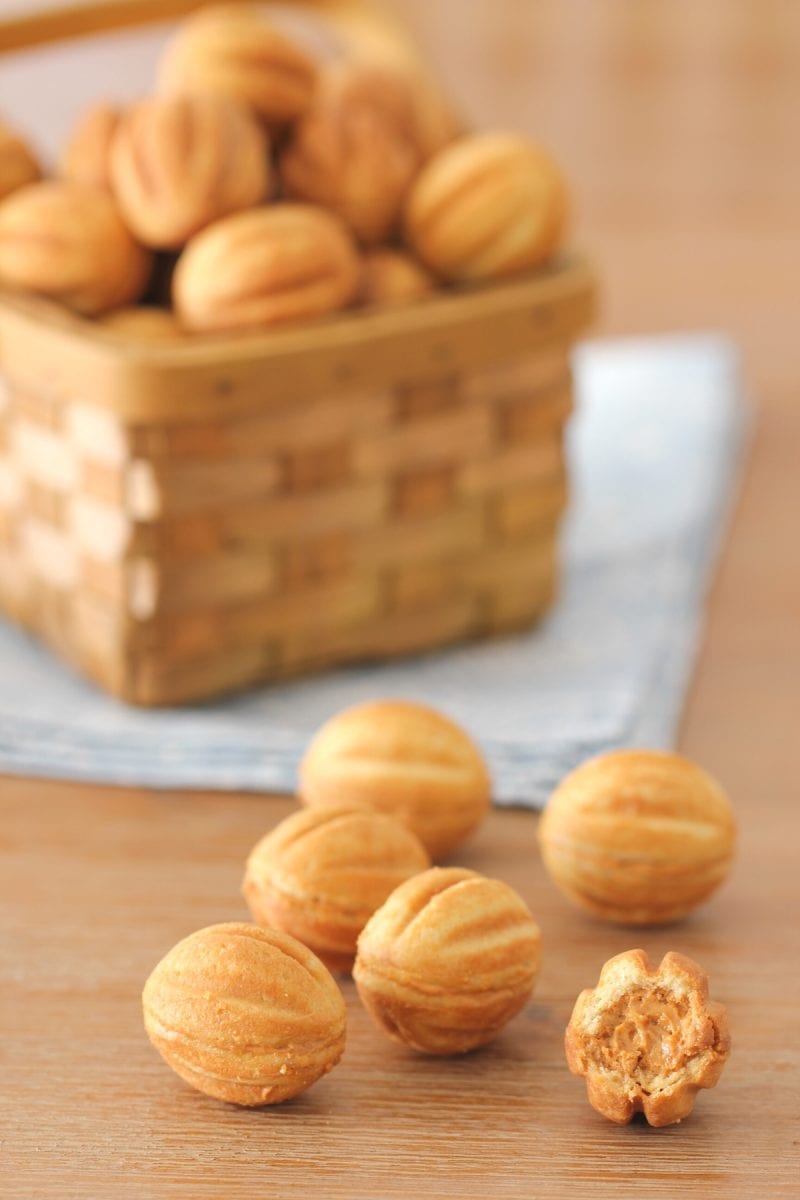
The crisp, golden exterior of the cookies hold a very creamy, dulce de leche filling. Slavic people love using cooked condensed milk in lots of desserts and in Oreshki, it is definitely the star. You can use the excess cookie crumbs or crushed nuts in the filling, for added flavor and crunch.
Oreshki are a labor or love and always the sign that this is a holiday or special occasion. They are wonderful to give as gift - so pretty and delicious. You can make them in advance and they even freeze really well.
How to make Oreshki Video
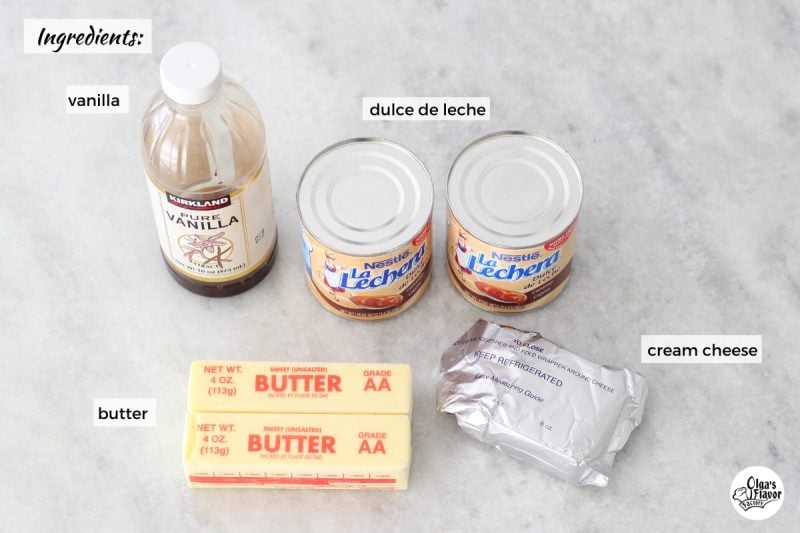
Ingredients:
(Scroll down to the bottom of the page for the Printable Recipe with measurements)
Cookies:
- eggs (large), room temperature
- granulated sugar
- melted butter
- sour cream
- mayonnaise
- this may seem like a strange ingredient for cookies, but the combination of sour cream + mayonnaise gives the cookies the iconic texture and flavor
- baking soda dissolved in vinegar
- all purpose flour

Filling:
- dulce de leche (cooked condensed milk)
- butter, softened to room temperature
- cream cheese, optional (also softened to room temperature)
- not in the original recipe, but I like the addition for more flavor and texture, but it's not necessary
- vanilla extract
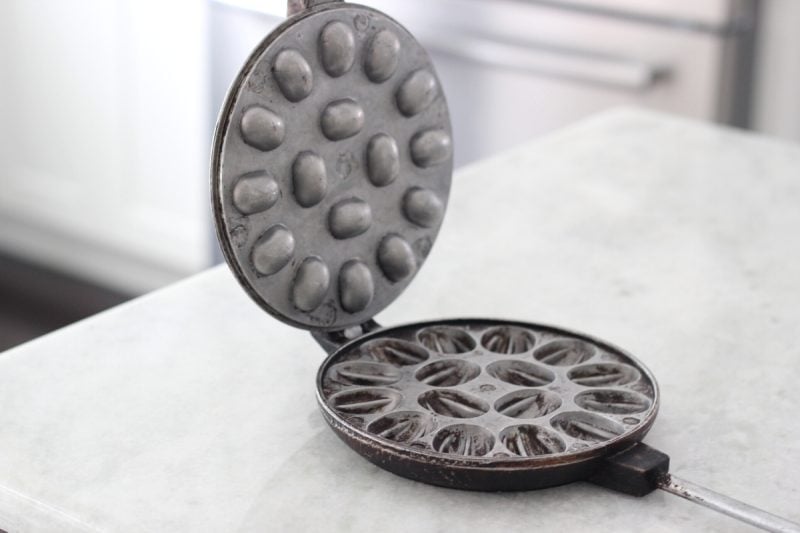
Oreshnitsa - the skillet needed to make oreshki
Oreshki require a special skillet, called the oreshnitsa, to cook them. The one I use is my mom's that she brought from Belarus and it's older than I am. It's extra special and still works just as well. There are also electric oreshki makers. I have an in depth review and comparison of both. The recipe is the same for both.
- Here's a similar design to the original Slavic version, although I haven't used it myself:
- Classic Stovetop Oreshnitsa (affiliate link)
- If you would prefer the electric oreshnitsa, here is the one I have and reviewed:
- Electric Oreshnitsa (affiliate link)
- Oreshnitsa Comparison and Review
How To Make Oreshki
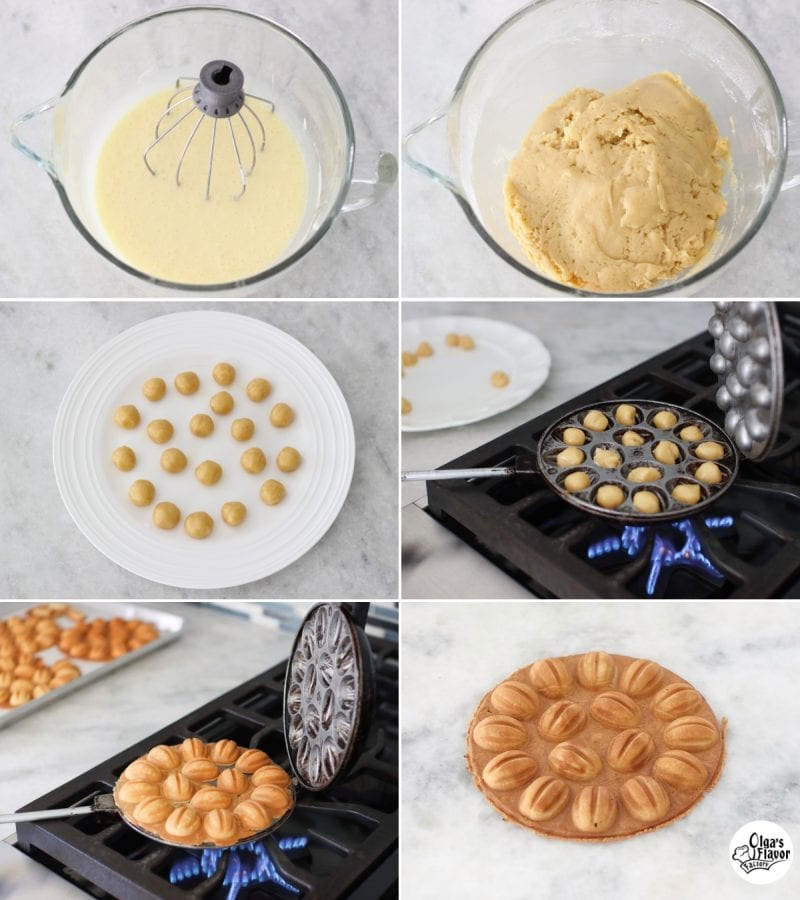
- Make the cookie dough.
- Mix the eggs with the sugar until pale yellow and fluffy, about 5 minutes. (Use a hand held mixer or a stand mixer.)
- Add the melted butter, mayonnaise, sour cream until evenly mixed.
- Next, add the baking soda dissolved in vinegar and mix again until combined.
- Lastly, Add the flour and mix, starting on low speed and gradually increasing the speed to medium, until all the flour is incorporated. The dough should be really soft but not stick to your hands. Add a few tablespoons more if it needs it, up to ¼ of a cup. However, don't add too much flour, or the cookies will be too hard. Keep in mind that the dough will get thicker the longer it stands.
- Shape little balls from the prepared cookie batter, about ½ - ¾ of a teaspoon of batter for each walnut shape. (slightly more than ½ teaspoon for the stovetop oreshnitsa and slightly less than ¾ teaspoon for the electric oreshnitsa)
- Don't make them any bigger, because the excess batter will ooze out of the skillet.
- It's very helpful to shape a lot of the cookie balls before you start cooking them.
- You may want to cover them with plastic wrap so they don't dry out.
- Heat the oreshnitsa on medium heat on the stove until hot or preheat the electric oreshnitsa.
- Cook the Oreshki.
- Quickly place a cookie ball into each of the cookie wells, close the lid and tightly hold the two ends, squeezing them as tight as you can. Immediately wipe away any leaking butter or any cookie dough that comes out from the sides, if you have any.
- Cook each side until golden on both sides, flipping the griddle over halfway through. The time really depends on the type of griddle you are using, on your stove and the heat that you use. I cooked mine for only 1 - 1 ½ minutes per side, but you might need to cook them longer, up to 3 minutes per side.
- The cookie batter will spread when you're squeezing the two sides together and that's a good thing, since it makes sure that the entire walnut shape is completely covered and you will also use all the leftover cookie scraps in the filling.
- Cook all the cookies, making sure to lay them flat while they are cooling.
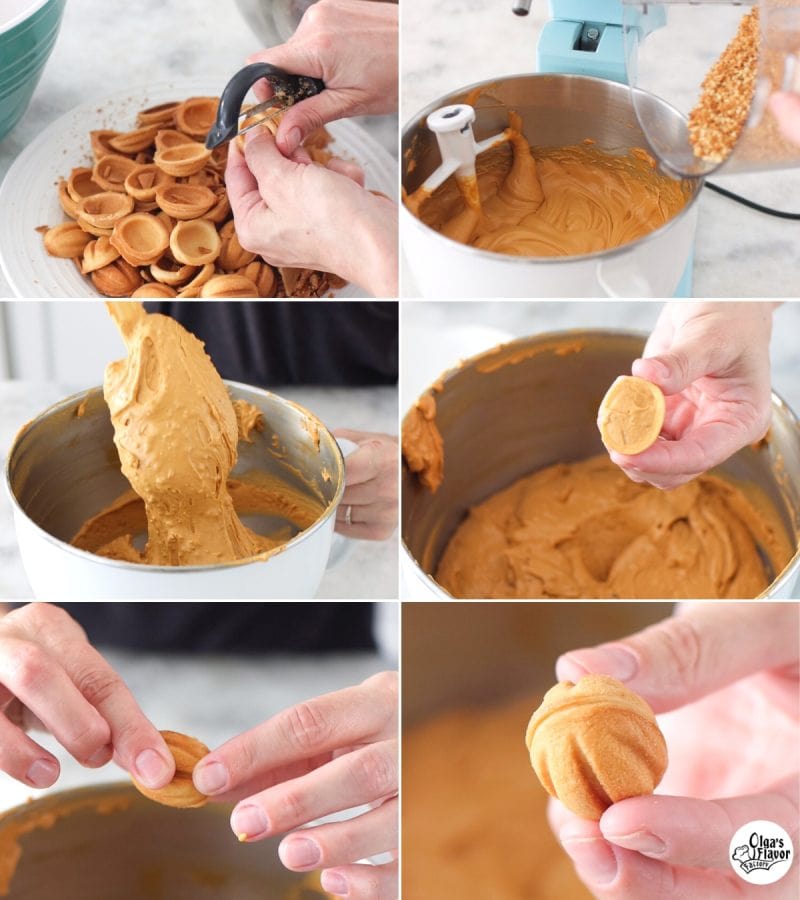
Assembling Oreshki
- Break off each of the walnut shaped cookies and remove the excess to make a neat shape. I like using a vegetable peeler to go around the edges of the cookies. Set aside all the scraps. Crush all the cookie scraps into small crumbs, using a ziplock bag and a rolling pin, or a food processor.
- Make the dulce de leche filling.
- In a large bowl, using a stand mixer or a hand held mixer, combine the dulce de leche, butter, cream cheese and vanilla extract until evenly mixed.
- Add the cookie crumbs to the filling and mix again to combine.
- Instead of the crumbs, you can use crushed nuts, but I prefer the taste and texture of the cookie crumbs.
- Fill and assemble the cookies.
- Fill the inside of two walnut shaped cookies with the filling and place two of the cookies, filling side down, toward each other, gently squeezing, and scrape off the excess filling with a small paring knife.
- Continue to fill the cookies, gently squeezing the two halves of the cookies together. You should have a total of about 120-140 oreshki. (If you measure out the dough balls perfectly and don't have any dough coming out of the skillet, you can even get up to 146 filled cookies.)
Storing the Cookies
Store the cookies in an airtight container at room temperature. You can serve them immediately, but they will stay fresh for at least 1 week. (With this recipe, they should stay crisp even at room temperature.)
- If you want the Oreshki to be as crisp as possible, store them in the refrigerator.
- You can freeze the cooked, filled and assembled Oreshki in an airtight container for up to 3 months.
Helpful Tips and Frequently Asked Questions
It is normal for some butter to leak out of the oreshnitsa. The dough contains a lot of butter and some sour cream and mayonnaise, so as the cookies start to bake, it's normal for some butter to leak out.
It's important for each of these ingredients to be there in that amount because this prevents the dough from sticking to the oreshnitsa skillet, but also to give the cookies a golden color and crisp exterior.
As soon as you add the dough and squeeze the two sides together, wipe the butter coming out of the sides and any excess dough before returning it to the stove. The most leaning butter will be in the beginning, so if you clean up the skillet right away, it will be much less messy. 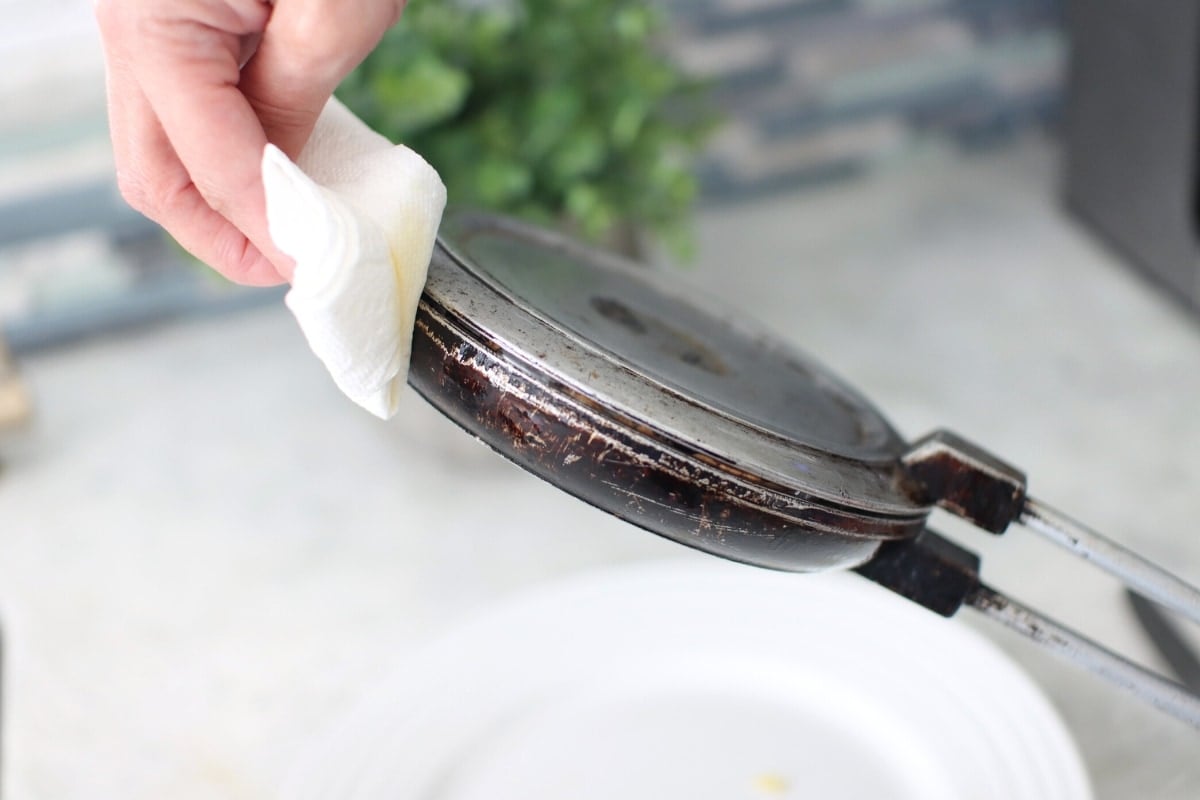
Don't overfill the pan with dough. If you measure out the cookie dough and add the perfect amount, you shouldn't have any excess dough oozing out of the sides.
For the stovetop oreshnitsa, I used slightly more than ½ teaspoon of dough per each walnut cavity and for the electric oreshnitsa, I used slightly less than ¾ teaspoon of dough.
If you do have some dough coming out, scrape it off with a butter knife.
That is why I measure out the dough precisely. It will give you the neatest shape and make sure you don't have any gaps when you fill the cookies.
I also like using the crumbs in the filling, so i want to make sure I have crumbs. Win-win!
Oreshki - Russian Walnut Shaped Cookies

Oreshki are Russian walnut shaped cookies, made by cooking them in a special skillet. The crisp, golden exterior of the cookies hold a very creamy, caramely filling made with dulce de leche.
- Prep Time: 2 hours
- Cook Time: 80 minutes
- Total Time: 3 hours 20 minutes
- Yield: 115 cookies 1x
- Category: Dessert
Ingredients
Cookies:
- 2 large eggs, room temperature
- 1 ½ cups granulated sugar
- 1 cup butter, melted and slightly cooled (16 Tablespoons)
- 3 ½ Tablespoons mayonnaise
- ½ cup sour cream
- 1 teaspoon baking soda dissolved in 1 teaspoon vinegar
- 4 - 4 ¼ cups all purpose flour (start with 4 and only add more if you need to)
Filling:
- 1 ½ (14 oz) cans dulce de leche (cooked condensed milk (21 oz total))
- 1 cup butter (or 16 Tablespoons, room temperature)
- 4 oz cream cheese (room temperature), optional
- 1 teaspoon vanilla extract
Instructions
- Make the cookie dough. In a large bowl, using a stand mixer with a whisk attachment or a hand held mixer, mix the eggs and sugar until pale yellow and fluffy, at least 5 minutes.
- Add the melted butter, mayonnaise, sour cream until evenly mixed. Add the baking soda dissolved in vinegar and mix again until combined.
- Add 4 cups of the flour and mix, (switch to a paddle attachment) starting on low speed and gradually increasing the speed to medium, until all the flour is incorporated. The dough should be really soft but not stick to your hands. Add a few tablespoons more if it needs it, up to ¼ of a cup. Keep in mind that the dough will get thicker as it stands, so don't add too much flour.
- Shape little balls from the prepared cookie batter for each walnut shape. It's very helpful to shape a lot of the cookie balls before you start cooking them. For the stovetop oreshnitsa, I use slightly more than ½ teaspoon of dough and for the electric oreshnitsa, I use slightly less than ¾ teaspoon of dough. (You may want to cover the dough balls with plastic wrap to keep them from drying out.)
- Preheat the oreshnitsa on medium heat until hot or turn on the electric oreshnitsa until it's preheated.
- Quickly place a cookie ball into each of the cookie wells, close the lid and tightly hold the two ends, squeezing them as tight as you can. Cook each side until golden on both sides, flipping the griddle over halfway through. The time really depends on the type of griddle you are using and on your stove. I cooked mine for only 1 - 1 ½ minutes per side, but you might need to cook them longer, up to 3 minutes per side.
- The cookie batter will spread when you're squeezing the two sides together and that's a good thing, since it makes sure that the entire walnut shape is completely covered and you will also use all the leftover cookie scraps in the filling. Wipe the outside of the pan right away, getting rid of any melting butter and scrape off any excess dough too.
- Cook all the cookies, laying them flat too cool off. Then, gently break off each walnut half, and use a vegetable peeler to make the sides smooth and even. Crush all the cookie scraps into small crumbs, using a ziplock bag and a rolling pin, or a food processor.
- For the filling, in a large bowl, using a stand mixer or a hand held mixer, combine the dulce de leche, butter, cream cheese and vanilla extract until evenly combined. Add the cookie crumbs to the filling and mix again to combine. Instead of the crumbs, you can use crushed nuts.
- Fill the inside of two walnut shaped cookies with the filling and place two of the cookies, filling side down, toward each other, gently squeezing, and scrape off the excess filling with a small paring knife.
- Continue to fill the cookies, gently squeezing the two halves of the cookies together. You should have a anywhere from 110-146 cookies total, filled and assembled. It depends on the oreshnitsa that you use and if you have any excess dough wasted if you overfill the oreshnitsa.
- Store the cookies in an airtight container at room temperature. You can serve them immediately, but they will stay fresh for at least 1 week. They get softer as they stand, but still remain crunchy on the outside if you use this recipe.
- To keep them as crunchy as possible, store the filled cookies in the refrigerator. You can also freeze them in an airtight container for up to 3 months.
This recipe was originally published on May 4, 2016. I have added a video to make it even more easy to follow the recipe. The recipe is still exactly the same and has been enjoyed by our family and many readers for years.

After wanting to try these for a few years, I finally purchased an oreshnitsa from Amazon and made these. So glad I did, they are wonderful and freeze well for advance holiday cookie prep. The dough recipe with mayo is perfect and makes a cookie that is crisp but not hard. I made 3 different fillings this year, one the traditional dulce de leche, one with walnut butter and chocolate (used filling from https://www.countryliving.com/food-drinks/a45573796/chocolate-walnut-sandwich-cookies-recipe/ ) and one a simple chocolate ganache. They were all exceedingly well received on the family holiday cookie plates. Thank you so much for the inspiration!
Hi Randi,
Thank you so much for sharing your experience! I’m so glad you finally got your oreshnitsa and that the cookies turned out wonderful! It sounds like you got really creative with the fillings—yum! I bet the walnut butter and chocolate combo was a hit, and I love that you made a variety of flavors. I’m thrilled to hear the cookies were well-received on the holiday cookie plates. Thank you for trusting my recipe, and I’m so happy it helped inspire your baking.
Wishing you many more delicious cookie baking adventures!
I'm just wondering why you also add too much butter to the fillings of Oreshki?
Hi Olga, I have acorn molds that you bake in the oven. Do you think this recipe would work for these molds?
Hi! I haven't tried this recipe with acorn molds before, but I think it could be a fun experiment! It’s definitely worth a try, and I'd love to hear how it turns out if you give it a go.
I made these cookies for Thanksgiving and they came out delicious. It is very time consuming but so worth it.
The best recipe. Thank you so much.
I made this recipe yesterday, and they turned out so good!! Nostalgic treats from my childhood... Thanks, Olga, for sharing all the tips, they were super helpful!
It was my first time making oreshki and this recipe was perfect!!
I'm curious why do you use mayonnaise and sour cream to make the cookie batter?
I use mayo and sour cream because this is a recipe that has been in my family since before I was born and is a family favorite. I did not come up with this recipe, but I do know that both mayonnaise and sour cream add more richness and texture to the cookies and add their own unique flavor additions.
I have tried other recipes without the mayo and I prefer the taste and texture of the cookies that have the mayo and sour cream in the batter.
That makes sense and good to know. Thank you and I love your recipes.