
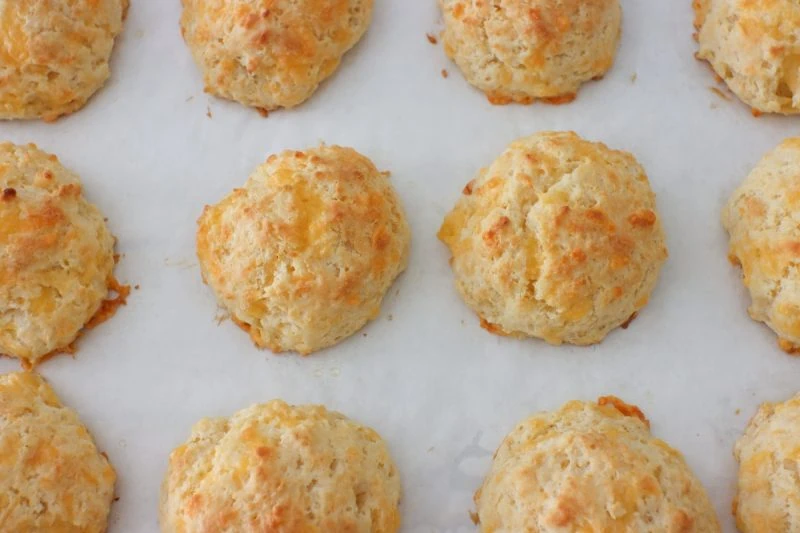
Homemade Cheddar Biscuits, with their irresistibly cheesy and tender texture, are a delightful treat that are surprisingly simple to prepare.

There's nothing quite like the mouthwatering aroma of freshly-baked cheddar biscuits wafting through the kitchen. These irresistible little treats are the perfect combination of flaky, buttery goodness and rich, creamy cheddar cheese.
From all the different types of foods that are available, bread is one of the best examples of simplicity. There is a reason that the smell of homemade bread makes any home inviting and why so many restaurants serve bread as the start of the meal, as an introduction to something great. Biscuits are one of the quickest breads to prepare. The buttery, tender and flaky morsels are so satisfying.
Even though Cheddar Biscuits are SO easy to make, but you can't mess with it too much. The issues that most cooks run into when making biscuits is that they don't know when to leave well enough alone. The secret to flaky and tender biscuits is to have little bits of cold butter distributed throughout the dough that will melt and puff up the biscuits when they bake at a high temperature. If you melt the butter with your warm hands or well-intentioned kneading when mixing up the batter, what you end up with are no flakes, no tenderness, just hard, dense biscuits.
Another reason why this recipe is one of the best, is because it's a drop biscuit recipe, meaning you don't have to roll it out. You just mix up the batter, then scoop it out with a portion scoop and place it on the baking sheet. Biscuits are not only great to enjoy on their own, you can make sandwiches with them with deli or try chicken salad. I especially love them as breakfast sandwiches. Top a biscuit with a poached egg and it makes your breakfast so much more indulgent and satisfying.
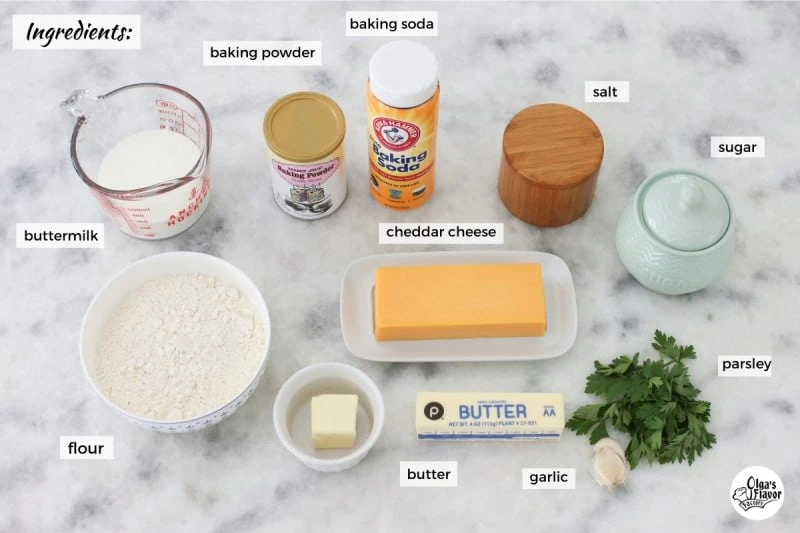
Ingredients:
The complete list of ingredients and their exact measurements can be found in the recipe card below.
- all-purpose flour
- baking powder
- baking soda
- sugar
- salt
- cheddar cheese
- You can use other cheese that you like instead of the Cheddar OR in addition to the cheddar, such as Parmesan, Monterey Jack, Colby, etc.
- buttermilk (cold)
- instead of the buttermilk, you can also use kefir
- butter
- garlic
- parsley
Video of Cheddar Drop Biscuits
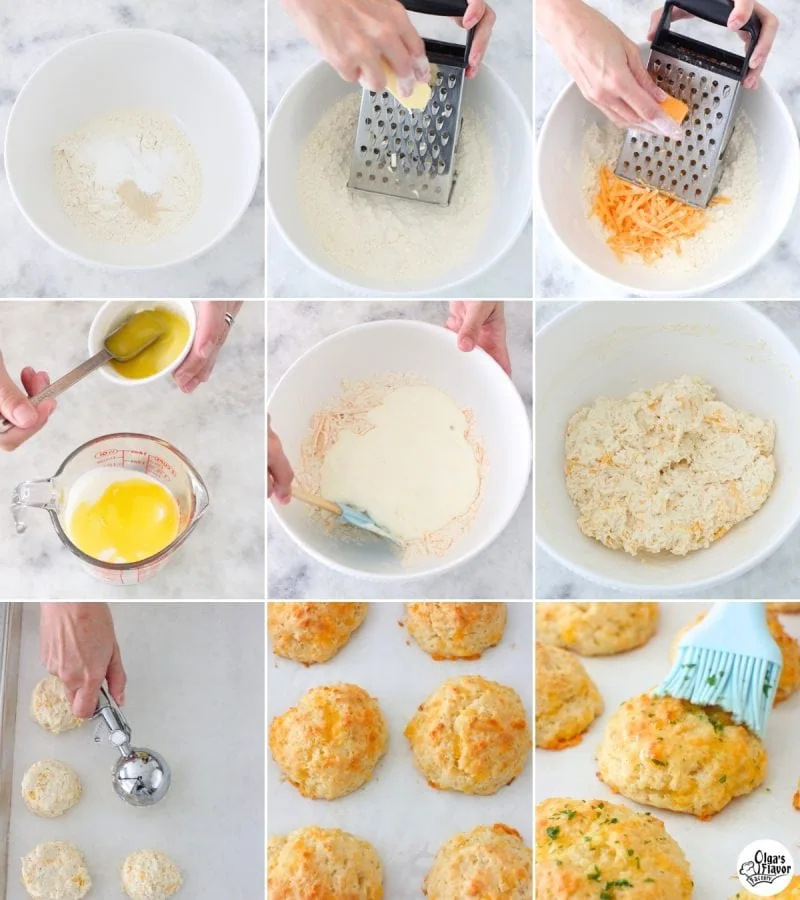
How to Make Cheddar Biscuits
- Preheat the oven to 475 degrees. Line a rimmed baking sheet with parchment paper.
- Mix the dry ingredients in a large bowl.
- Whisk the flour, baking powder, baking soda, sugar and salt in a large bowl until all the ingredients are evenly mixed.
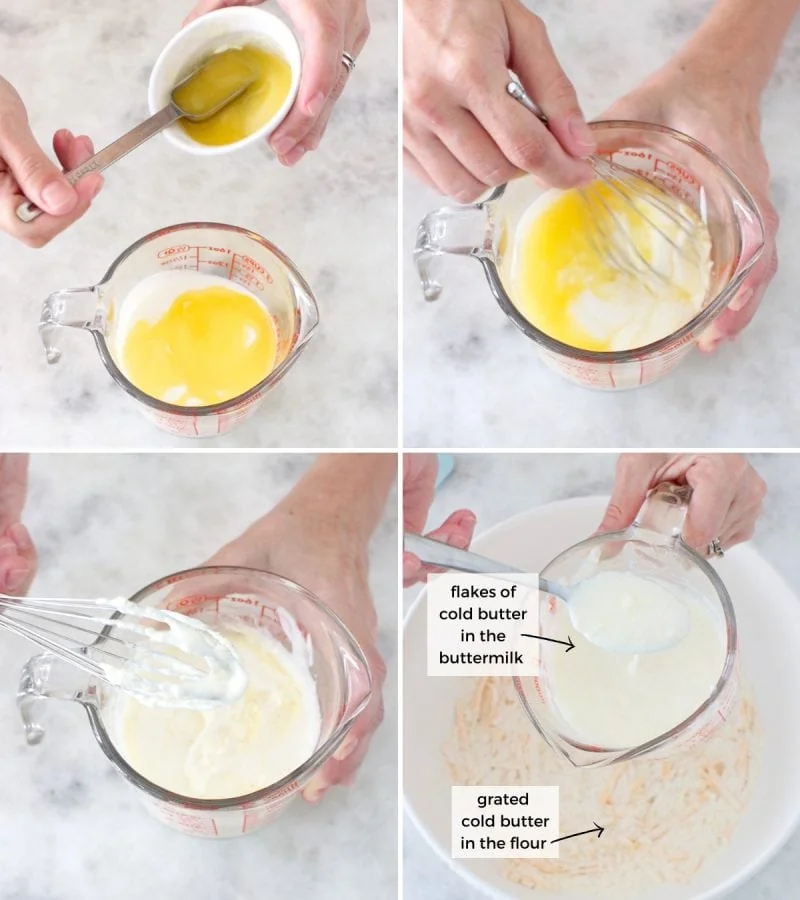
- Next, prepare the butter and liquid ingredients.
- Melt 6 Tablespoons of butter and cool slightly.
- Add 4 Tablespoons of butter to the cold buttermilk, mixing to combine.
- Grate the remaining 4 Tablespoons of cold butter and then the cheddar cheese right into the dry ingredients, mixing, to coat them in the flour.
- Add the liquid ingredients to the dry ingredients.
- Make a well in the center of the dry ingredients. Pour in the buttermilk mixture and mix the batter quickly and gently, just until the batter is moistened and comes together.
- If there are streaks of flour still in the batter that is ok. That's it. Leave it alone. Don't over mix the batter.
- Scoop out the dough and place onto the prepared baking sheet.
- You can use a portion scoop or a ¼ cup measuring cup to scoop out the biscuit dough.
- If you're using a measuring cup, spray it first with oil so the batter comes out easier.
- Bake the biscuits in the preheated oven for 12-14 minutes.
- Meanwhile, make the garlic parsley topping.
- Crush or mince the garlic and add it to the remaining 2 Tablespoons of melted butter. Add the parsley. Mix to combine.
- When the biscuits are baked, brush the biscuits with the garlic parsley butter.
- I try to leave the minced garlic in the bottom of the ramekin of melted butter; I like the subtle flavor it gives the biscuits, but I don't like raw garlic on top of the biscuits. It's completely up to your preference.
How to Store and Reheat Biscuits
Store the biscuits at room temperature, covered, for 1-2 days. For longer storage, keep them in the refrigerator.
If you have any biscuits leftover, you can reheat them in the oven, the microwave or the toaster and they will taste just as fresh as the day you baked them.
You can even freeze biscuits for up to 3 months.
Helpful Tips and Frequently Asked Questions
If the butter is too warm, the biscuits will not be as tender and flaky, they will spread out more when baking and will be more dense.
When you pour the melted butter into the cold buttermilk, the butter will begin to look curdled. This will give you little clumps of butter that will be mixed in throughout the biscuit batter. This is such a cool trick to having easy, foolproof tender and flaky biscuits. The small clumps of butter will melt as the biscuits bake at a high temperature, creating little pockets in the biscuits.
Add some chopped up ham or bacon to the biscuit batter. SO yummy!
Instead of the cheddar cheese, you can use so many other cheeses, such as Swiss, Gruyere, Jarlsberg, Monterey Jack, Colby Jack, etc.
You can also use other herbs, such as chives, thyme or rosemary.
Yes, they freeze very well. Place them in an airtight container, a freezer ziptop bag or vacuum sealed package and freeze for up to 3 months.
Thaw and reheat, if you'd like.
What to Serve With Cheddar Biscuits
Any soup would be amazing served with biscuits. Here are a few of my favorites:
Make the biscuits into sandwiches. Cut them in half, add some ham and cheese, and it's so yummy. Smoked salmon sandwiches are so good too.
We love making breakfast sandwiches with biscuits.
- English Muffin Breakfast Sandwiches (use biscuits instead of the English Muffins)
- Poached Egg Breakfast Sandwich

Cheddar Biscuits

- Prep Time: 20 mins
- Cook Time: 12 mins
- Total Time: 32 mins
- Yield: 12 biscuits
- Category: Miscellaneous
Ingredients
- 2 cups all-purpose flour
- 2 teaspoons baking powder
- ½ teaspoon baking soda
- 1 teaspoon sugar
- ¾ teaspoon table salt
- 10 Tablespoons butter total (6 Tablespoons melted and 4 Tablespoons cold and grated)
- 4 oz. cheddar cheese, grated
- 1 cup buttermilk or kefir (cold)
- 1-2 garlic clove, smashed or minced
- 1 Tablespoon fresh parsley, minced
Instructions
- Preheat the oven to 475 degrees. Line a rimmed baking sheet with parchment paper.
- Whisk the flour, baking powder, baking soda, sugar and salt in a large bowl until all the ingredients are evenly mixed.
- Melt 6 Tablespoons of butter. Set aside to cool.
- Meanwhile, grate the cold butter (4 Tablespoons) and the cheese into the flour mixture, mixing together to coat the butter and cheese in the flour.
- Add 4 Tablespoons of butter to the cold buttermilk. Mix to combine. The butter will congeal and you'll have flakes of cold butter in the buttermilk AND the flour.
- Set aside the remaining 2 Tablespoons of butter, adding the garlic and parsley to it. This will be used to brush on the biscuits when they are baked.
- Make a well in the center of the dry ingredients. Pour in the buttermilk mixture and mix the batter quickly and gently, just until the batter is moistened and comes together. If there are some streaks of flour still in the batter that is ok. Don't over mix the batter.
- Now use a portion scoop or spray a ¼ cup measuring cup with oil and use it to scoop up and portion out the batter. The biscuits will slide right out onto the prepared baking sheet.
- Bake the biscuits in the preheated oven for 12-14 minutes.
- When the biscuits are baked, brush the biscuits with the garlic-parsley butter.


What kind of cheddar cheese did you use Sharp, medium, or mild? Thank you!
I've used all variations, Jessica:). I've been making these biscuits for more than a decade, so I've used all the types of cheddar cheese and even use other types of cheeses too - Colby Jack, Monterey Jack, Gruyere, Jarlsberg, etc. They all work great. It's really a matter of taste preference.
These are fantastic and a were a big hit with homemade Chicken and Rice soup. I got several complements from EVERYONE at the table. I chose to leave out the sugar and they really hit the spot!
I’m so glad to hear the cheddar biscuits were a hit with your Chicken and Rice soup! 😊 It’s awesome that they got so many compliments. Thanks for sharing your experience, and I’m thrilled they hit the spot for everyone!
These biscuits were out of this world delicious!! I made them to serve with your salmon and potato soup and they were both terrific. My husband said to keep this recipe for SURE! Thanks so much for the awesome recipes!
We love your soups too. I am intrigued to try to home made Kefir- thanks for the suggestion.
That's wonderful, Roberta! I'm so glad you enjoyed the biscuits.
Thank you for taking the time to write.
Thank you, Olga. My husband said that they're better than in Red lobster and I agree with him
That's great, Lana. So awesome to hear:).
Hi Olga , has something happened to your Facebook account? I was used to watching you there and it’s been a lot of weird stuff for what seems like months. Are you going to be coming back to Facebook anytime soon? I love all your cooking videos. So was wondering.
Hi Anna,
My FB page was hacked more than a month ago. I have submitted every possible form multiple times as well as written many emails to FB and have not been able to get through to anyone, or at least have gotten any response. It's out of my control at this point.
I will continue posting my cooking videos on Youtube, so you can still see them there. Olga's Flavor Factory Youtube Channel
These are the best! I make them year after year for Thanksgiving 🥰
Hi Olga! I was wondering if I can substitute with kefir instead buttermilk?
I haven't tried it myself, but I think it would work.
I’ve tried it since I didn’t had buttermilk and it worked well! Thank you for sharing!!!
Olga, I’m gluten free unfortunately. Could I substitute gluten free 1 to 1 flour for the regular flour. I hope so. Thank you Carole Gibki
I have never tested it with gluten free flour, so I am not sure how will it will or will not work. If you try it, I'd love to hear your experience.
Thank you so much for this recipe! I tried it for the first time today and it came out great!!My family absolutely loved them!!! I’m glad I read all the comments and the idea of ore making and freezing them is wonderful, since I wouldn’t know what to do with the rest of butter milk!
Thank you!!
Hi Olga,
I was wondering can you make the mixture the night before and stick in the fridge and bake in the morning?
I wouldn't recommend it. You can always heat up the biscuits for a few minutes in the oven or in the microwave after they are baked. Since there is baking soda in the batter, it will start reacting as soon as you add it to the batter. The texture of the biscuits will not be as tender and fluffy as they should be.
I made these for my family dinner last night- AMAZING!! I always seem to have a hard time with biscuits but these were fail proof.
Thank you!!
-Alena
I'm so happy you enjoyed the biscuits, Alena. Thanks for taking the time to write.
Hi Laleh,
When I am baking from the freezer I am lowering tempruter to 375. Otherwise bottom overbrowning. But that is my oven.
I've been looking for a recipe for years to match up Red Lobsters.... I tell ya! This is much better than... oh well!
Hey Marina, freezing/baking a few at a time is a great idea. I will try that.
And... thank you Olga!
That's great, Laleh! Glad you enjoyed them.
100% foolproof !
I made them few times by now. For personal preference I added more salt , cheese and onion powder. More garlic to the wash. I can't keep my boys and husband away from them:)
Right now I am pre making them, freezing and baking when I need , few at the time. Only lowering the oven tempruture .
Thank you Olga!
Yay! Comments like yours always give me such a warm and fuzzy feeling inside:).
Thanks for taking the time to write. It means a lot to me, Marina.
Thank you sooo much for posting this recipe, Olya!! I first mixed up just half of all the ingredients since I wasn't sure how well these will turn out and if my picky husband will eat them but they turned out great!! So as soon as he ate one and said it was good I immediately mixed up another half, lol 🙂 ...Even my 18 months old son had a few bites!!! Thanks so much again for the great work you do on this blog, may God bless you!
These were so delicious! The garlic and parsly was a nice touch. My kids even ate these. Thanks for the recipe!
That's great, Olga G! I think so too:).