Olga's Flavor Factory

  • Home
  • About
  • Recipe Index
  • Ebook
  • Olga's Tips
menu icon
go to homepage
  • Home
  • About
  • Recipe Index
  • Ebook
  • Olga's Tips
  • olgasflavorfactory@gmail.com
  • //instagram.com/olgasflavorfactory
  • Pinterest
  • YouTube
search icon
Homepage link
  • Home
  • About
  • Recipe Index
  • Ebook
  • Olga's Tips
  • olgasflavorfactory@gmail.com
  • //instagram.com/olgasflavorfactory
  • Pinterest
  • YouTube
×
Home » Recipes

Easy Pickled Red Onions

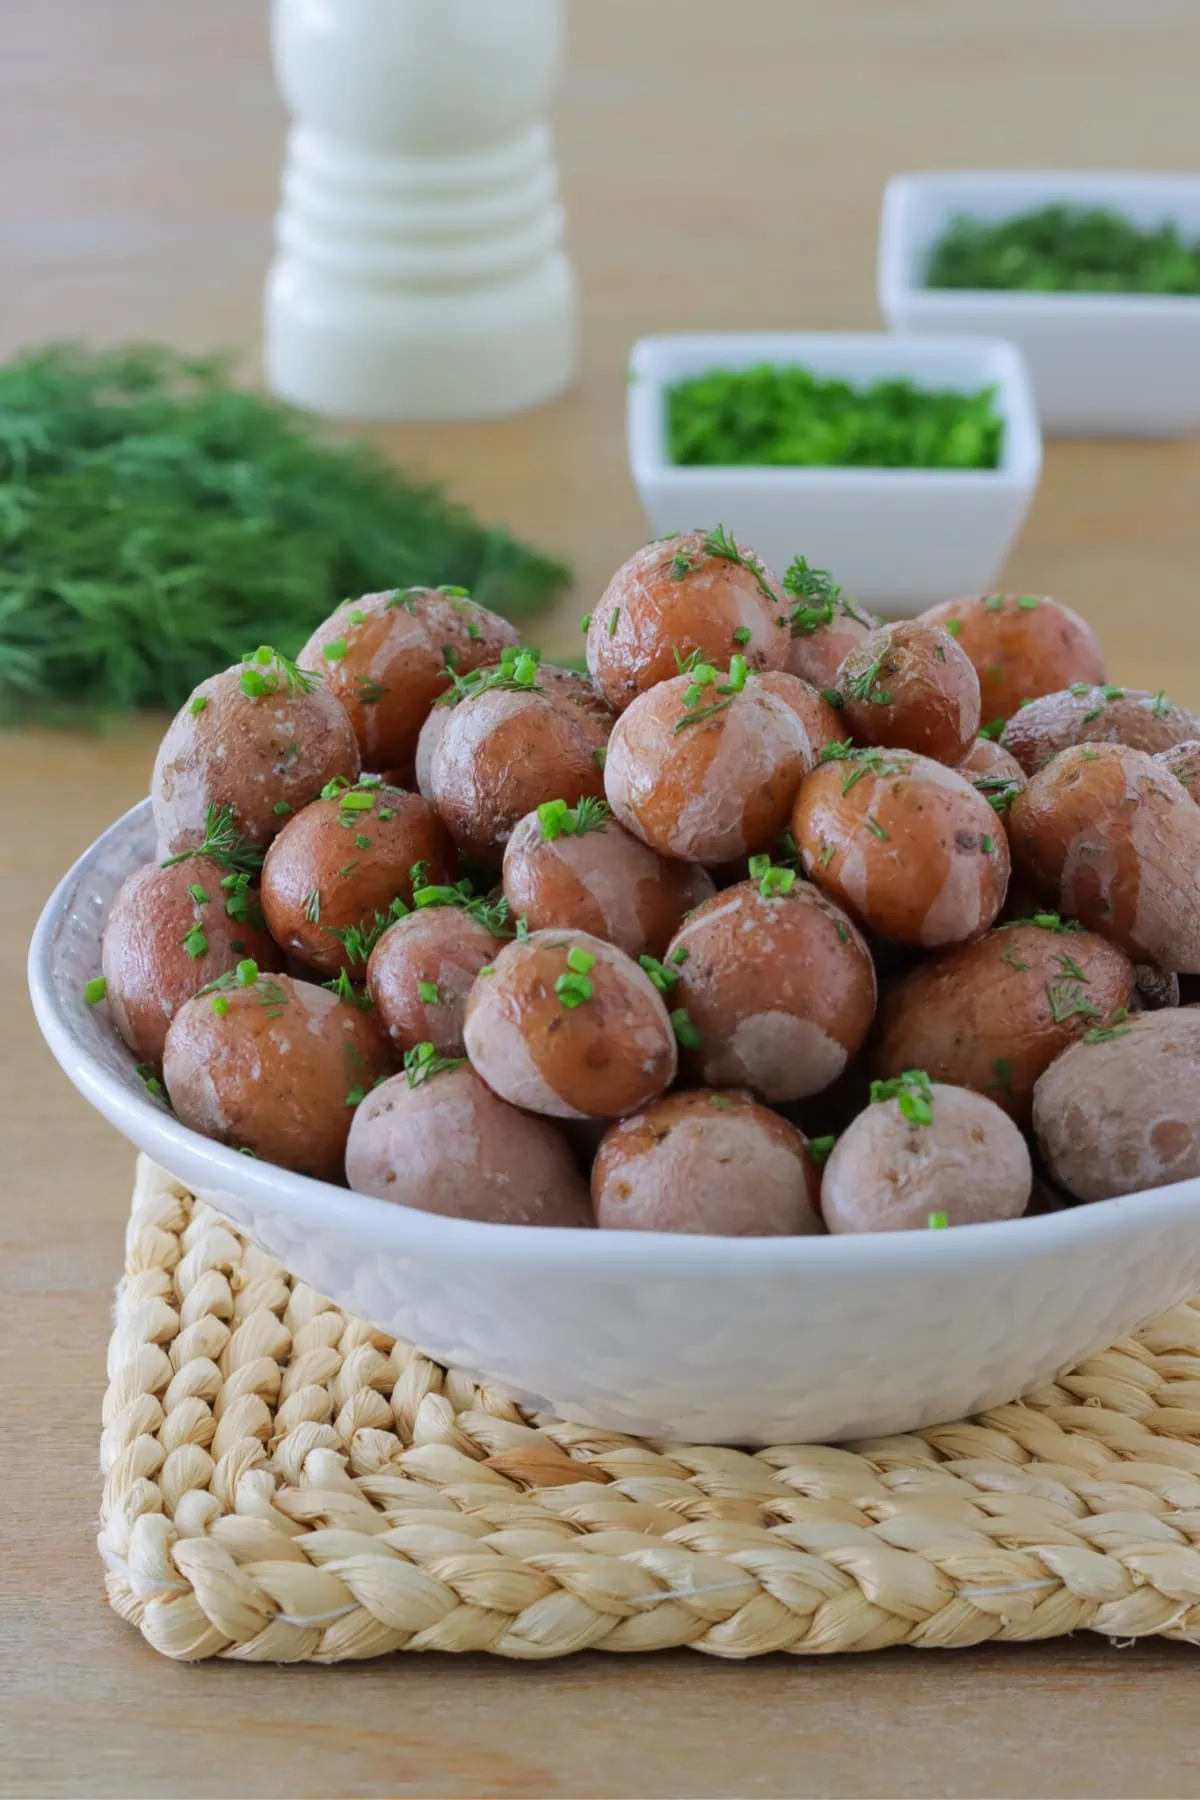
Looking to add a pop of flavor to your cooking? You won’t believe how much these Easy Pickled Red Onions can elevate your meals. Add them to everything from avocado toast, Caprese Burrata Salad, Cod Fish Tacos and Chicken Burrito Bowls.

Easy pickled red onions in a glass mason jar.

Pickled red onions are a staple in our fridge—and for good reason. They’re quick, simple to make, and absolutely delicious. If you’ve ever loved onions but found their raw bite a bit too sharp, pickling them is the perfect solution. Even people who can't stand raw onions end up loving these! It takes just five minutes to prep these vibrant, tangy onions, and the results are nothing short of irresistible. From Loaded Nachos and Beef Fajitas to Tomato Avocado Salad and even Easy Tuna Salad sandwiches, these pickled red onions add a burst of flavor to almost anything. Once you try these, you'll be reaching for them all week to add them to your meals.

[feast_advanced_jump_to]

Why You'll Love This Recipe

  • Quick & Easy to Make: Just five minutes to prep. Super easy and no complicated steps required.
  • No Raw Onion Bite: The pickling process softens the sharpness and bite of the onion, leaving a sweet, tangy flavor that’s perfect for even onion skeptics.
  • Versatile & Flavorful: Great on everything from tacos to salads, sandwiches, and even avocado toast.
  • Meal Prep Friendly: Prepare in advance and store in the fridge for at least a week—always ready to add extra flavor to your meals.

Ingredients

Ingredients for easy pickled red onions on a marble counter.
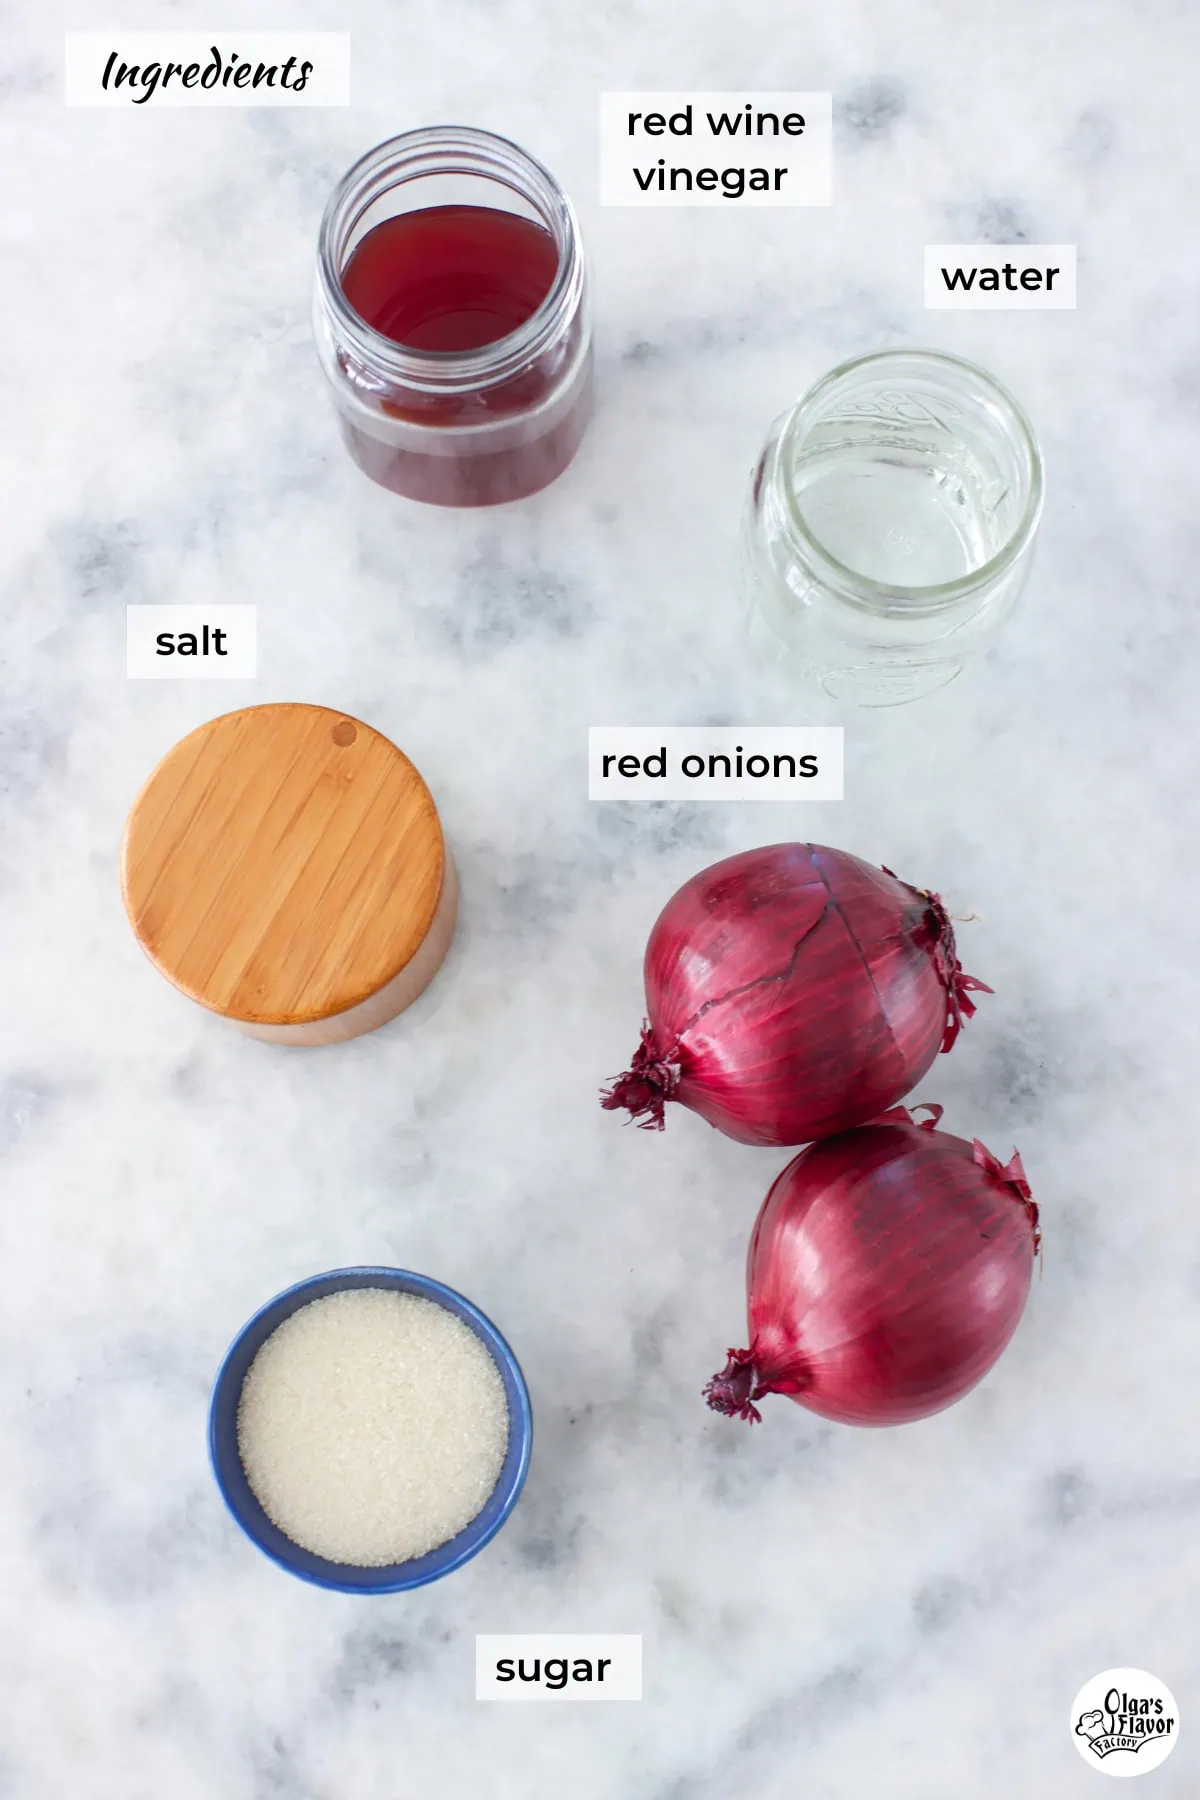
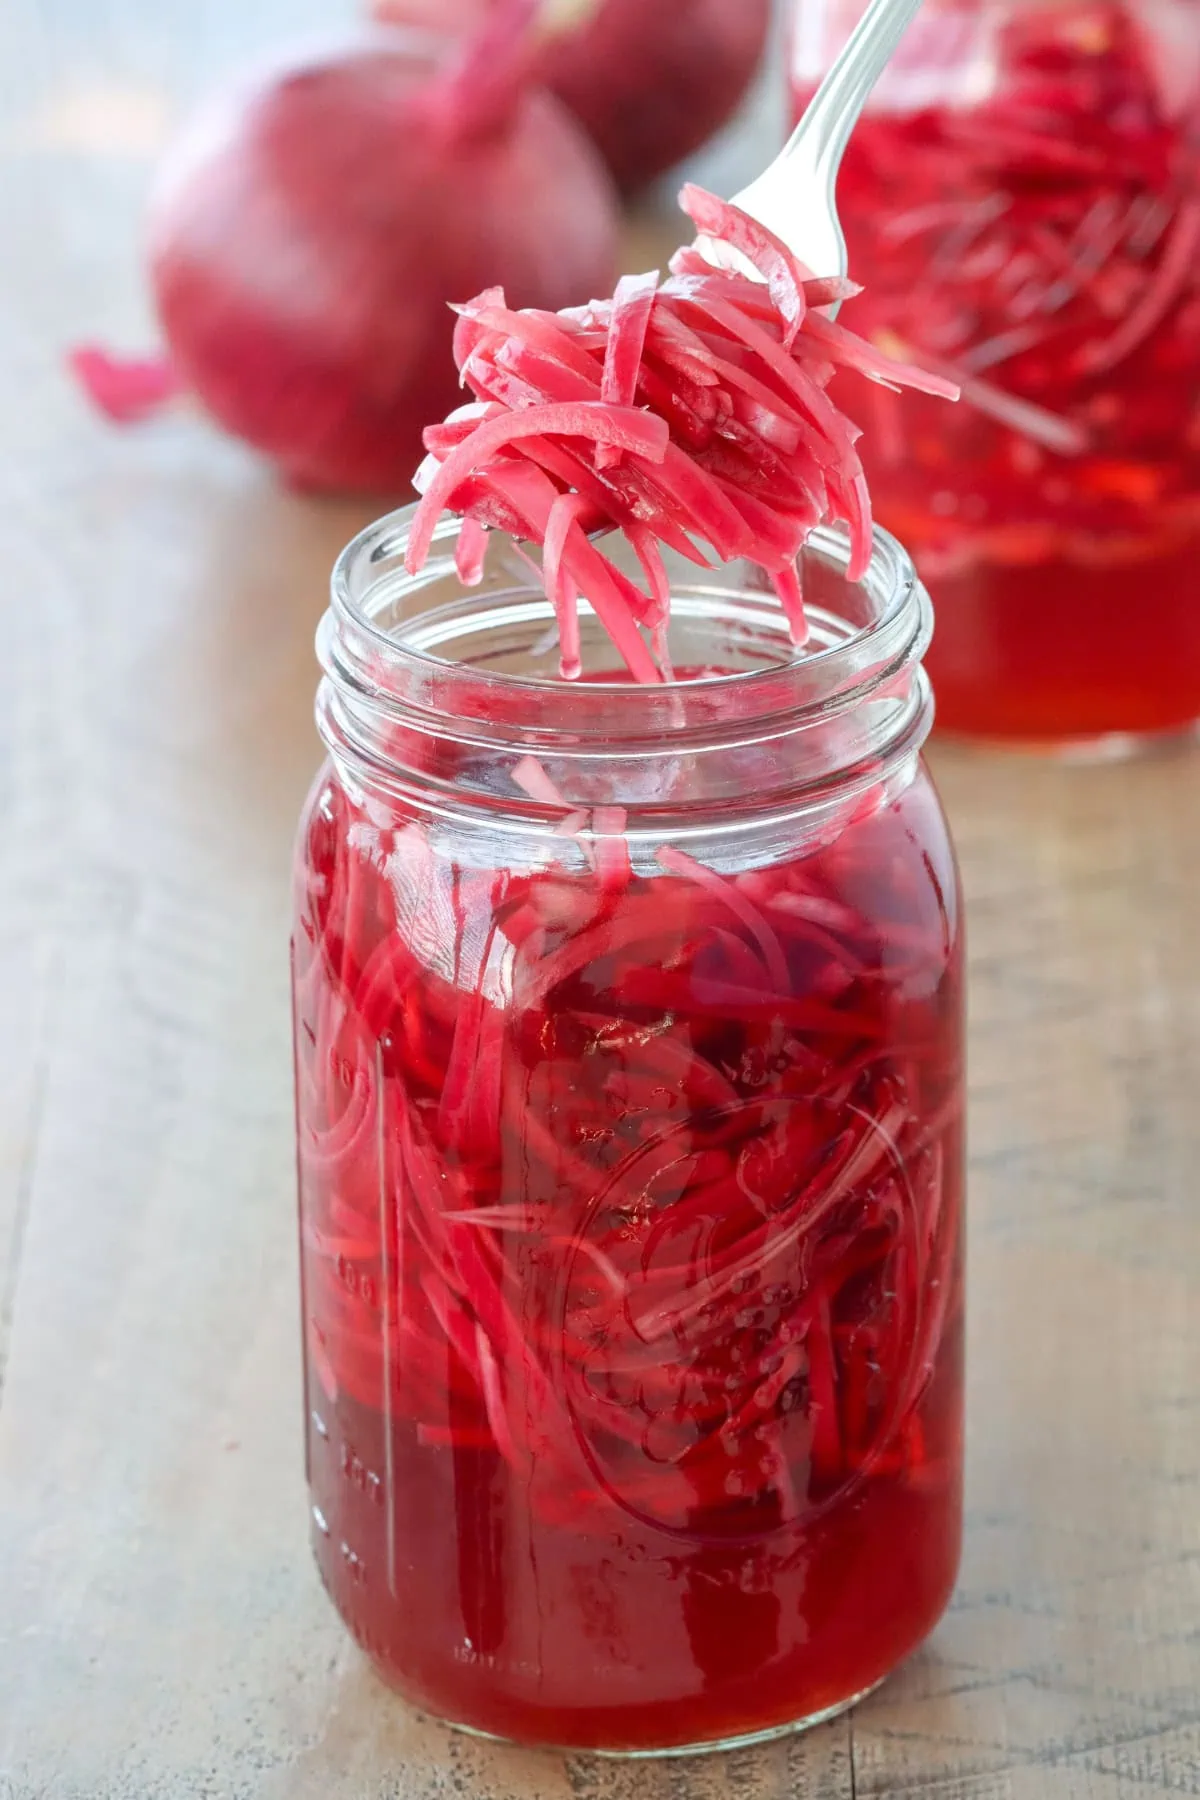
  • Red Onions: Any red onion works, but I prefer smaller ones. They tend to have a more vibrant purple color once pickled, making them even more visually appealing.
  • Red Wine Vinegar: The tangy flavor of red wine vinegar pairs beautifully with the sweetness of the red onions. It enhances both the color and taste, creating the perfect balance.
  • Sugar: I like to use raw sugar for a more natural sweetness, but granulated sugar works just as well if that’s what you have on hand.

The complete list of ingredients and their exact measurements can be found in the recipe card below.

How To Make Pickled Red Onions

Making the brine in a small saucepan for pickled red onions.

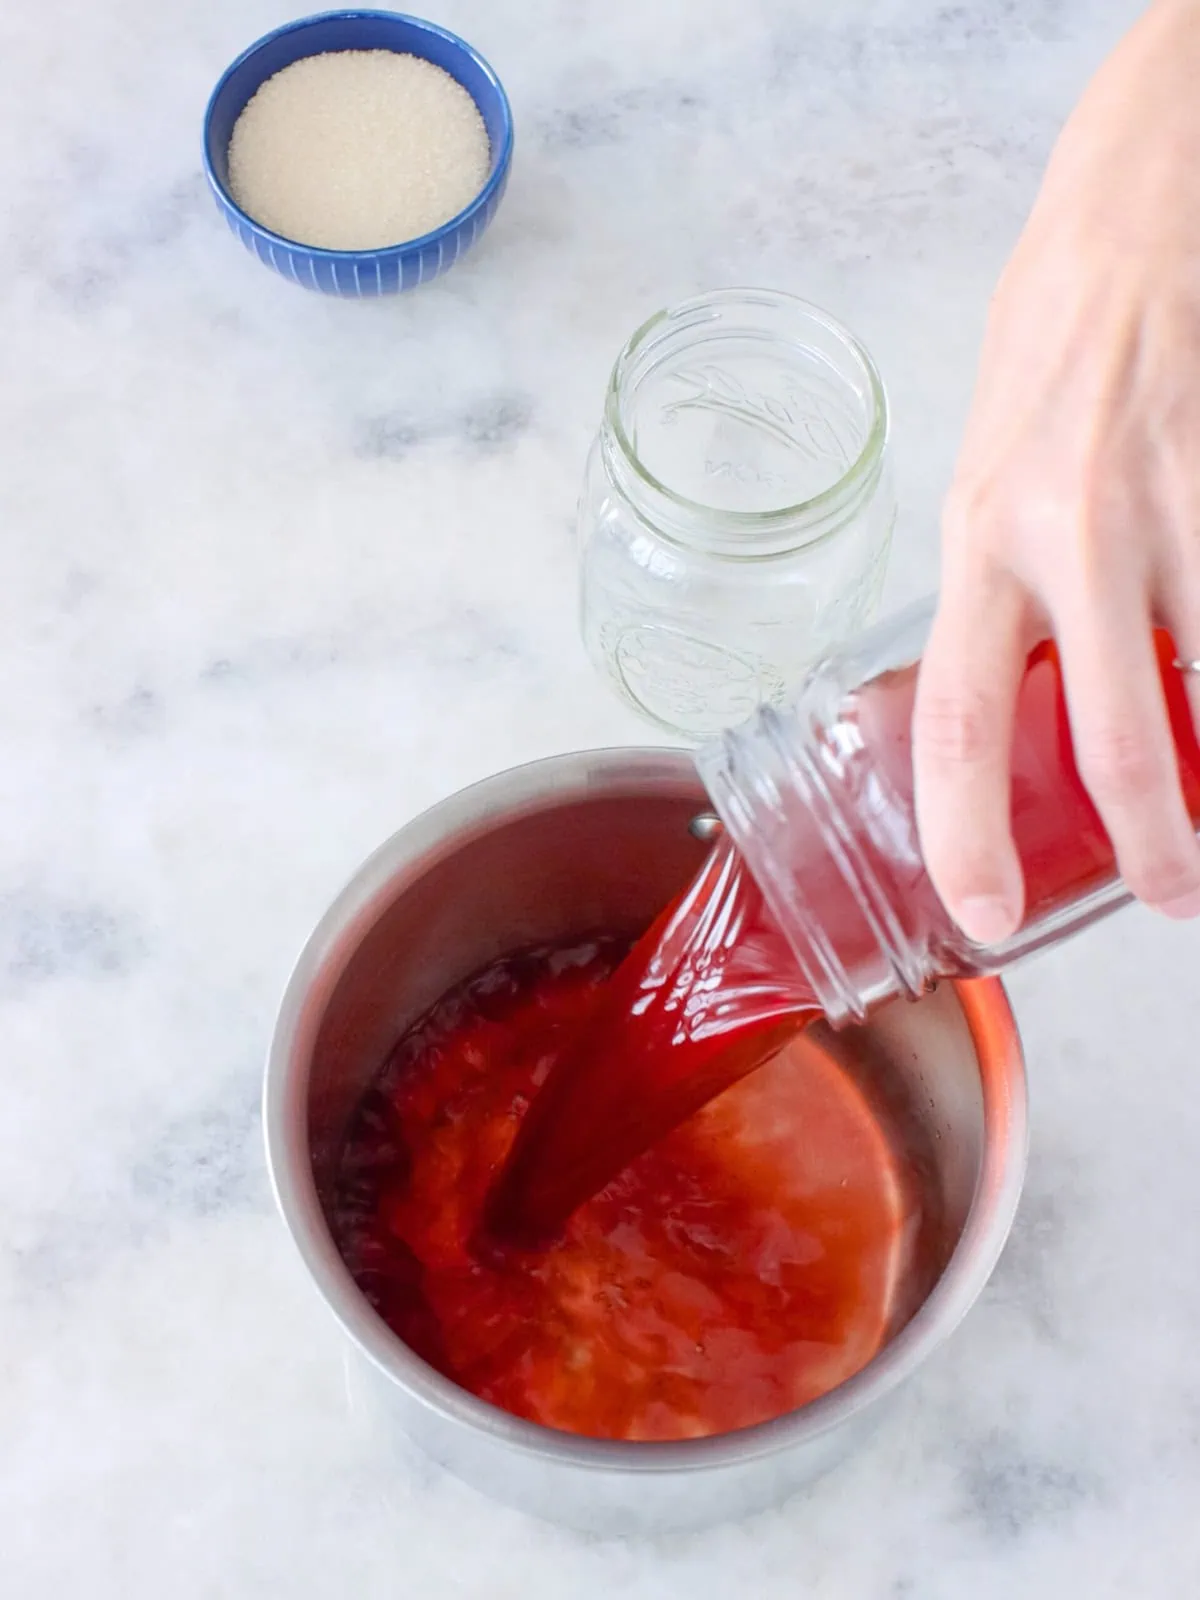
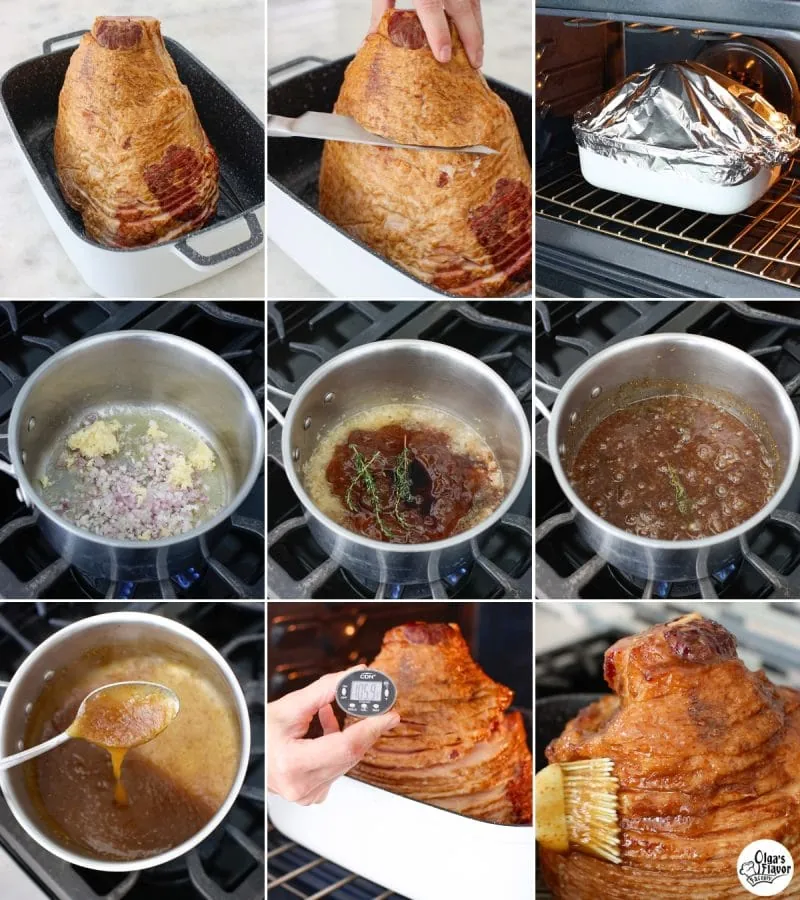
Step 1: Prepare the Brine. In a small saucepan, combine the water, red wine vinegar, sugar, and salt. Heat over medium heat, stirring occasionally, until the sugar and salt have dissolved. Once dissolved, remove from heat.

Sliced red onions on a cutting board.

Step 2: Meanwhile, prep the onions. Slice the onions in half, then into thin slices.

Sliced red onions in a glass mason jars.

Step 3: Pack the Jar. Place the sliced red onions into a glass mason jar. Using a mason jar makes it easy to store and serve the onions later.

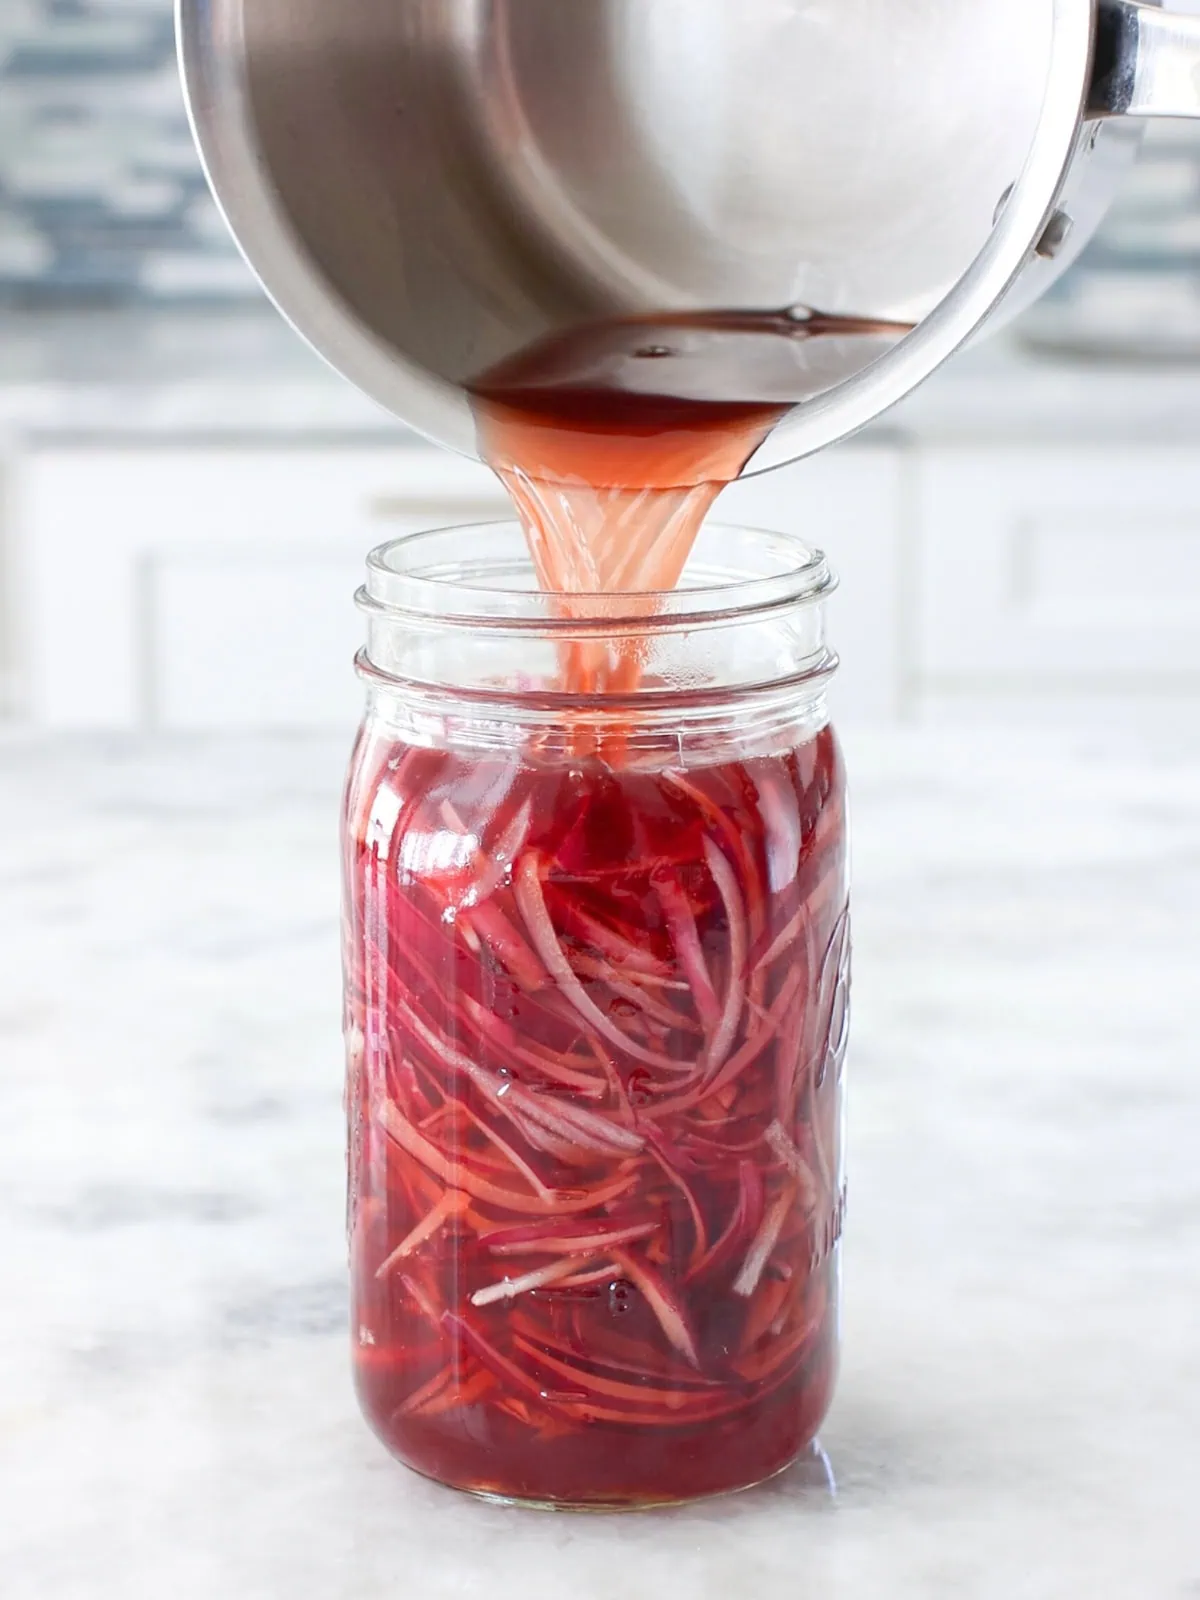
Step 4: Pour the Brine. Pour the hot brine over the onions in the jar, ensuring the onions are fully submerged. Let the pickled onions cool to room temperature, about 1 hour.

The pickled onions will be ready in about 30 minutes but are even better after a few hours or overnight. Refrigerate.

Serving and Storing

Serving: Let the pickled onions cool to room temperature for about 1 hour so the flavors can come together. They’ll be ready to eat in about 30 minutes but will still be warm.

For the best taste, try making them at least an hour ahead of time, or even a few hours or overnight, so they have time to cool and develop flavor.

Storing: Pickled onions can be stored in an airtight container (a glass mason jar works great) in the fridge for at least 1 week—this is when they’re at their best—and up to 2 weeks.

Easy pickled red onions in a glass mason jar on the counter.

Helpful Tips

  • Add Extra Flavor: Enhance your pickled onions by adding spices like peppercorns, pickling spice, garlic, or a bay leaf to the brine. These additions bring even more depth and complexity to the flavor.
  • Try Shallots: For a milder, sweeter taste, you can swap the red onions for shallots. They pickle beautifully and offer a slightly different flavor profile.
  • Convenient Storage: Using a mason jar to pickle your onions is not only convenient for storage but also makes it easy to refrigerate and serve directly from the jar.

What To Serve With Pickled Onions

Serve the pickled red onions in a whole variety of ways! They are one of the best toppings to add to just about anything. One of the most common way we enjoy them in our family is on avocado toast and tons of other sandwiches.

Avocado toast with pickled red onions and microgreens on a plate.

They are wonderful on this absolutely best cheeseburger recipe and even to something simple like the easy tuna salad sandwich.

The absolute best way to serve them is on cod fish tacos. We make them for every family reunion and the pickled onions are always a hit.

Frequently Asked Questions

How long do pickled red onions last in the fridge?

Pickled red onions can last in an airtight container in the fridge for up to 1-2 weeks.

Can I use a different type of vinegar to make these easy pickled red onions?

Yes! You can substitute the red wine vinegar with white vinegar or apple cider vinegar, but it will change the flavor and color.

How soon can I eat pickled red onions?

Pickled red onions can be eaten as soon as 30 minutes after cooling, but they taste even better if you let them sit for a few hours or overnight to let the flavors fully develop.

Do I need to refrigerate the easy pickled red onions?

Yes, pickled red onions should always be stored in the refrigerator to maintain their freshness and flavor.

Why are my pickled onions not as vibrant as I hoped?

Smaller red onions tend to produce the most vivid purple color once pickled. Also, the freshness of the onions can affect the color, so be sure to use fresh, firm onions for the best result. The red wine vinegar also plays a big role in the color, so if you use another vinegar, it will have a different color.

More Recipes You May Enjoy

  • Easy Tomato Onion Sauce
  • Dill Pickle Spears
  • Lecho - Bell Pepper, Tomato and Onion Stew
  • Homemade Tomato Vegetable Juice

If you tried this Easy Pickled Red Onions recipe or any other recipe on my blog, please leave a 🌟 star rating or a comment below. I love hearing from you!

Easy Pickled Red Onions

Olga Klyuchits
Tangy, sweet, and quick to make—these easy pickled red onions will become your go-to topping for so many things. The pickling process removes the sharp bite from the onions.
5 from 2 votes
Print Recipe Pin Recipe
Prep Time 5 minutes mins
Cook Time 2 minutes mins
Course Side Dish, condiment
Cuisine American

Ingredients
  

  • 2 red onions small-medium size
  • 1 cup water
  • 1 ½ cups red wine vinegar
  • ⅓ cup sugar
  • 1 teaspoon salt

Instructions
 

  • Start by making the pickling brine first. In a small saucepan, combine the water, red wine vinegar, sugar, and salt. Heat over medium, stirring occasionally, until the sugar and salt dissolve completely.
  • Slice your red onions and pack them into a glass mason jar. The size of the onions will determine how much you can fit in, but don't worry—once the brine is added, the onions will shrink a little.
  • Pour the hot brine over the onions, making sure they are fully covered by the liquid.
  • Allow the pickled onions to sit at room temperature for about 1 hour, letting the flavors combine.
  • Once cooled, cover the jar and store it in the refrigerator. The pickled onions will be ready to eat in about 30 minutes, but they taste better once they are completely cold and get an even better flavor after a few hours or overnight.

Video

Notes

  • Mason Jar Size: A 4-cup glass mason jar works perfectly for this recipe. Feel free to adjust the onion quantity to fit the size of your jar. The onions will shrink slightly once the brine is added, so pack them tightly.
  • Vinegar Substitution: You can swap red wine vinegar for apple cider vinegar or white vinegar, though it will change the flavor and color.
  • Flavor Variations: Add extra spices like peppercorns, garlic, or a bay leaf to the brine for extra flavor.
  • Storage: Pickled onions can be stored in an airtight container (a glass mason jar works great) in the fridge for at least 1 week—this is when they’re at their best—and up to 2 weeks.

Lemon Garlic Baked Cod

Juicy, flavorful, and incredibly easy to make, this Lemon Garlic Baked Cod is the perfect weeknight dinner. With just a few simple ingredients, it’s packed with flavor and so versatile—serve it with long grain white rice, fluffy homemade mashed potatoes, or even use it in cod fish tacos for a delicious twist.

Lemon Garlic Baked Cod on a sheet pan, with a slice of lemon.

This Lemon Garlic Baked Cod is everything you want in a simple yet mouthwatering meal. Whether you're cooking for a busy weeknight or preparing a special dinner, this recipe is a total winner.

You simply pop the cod in the oven and let it bake to perfection, all while you focus on other things. It’s a perfect solution for anyone looking to enjoy a healthy, satisfying meal without spending hours in the kitchen. Want more sheet pan dinners like this one? The Shrimp and Vegetable Sheet Pan Dinner is such a winner.

[Read more...]

Instant Pot Chicken Broth

Homemade chicken broth is incredibly easy to make, rich in flavor, and so much faster when prepared in the Instant Pot. Not only is it budget-friendly, but making your own broth also allows you to customize the flavor with any vegetables, herbs, and spices you enjoy. The result is a concentrated, delicious broth that's perfect for a wide variety of recipes. 

Instant Pot Chicken Broth, strained and poured into jars

Is it worth making your own chicken broth? Absolutely! Homemade chicken broth is packed with flavor, super easy to make, and the Instant Pot speeds up the process like a charm. Plus, you can make a big batch that’s perfect for soups, stews, sauces, and even main dishes. The depth of flavor it adds to your recipes is unbeatable.

Not only does it taste far better than store-bought broth, but it’s also really inexpensive to make yourself. I love tossing in some veggies along with the chicken to boost the flavor even more. Cooking it in the Instant Pot is a total game-changer for saving time. If you make extra, freezing it for later is such a convenience.

Chicken broth is definitely a staple in my kitchen. I always have a batch on hand because it’s so versatile and adds so much flavor to so many dishes. Whether I'm making a quick soup, a rich sauce, or a comforting stew, it’s my go-to base. Plus, having homemade broth ready to go makes me feel like I’ve got a secret ingredient for almost any meal. There’s nothing like having a stash of homemade broth ready whenever you need it.

And if you’re looking for more, I also have a terrific recipe for Stovetop Chicken Broth, as well as Vegetable Broth and Beef Broth too.

[Read more...]

Slow Cooker Apple Cider

Cozy up with this slow cooker apple cider recipe! Fresh apples, cinnamon, and brown sugar create a rich, comforting drink that’s perfect for cold days.

Slow Cooker Apple Cider poured into a mug

If you’re looking for a cozy, comforting drink to warm you up this winter, this slow cooker apple cider recipe is exactly what you need. Instead of just heating up store-bought apple cider, this recipe takes things up a notch by simmering fresh apples in your slow cooker. The apples are slowly cooked, then strained, resulting in a rich, full-bodied flavor that will make your house smell absolutely amazing. A hint of cinnamon adds warmth, while brown sugar gives it that lovely molasses sweetness. What’s really special about this recipe, though, is the way the apples are pressed through a fine mesh sieve, extracting all the delicious, concentrated flavor without any unwanted pulp. It’s the ultimate comforting drink—rich, flavorful, and perfect for sipping on cold days.

The best part? It’s incredibly easy to make and requires very little hands-on time. You won’t have to worry about it boiling over on the stove, and there’s no need to babysit it. Simply toss everything into the slow cooker, set it, and let the magic happen. Whether you cook it overnight, strain it in the morning, and keep it warm for a whole day of enjoyment, or cook it on high for a few hours and enjoy it later, this cider is perfect for any occasion. Imagine coming in from playing in the snow or sledding, then wrapping your hands around a warm mug of this homemade cider. It’s pure luxury! Plus, it’s an excellent drink to serve at parties or get-togethers—everyone will love having a hot cup of this delicious, soothing cider ready to enjoy.

[Read more...]

Cabbage Meatball Soup

Looking for a cozy, healthy meal? Try this cabbage meatball soup—full of fresh vegetables, flavorful broth, and tender chicken meatballs, a quick, hearty twist on classic Slavic Shchi.

Cabbage Meatball Soup (ladle in the soup pot)

Cabbage Meatball Soup is a hearty, wholesome dish that combines tender chicken meatballs with a rich, flavorful broth. A twist on traditional Shchi, Russian Cabbage Soup, this soup is filled with fresh vegetables like cabbage, carrots, onions, and peppers, making it a nutrient-packed meal that’s both satisfying and delicious. Perfect for those cold, cozy nights or busy weeknights when you need something quick and comforting, this soup delivers on flavor, freshness, and filling goodness—without the long cooking time.

Not only is this soup healthy, but it’s also beautiful to look at, with its vibrant colors and hearty textures. And those chicken meatballs? They’re incredibly tender and full of flavor, adding the perfect touch of protein to make the soup extra satisfying. If you love meatball soup, try my Russian Chicken Meatball Soup or Tomato Meatball Soup.

[Read more...]

Citrus Fruit Salad

This citrus fruit salad is bursting with the bright flavors of oranges, grapefruit, and mandarins. Add fresh mint for an extra layer of freshness in this simple, fresh and beautiful dish.

Citrus fruit salad with mint and honey

If you’re a fan of fresh fruit—or looking for a new twist on a classic fruit salad—you’re going to love this citrus fruit salad. While fruit is always delicious on its own, there’s something extra special about mixing citrus fruits into a vibrant, refreshing salad that bursts with flavor. Personally, I’m a huge citrus lover—when it's citrus season, we definitely enjoy it as much as we can. Oranges, mandarins, and grapefruit are always a welcome treat during those months, and each variety brings its own unique balance of sweetness, tartness, and refreshing aroma. So why not bring them all together in one simple, healthy dish?

This citrus salad is the perfect way to showcase the natural beauty and bold flavors of citrus fruits. It’s refreshing, light, and so easy to throw together, making it a great addition to any meal or just as a snack on its own. The bright, juicy oranges, tangy grapefruit, and sweet mandarins come together in a stunning display of color and flavor. But what really takes it over the top is the addition of fresh mint. Inspired by the Mint Lemonade I love making, the mint adds a burst of freshness that enhances the citrusy goodness and makes this salad even more irresistible.

This citrus salad is a showstopper both in taste and appearance. Whether you're serving it at a brunch, as a light side dish, or just enjoying it as a refreshing snack, it's guaranteed to brighten up your day. And the best part? Once you take the time to make it, you can enjoy it for several days.

[Read more...]

Shakshuka With Fresh Tomatoes

Looking for a delicious, flavorful breakfast? Try Shakshuka with fresh tomatoes, packed with tomatoes, onions, and herbs, plus eggs cooked right in.

Shakshuka with Fresh Tomatoes in a skillet, sprinkled with crumbled cheese and fresh herbs.

Shakshuka is one of those breakfasts that’s so comforting and flavorful, it’s hard not to fall in love with it. But when you make Shakshuka with fresh tomatoes, it’s taken to a whole new level. You get the perfect combination of tomatoes, onions, and fresh herbs all simmered together, with eggs cooked right in the center, creating a rich, savory base that’s both hearty and satisfying.

Serve it with a slice of crusty toast to dip into those perfectly runny egg yolks, and sprinkle a little cotija or feta cheese on top for that extra creamy, salty touch. It’s simply delicious!

[Read more...]

Layered Rainbow Jello

This colorful layered rainbow jello dessert is perfect if you're looking for a fun and healthy treat. Made with juice instead of boxed jello, it’s a healthier option - free from artificial ingredients and dyes, and ideal for kids’ parties and family get-togethers.

Layered Rainbow Jello cut into slices

Layered Rainbow Jello is the perfect treat for any occasion. This colorful dessert is not only eye-catching but also incredibly fun to make. It’s great for birthday parties, family gatherings, or just as a special treat for your little ones.

There are tons of rainbow jello recipes out there, but this one stands out because it uses fruit juice instead of boxed jello. This way, you can skip all the unnecessary sugars, artificial dyes, and chemicals. The result? A naturally delicious treat with bright, beautiful layers that pop—especially when combined with the creamy, sweetened condensed milk white layers. The addition of unflavored gelatin ensures the jello is firm and delightfully jiggly, just the way it should be. 

One of the best things about this recipe is how customizable it is. You can mix and match different juice flavors and colors, and even play around with fun shapes or individual servings.

As a mom, I love knowing that this treat is not only something my kids will enjoy, but it’s also made with wholesome ingredients. The flavors from the fresh juices take it to the next level, making it a hit even with adults—my husband, who’s not usually a jello fan, loves this version. The juice really makes all the difference!

[Read more...]

Orange Salad

A refreshing and beautiful orange salad with a mix of lettuces, dried cranberries, pepitas, and a tangy orange vinaigrette. Perfect for holiday meals or simple weeknight dinners.

Orange salad made with fresh oranges, spring salad mix, cranberries, pepitas and a fresh orange and lemon vinaigrette

This orange salad is the perfect blend of fresh, light, and vibrant flavors that come together in a way that's both simple and satisfying. Made with juicy, sweet oranges as the star ingredient, it features a mix of tender spring lettuces. This makes it both visually stunning and delicious. The addition of dried cranberries and crunchy pepitas adds a delightful texture. The homemade orange vinaigrette, with hints of shallots, garlic, and fresh herbs, brings everything together. This salad is not only a great choice for a special holiday meal, but it’s also easy enough to whip up on a busy weeknight. Its freshness and natural sweetness make it the perfect complement to a wide variety of dishes. The vibrant colors make it a showstopper on any table.

What makes this orange salad so special is its simplicity. With just a handful of ingredients, it delivers a burst of flavors that feel as refreshing as they are satisfying. The freshness of the oranges combined with the crisp lettuce creates a light, yet filling base. The vinaigrette adds a subtle richness that ties everything together. Perfect for any occasion, this salad is sure to become a favorite. Whether you're looking for a light side dish or something to brighten up your holiday spread. Easy to make, yet impressive to serve, this salad is a go-to for anyone looking for a fresh and flavorful addition to their meals.

[Read more...]

Potato, Bacon and Cheese Pastry

Whether hosting brunch or treating your family to something special, this Potato, Bacon and Cheese Pastry will be a crowd-pleaser at any meal. Thinly sliced potatoes, onions, bacon and cheese all encased in a buttery and flaky puff pastry.

Potato Pastry made with sliced potatoes, onions, bacon and cheese encased in puff pastry.

There’s something truly magical about the combination of crispy bacon, creamy potatoes, savory onions, and melted cheese. When these ingredients come together in a buttery, flaky potato pastry, you’ve got a dish that’s sure to impress. Whether you're hosting a brunch, serving overnight guests, or looking to treat your family to something extra special, this potato, bacon, and cheese pastry is the perfect option. The best part? It’s versatile enough to be served at any time of day – breakfast, lunch, or even dinner.

[feast_advanced_jump_to]

Potato Pastry Video

Why You'll Love This Recipe

Perfect for hosting: Looks impressive and will wow your guests. The golden, flaky puff pastry makes it a showstopper.

Very satisfying: A delicious combination of crispy bacon, creamy potatoes, savory cheese, and buttery pastry.

Convenient: Uses frozen puff pastry, saving you time without compromising on flavor.

Ingredients:

Ingredients for Potato Bacon Pastry on the counter.

(Scroll to the bottom of the page for the printable recipe with all the measurements.)

  • Frozen puff pastry sheet: Using frozen puff pastry makes this recipe quick and easy — just unroll and bake. It's the perfect shortcut for a delicious dish with minimal effort.
  • Bacon: Adds a smoky, savory flavor.
    • Instead of bacon, you can use some chopped ham.
  • Onion (any onion can be used, yellow onion is my usual choice)
  • Potatoes: I prefer using gold potatoes for their creamy texture and subtle sweetness, but you can use any type of potato for this recipe. Each variety will bring its own unique flavor and texture to the dish.
  • Fresh Herbs: I usually use chives and parsley for a fresh, aromatic flavor, but you can also experiment with green onions, dill, rosemary, or thyme.
  • Grated cheese: Any cheese that melts well can be used in this recipe. I recommend options like cheddar, mozzarella, fontina, Monterey Jack, Colby Jack, or Jarlsberg.
  • salt, ground black pepper, dry herbs and spices
    • One of my favorite spice blends to use is Trader Joe's Onion Salt and Simply Organic All Purpose Seasoning. You can always swap it out with other seasoning blends if you prefer.
  • Egg (for egg wash) – Brushed on top of the pastry for a golden, glossy finish.

How To Make Potato and Bacon Pastry

Before getting started:

  • Preheat the oven: Set your oven to 350°F and line a half sheet-sized rimmed baking sheet with parchment paper. This will help prevent the pastry from sticking and make cleanup a breeze.
  • Take the frozen puff pastry out of the freezer and thaw beforehand, but be sure to keep it cold. If it starts to warm up too much, it will lose its flaky texture. (Cover it with a damp towel or plastic wrap to prevent it from drying out while you prep everything else.)
  • Prep all the ingredients. Cut the bacon into small pieces, slice the onion, peel and slice the potatoes, and grate the cheese. Lastly, beat the egg with 1 tablespoon of water in a small bowl to make the egg wash.
Bacon cooking in a pan, large spoon scooping out a portion.
  1. Cook the bacon: Heat a skillet over medium heat and cook the bacon until it’s crispy and golden. Scoop it out and place it on a plate lined with paper towels to absorb any excess grease. You can also cook the bacon in the oven, then cut into slices. Tip: Let the bacon cool slightly before adding it to the pastry so it doesn’t melt the cheese when baking.
Sliced onions cooking in a pan.
  1. Cook the onions: Drain the excess bacon grease from the skillet, leaving just about ½ tablespoon. Add the onions, season with salt and pepper, and cook until they're tender and slightly golden. Be careful with the salt—the bacon grease can already add some saltiness.
Thinly sliced potatoes in a bowl with herbs and spices to be used in a potato pastry.
  1. Season the potatoes: In a large bowl, season the potatoes with salt, pepper, dry and fresh herbs, then mix everything together. As the potatoes sit, the salt will draw out moisture. Drain the liquid as much as possible before layering them on the pastry to avoid sogginess.
Frozen/thawed puff pastry rolled out with a rolling pin on a counter.
  1. Roll out the pastry: Roll out the thawed puff pastry to approximately 12x12 inches. It doesn't have to be exact.
Assembling Potato bacon pastry before baking. puff pastry on a baking sheet, topped with potatoes, onions and bacon.
  1. Assemble the pastry: Lay the potatoes on one half of the puff pastry, leaving a 1 - 1 ½-inch border around the edges. Top the potatoes with the cooked onions, followed by the bacon and then the grated cheese.
Assembling a potato bacon pastry, brushing egg wash around the edges.
  1. Brush with egg wash: Carefully brush the edges of the puff pastry with the egg wash. This will help the pastry seal.
Potato bacon pastry, folded and sealed. Cutting slits with a knife on top of pastry.

7. Fold and seal: Fold the other half of the pastry over the filling. Pinch the edges together to seal, and then use a fork to crimp the edges even more. Cut a few slits in the top to let steam escape while baking. Brush the top of the pastry with more egg wash for a shiny, crisp finish.

Potato pastry baked golden brown and taken out of the oven from the baking sheet to serving board.

8. Bake: Place the pastry in the oven and bake for about 45 minutes, or until the pastry is golden brown and puffed up. Once it’s out of the oven, let it cool for a few minutes before slicing and serving.

Expert Tips

Use Cold Puff Pastry: Make sure to thaw the frozen puff pastry properly but keep it cold right up until you’re ready to assemble the pastry. This helps the layers puff up nicely when baked, giving you that flaky, golden crust.

Be Careful with Potato Moisture: After seasoning your sliced potatoes with salt, let them sit for a bit to draw out excess moisture. When assembling the pastry, try to remove as much liquid as possible—this prevents the pastry from getting soggy.

Look how much liquid was at the bottom of the bowl!

Prepping potatoes for potato pastry - remove excess liquid

Make a Double Batch

If you're cooking for company or have a larger family, making a double batch is a great idea! (Honestly, it’s just the 4 of us, and with my two growing boys, one pastry just isn’t enough! 😊)

Frozen puff pastry usually comes with two sheets per box, so it works perfectly for this recipe. Double the rest of the ingredients and make two pastries at the same time. I recommend using an extra-large rimmed baking sheet to fit both pastries comfortably. Not only will you have enough to feed a crowd, but it also makes for a gorgeous presentation when serving! Plus, extra leftovers never hurt anyone. 😉

Potato pastry - making a double batch on an extra large rimmed baking sheet.

Enjoy having more of this deliciousness on hand—it’s perfect for lunch the next day or for a quick snack!

Frequently Asked Questions

Can I use a different type of potato for the potato pastry?

Absolutely! While I prefer golden potatoes for their creamy texture and flavor, you can use other varieties like Russet, or red potatoes. Just make sure to slice them thinly so they cook evenly in the pastry.

Can I use pre-cooked bacon in the potato pastry?

Yes, you can use leftover bacon and it will work well too. Learn how to cook bacon in the oven - my favorite way to do it!

Can you reheat leftovers?

Leftovers will stay fresh in the fridge for about 3 days. Simply reheat them in the oven at 375-400°F for about 5-8 minutes to get the pastry crispy again.

Potato Pastry sliced into pieces

Serving the Potato Pastry

This potato and bacon pastry is wonderfully versatile, making it a great option for both breakfast and dinner.

For a hearty breakfast or brunch, serve it alongside a fresh, vibrant fruit salad. The sweetness of the fruit perfectly balances the savory richness of the pastry, creating a well-rounded meal. If you're looking to make it extra special, pair it with some homemade Blueberry Lemon Scones or Orange Scones.

As a dinner option, this pastry makes a fantastic main dish when served with a simple salad. A crisp green salad with a tangy Lemon Vinaigrette works wonderfully, providing a refreshing contrast to the rich, cheesy filling of the pastry.

Potato Pastry made with sliced potatoes, onions, bacon and cheese baked in puff pastry.

More Amazing Potato Recipes

  • Crispy Breakfast Potatoes in the Oven
  • Salt Potatoes
  • Easy Scalloped Potatoes
  • Potato Waffles

If you tried this Potato Pastry recipe or any other recipe on my blog, please leave a 🌟 star rating or a comment below. I love hearing from you!

Potato, Bacon and Cheese Pastry

Olga Klyuchits
Whether hosting brunch or treating your family to something special, this potato, bacon, and cheese pastry will be a crowd-pleaser at any meal. Thinly sliced potatoes, onions, bacon and cheese all encased in a buttery and flaky puff pastry.
Print Recipe Pin Recipe
Prep Time 30 minutes mins
Cook Time 45 minutes mins
Total Time 1 hour hr 15 minutes mins
Course Breakfast, Main Course, Entree
Servings 4

Ingredients
  

  • 1 frozen puff pastry sheet
  • 4 slices bacon cut into small pieces
  • 1 onion sliced thin
  • 1 pound (2-3 small potatoes), peeled and sliced very thin
  • 1 teaspoon each chives, parsley, minced
  • 4 oz grated cheese (cheddar, colby jack, Jarlsberg)
  • salt, ground black pepper to taste
  • dry herbs and spices to taste
  • 1 egg (for egg wash)

Instructions
 

  • Preheat the oven to 350 degrees Fahrenheit.
  • Thaw the puff pastry, but make sure it stays cold and cover it so that it doesn't dry out.
  • Prep all the ingredients. Cut the bacon, slice the onion, peel and slice the potatoes and grate the cheese. Beat the egg with 1 Tablespoon of water slightly in a small bowl and set it aside.
  • In a skillet, cook the bacon on medium heat until it's crisp and golden. Scoop out the bacon and place it on a plate lined with a paper towel to soak up all the extra grease. (You can also cook the bacon in the oven.)
  • Meanwhile, drain all the excess bacon grease from the skillet, leaving behind only ½ Tablespoon. Add the onions to the skillet, season them with salt and ground black pepper and cook until tender and slightly golden. Be careful when adding the salt, because the bacon grease will be salty.
  • Cool the bacon and onions slightly.
  • Meanwhile, in a large bowl, place the potatoes and season them with ¼ teaspoon of salt and ground black pepper. Add the parsley and chives and mix to combine. As the potatoes are resting while the rest of the ingredients are cooling, the salt will draw out the moisture out of the potatoes. When you will fill the pastry with the potatoes, make sure to leave behind as much of the liquid as possible.
  • Roll out the thawed puff pastry to approximately 12x12 inches. It doesn't have to be exact.
  • Layer the potatoes on half of the puff pastry, leaving a 1- 1 ½ inch border. Place the onions on top of the potatoes, followed with the bacon and then the grated cheese.
  • Brush the edges of the puff pastry with the egg wash. Fold the second half of the puff pastry over the filling ingredients.
  • Pinch the edges of the pastry sheets together and then use a fork to seal the edges even more. Cut some slits on the top of the pastry. Brush the top of the pastry with the egg wash.
  • Bake in the preheated oven for 45 minutes, or until golden brown and puffy.

Notes

  • Flavor variations: Feel free to swap bacon for ham or sausage, or leave out the meat entirely and add mushrooms or veggies like bell peppers for a vegetarian version.
  • Remove excess moisture from potatoes: Don’t skip this step! When seasoning the potatoes, the salt will draw out moisture. Drain all the excess liquid, or your pastry may turn out soggy. You can even use a paper towel to blot out any remaining moisture before assembling.
  • Make a double batch: Perfect for hosting or feeding a large family. Frozen puff pastry typically comes with two sheets per box, which works perfectly for this recipe.
  • Use an extra-large rimmed baking sheet: This way, both pastries fit comfortably and can bake at the same time.


Poppy Seed Rugelach

These tasty and tender Poppy Seed Rugelach cookies are made with a cream cheese dough and filled with a sweet poppy seed filling. Learn how to make these crescent-shaped delights with endless filling options.

These scrumptious Poppy Seed Rugelach cookies are a perfect treat to delight your guests, whether it’s the holidays or any time of year. Shaped into crescent rolls, these pastries are filled with a sweet, creamy poppy seed filling that has a rich, almost nutty flavor and a delicate texture. The filling adds a unique depth of flavor that perfectly complements the soft, tender dough. It’s a taste that’s both comforting and distinctive, making these rugelach truly irresistible. The cream cheese dough makes them incredibly soft and tender, and it’s so easy to work with! Bonus: you can make the dough ahead of time and keep it in the fridge for a few days or even freeze it for months—how convenient is that?

In our family, these pastries were known as гости на пороге ("guests at the doorstep"), a nod to how quickly you can pop them in the oven when unexpected visitors arrive. The dough does need some chilling time before you shape them, so it’s ideal to prepare in advance and have it ready to go. The poppy seed filling is our favorite, but feel free to make your own (I’ve included a link to my recipe, which freezes beautifully), or use store-bought filling for even more convenience. The great thing about rugelach is the endless filling possibilities—jam, ground nuts, raisins, cinnamon, apples, Nutella, or even melted chocolate all make great alternatives. The only thing you’ll need to decide is which one to try first!

[Read more...]

Pryaniki - Russian Honey Spice Cookies

Discover the irresistible flavor of Pryaniki, Russian honey spice cookies that are soft, flavorful, and perfect for freezing! Try this easy recipe and surprise your friends and family with these homemade treats.

Pryaniki - Russian Honey Spice Cookies

Pryaniki have been a staple in Russian kitchens for centuries. These unassuming honey spice cookies are often glazed and served alongside a warm cup of tea. You’ll find them on every store shelf in Russia, Ukraine and Belarus but don’t be fooled by their simplicity. The store-bought versions are often a little underwhelming—think along the lines of graham crackers or vanilla wafers. They’ll satisfy a sweet craving.... when you're desperate, but they’re not exactly mind-blowing.

Now, if you’ve only ever tasted the packaged Pryaniki, get ready for a treat! Homemade Pryaniki are a whole different experience. When you make them yourself with wholesome, recognizable ingredients, the flavor and texture improve by 100%. Trust me, these cookies will steal the show.

I’ve been making Pryaniki for years, and there’s nothing more fun than watching people try them for the first time. When I offer them these cookies, they don’t seem too excited. In fact, if there are other options on the table, the Pryaniki might get ignored. But once they take that first bite, their expressions always change. They go from curious to surprised, reaching for seconds (or thirds!) and asking for the recipe.

The texture of homemade Pryaniki is so much softer in texture than the store bought variety, which is no small wonder, since who knows how long the latter were on the shelf before you opened up the package. You can actually taste the freshness. And the flavor? It's rich with honey, coffee, and a delightful blend of spices—vanilla, nutmeg, allspice, and a hint of anise. Pure magic.

These cookies also freeze beautifully. I love setting up a cozy baking station, throwing on a movie or my favorite podcast, and making a big batch ahead of time. After baking and glazing, just pop the cookies into a sealed zip-top bag and freeze them for months. When you’re ready to enjoy them, simply thaw, and they’ll taste as fresh as the day you made them.

[Read more...]

Festive Almond Green Beans

These festive almond green beans with toasted almonds, lemon zest, and Parmesan cheese are the perfect holiday side dish—easy to make and full of flavor!

Festive Almond Green Beans (with garlic, lemon zest and Parmesan cheese)

One of my favorite side dishes to serve is almond green beans. They’re versatile, quick to prepare, and add a fresh, vibrant touch to any meal. Whether it’s a cozy weeknight dinner or a festive holiday spread, almond green beans always make a meal feel a little more special. Plus, they’re so easy to make ahead of time, which takes the stress out of cooking for special occasions.

For everyday meals, I usually keep things simple with just a bit of seasoning, like my Garlic Green Beans. But when it comes to holiday tables, I love to take it up a notch! This festive almond green bean recipe adds a wonderful crunch from toasted almonds, a zesty pop of lemon, fresh garlic, parsley, and a sprinkle of Parmesan cheese. It’s a delicious way to elevate your green beans and make them feel like a star of the meal.

I know how tight cooking space can get during the holidays, and trying to figure out when everything should go in the oven or on the stove can feel like a juggling act. That’s why this dish is perfect—it’s made entirely on the stovetop and takes just minutes to prepare, leaving you with more room (and time!) for everything else.

[Read more...]

Pumpkin Tiramisu

Celebrate fall with this delicious, no-bake Pumpkin Tiramisu. Creamy mascarpone, subtle pumpkin flavor, and warm spices make this festive dessert a perfect addition to your Thanksgiving table or any autumn gathering.

Pumpkin Tiramisu (slice held up above pan)

If you love classic Tiramisu, you’re going to fall head over heels for this Pumpkin Tiramisu! It has all the creamy, velvety texture you love, with the addition of a subtle pumpkin flavor and the warm spices that make fall so irresistible. The pumpkin flavor is perfectly balanced—not too overpowering, just enough to add that comforting autumn richness.

The smooth mascarpone filling gets a rich makeover with pumpkin puree and cozy fall spices like cinnamon and nutmeg. It’s the perfect dessert to bring out the best of both worlds: the beloved Italian classic and the comforting flavors of pumpkin season.

This is the ideal dessert for Thanksgiving, especially with all the cooking and prep that comes with the big day. You can make it ahead of time—no baking required—and it’ll be ready when you need it. That means one less thing to worry about on Thanksgiving day. It’s also a great option if you’re a guest and want to bring something that’s both festive and will be a crowd pleaser. Trust me, this Pumpkin Tiramisu will be the perfect sweet ending to any holiday meal!

[Read more...]

Pear Almond Tart

This Pear Almond Tart is the perfect fall dessert. With a buttery almond filling and juicy pears, it’s a simple, delicious treat for autumn days. Perfect for busy bakers!

Pear Almond Tart, a slice in a tart pan

For me, fall baking always means apples and pears—I'm not as into pumpkin-flavored everything as some people, but I do love these sweet, juicy fruits. That said, I’m no stranger to pumpkin desserts. Over the years, I’ve started making my fair share of delicious pumpkin treats every fall, from a classic pumpkin pie to a rich pumpkin swirl cheesecake. But when it comes down to it, apple and pear desserts will always be my favorite. Maybe that’s because of my Belarusian roots, where apples and pears were in abundance and pumpkin baking wasn’t as popular. In fact, I didn’t even know what pumpkin pie was until we moved to the States!

With so many apple recipes already in my collection, I decided to branch out and explore more pear-based desserts. That’s when I found this Pear Almond Tart in a Taste of Home magazine, and I’m so glad I did.

The combination of almonds and pears is a match made in heaven. The tart's base is incredibly easy to make—just pulse the ingredients in a food processor, pour into the pan, and then arrange the pear slices on top. In just a few simple steps, you’ve got a gorgeous dessert ready for the oven. The result is a buttery, sandy texture with juicy, slightly tart pears that balance the sweetness of the almond filling. It’s the perfect dessert for cozy autumn days—and it’s ideal for anyone who needs a quick yet impressive treat.

[Read more...]

Potato and Chicken Casserole

Discover the ultimate comfort food with this delicious Potato Chicken Casserole! Tender potatoes, carrots, and savory onions come together, topped with juicy chicken and a golden, cheesy crust.

Potato Chicken Casserole

This Potato Chicken Casserole has been a beloved staple in our family for years, and I still can’t get enough of it! It has a delightful Soviet flair that instantly transports me back to my warm, nostalgic memories of our beloved Belarusian cuisine. Unlike many casseroles that can feel heavy, this dish strikes the perfect balance—it’s hearty yet not too heavy, combining potatoes and juicy chicken in one delightful pan.

The potatoes are tender and full of flavor while still holding their shape, and I love cutting them into long strips for that perfect texture and presentation. To elevate their taste, I sauté onions, carrots, and garlic, which infuse the potatoes with a rich, comforting flavor. They cook in a creamy dairy blend that makes every bite feel like a warm hug.

As for the chicken, it’s the crowning glory of the dish! Using chicken thighs ensures that it stays juicy and moist, while a spread of mayo and cheese creates a crispy, golden crust that’s simply irresistible.

This casserole is truly one of my favorites—honestly, it beats Lasagna any day! It may not win any beauty contests, but what it lacks in looks, it makes up for in flavor. Every time I serve it, I get rave reviews from friends and family. There’s something magical about the aroma wafting through the house as this dish bakes away in the oven, making it feel like home.

[Read more...]

Healthy Baked Chicken Meatballs

Enjoy juicy, delicious gluten-free baked chicken meatballs for a healthy twist on a classic dish. Get the easy recipe and tips to make perfect meatballs every time.

Healthy Baked Chicken Meatballs

Looking for a healthier meatball option that doesn’t compromise on taste? These delightful baked chicken meatballs are not just tender and juicy on the inside, but they also have a subtly crisp exterior that makes each bite a treat. If you're a busy mom like me who want to whip up something delicious without spending hours in the kitchen, these meatballs are a game changer!

What’s the secret to their incredible flavor? It’s all about the right blend of ground chicken, aromatic herbs and spices, combined with just enough binder to keep everything together. No heavy, dense beef or pork here! These chicken meatballs offer a light yet satisfying texture that melts in your mouth. Plus, they’re completely gluten-free, making them a fantastic choice for families with dietary preferences or restrictions. Chicken meatballs are my absolute favorite because of their taste and texture. It's a bonus that they are also a healthier choice too.

But the versatility doesn’t stop there! These chicken meatballs are perfect for meal prep. You can enjoy them on their own as is. Try adding them to your favorite pasta and sauce, or pile them high in a hearty sub or meatball sandwich. My favorite Easy Tomato and Onion Sauce is so good with them, or use them in the Honey Garlic Meatballs recipe. With this go-to recipe, you’ll have a nutritious and delicious option ready for any occasion—whether you’re feeding the family or hosting a get-together. Get ready to satisfy those meatball cravings in a way that’s both wholesome and incredibly tasty!

[Read more...]

Crispy Breakfast Potatoes in the Oven

Discover the joy of crispy breakfast potatoes made right in your oven! These golden, diced potatoes paired with sweet, tender onions create the perfect morning side dish. With a simple sheet pan method, you’ll enjoy a deliciously easy and convenient way to elevate your breakfast.

Crispy Breakfast Potatoes in the Oven potatoes and onions with fresh herbs

We absolutely love breakfast potatoes for breakfast. They’re hearty, delicious, and pair perfectly with all your breakfast favorites—think poached eggs, omelets, breakfast burritos, homemade breakfast sausage or even a classic breakfast sandwich. But let’s be real: breakfast prep can get chaotic. You’re juggling coffee, eggs, fruit, and more, all while trying to keep everything running smoothly.

That’s where my favorite method comes in: making crispy breakfast potatoes in the oven! Instead of hovering over the stove, you can pop your diced potatoes on a baking sheet and let the oven do the work. This way, you’re free to focus on other breakfast tasks while they bake to perfection. This is especially helpful if you have overnight guest or are hosting brunch at your house.

Not only can you fit way more potatoes on a giant baking sheet than in a frying pan, but the results are nothing short of amazing! You’ll end up with golden, crispy potatoes that are perfectly seasoned and so tasty. I use a lot LESS oil in the oven than when cooking them in a skillet on the stove, so they're actually healthier too. Trust me, this oven method will change your breakfast game.

[Read more...]

Best Kitchen Knives For Home Cooks

Wondering which knives every home cook should have in their kitchen? In this post, I’m sharing my top picks and explaining why they’re essential. You’ll learn about the best knives for different tasks, and get tips on how to care for them so they last for decades.

Best Kitchen Knives for home cooks
Must have kitchen knives.

Kitchen knives are truly the absolute most important tools in the kitchen. You can get along without many gadget and appliances, but knives are a must. Using high-quality knives that perform well can make the cooking process much more enjoyable.

I often get asked about the knives I use and recommend and I am so happy to finally do that in this post. We’ll cover the must-have essentials every home cook should own, along with a few nice-to-have extras that can make a world of difference.

Taking care of your knives is key to ensuring they last a lifetime, so I'll share my best tips to keeping them in pristine shape. Investing in quality knives not only elevates your cooking experience but also makes your food look amazing. That investment in quality knives really pays off in the long run. I have a blog post and video to level up your Knife Skills as a Home Cook and learn about Knife Safety.

[Read more...]

How To Sharpen Kitchen Knives at Home

A good set of knives is key to making cooking enjoyable and efficient. Keeping them sharp is absolutely crucial! Dull knives not only make your prep work harder, but they can also be more dangerous, since you’re more likely to cut yourself when using a blunt edge.

The good news? Sharpening your knives at home is a breeze with an electric knife sharpener! In this post, I'll walk you through some easy steps to help you sharpen your knives like a pro.

How to sharpen kitchen knives at home with an electric knife sharpener

Sharpening your knives at home is a fantastic option—it’s simple and super effective! Plus, you can handle it all on your own without needing to track down a professional, which let’s face it, most of us tend to put off. In fact, many people I’ve spoken with admit they’ve never actually sharpened their knives!

Now, I know that using a whetstone can seem a bit intimidating. It requires some skill, like knowing the right angle to hold the knife. I watched my Dad and grandpas sharpen knives with a professional whetstone growing up and it was fascinating.

Here’s the good news: electric knife sharpeners take all the guesswork out of the process! They make sharpening your knives easy and approachable. With just a few simple steps, you can give your knives the care they need and ensure they’re sharp and ready for your next cooking project. So why not give it a try? You’ll be amazed at the difference it makes! Prepping your food with a sharp knife is a game changer. If you’re eager to level up your knife skills and chop and slice like a pro, be sure to check out this blog post and video all about Knife Skills for Home Cooks. You’ll love it!

[Read more...]

Basic Knife Skills For Home Cooks

Master essential knife skills to prep ingredients safely and efficiently. Learn techniques to cut ingredients into uniform pieces for consistent cooking.

Basic Knife Skills For Home Cooks

Whether you’re whipping up a quick weeknight dinner, prepping for a weekend get together or an epic holiday meal, mastering basic knife skills can make a world of difference in your kitchen. Not only does it help you cut safely, but it also ensures your ingredients are sliced uniformly. Not only will this make your food look more beautiful, it also helps to have your ingredients cook through at the same time. We eat with our eyes first. If anything like me, it's so much more pleasant to have same cuts throughout your recipes, not have random giant or random sized pieces of food.

In this post, we’ll break down some essential techniques that every home cook should know. Don’t worry—this isn’t about fancy restaurant tricks or expert-level precision; it’s about giving you the confidence to tackle your veggies, meats, and herbs with ease. So grab your favorite knife, and let’s get chopping!

[Read more...]

Shrimp Scampi

If you're craving something decadent, try Shrimp Scampi. Tender shrimp simmered in a rich, garlicky white wine sauce - perfect as an appetizer or tossed with pasta for a restaurant-worthy meal at home.

Shrimp Scampi, sauteed in a skillet, in a garlic, white wine and fresh herbs

Shrimp Scampi is beautiful in it's simplicity, but sure doesn't lack in flavor. With perfectly cooked, plump and juicy shrimp, served with fresh parsley, basil, white wine and a bit of garlic, each component sings in this gorgeous composition. Perfect for date nights or a simple dinner solution, Shrimp Scampi will work every time, because it's elegant AND easy. The entire meal will be ready in the amount of time it takes to cook a pot of pasta. 

What I especially appreciate about Shrimp Scampi is that it is one of my solutions when I need a quick dinner but don't have anything planned. I try to have shrimp in my freezer for this very reason. All I have to do is get the bag of shrimp out of the freezer, fill it up with water and while I'm prepping the rest of the ingredients and bringing a large pot of water to a boil, the shrimp is thawed and ready for the skillet.

This classic recipe combines succulent shrimp with a garlicky, buttery sauce is perfect to be enjoyed with a crusty piece of bread, served with some grilled or roasted veggies or tossed with your favorite pasta. It’s the kind of meal that makes you look like a culinary rockstar without spending hours in the kitchen. 

[Read more...]

Nun's Puffs

Bake up a batch of these light and airy Nun's Puffs, a delightful choux pastry dessert baked in a muffin pan and drizzled with sweet honey. A fun and easy treat the whole family will love!

Nun's Puffs, a dessert made with pate choux pastry

Nun's Puffs are a delightful and fun-to-make recipe that I've been enjoying for years. I discovered this tasty treat in a Better Homes and Gardens cookbook back when I was engaged, and it's been a staple in my kitchen ever since.

The recipe calls for a classic pâte à choux dough, the same as used to make cream puffs, éclairs and beignets. Simply spoon the dough into a muffin pan and bake - the result is a light, airy pastry that's crisp on the outside and soft and crepe-like on the inside, like a cross between a popover and a Dutch baby. They definitely have a distinct eggy flavor, so if you're not a fan, this may not be for you.

I love how puffed-up and golden-brown these Nun's Puffs get in the oven. If you're a fan of cream puffs and beignets, you're sure to love these Nun's Puffs. They are traditionally served drizzled with honey, but you could also try them with whipped cream and fresh fruit and berries.

[Read more...]

Cheddar Biscuits

Homemade Cheddar Biscuits, with their irresistibly cheesy and tender texture, are a delightful treat that are surprisingly simple to prepare.

Cheddar Biscuits with a garlic and parsley

There's nothing quite like the mouthwatering aroma of freshly-baked cheddar biscuits wafting through the kitchen. These irresistible little treats are the perfect combination of flaky, buttery goodness and rich, creamy cheddar cheese.

From all the different types of foods that are available, bread is one of the best examples of simplicity. There is a reason that the smell of homemade bread makes any home inviting and why so many restaurants serve bread as the start of the meal, as an introduction to something great. Biscuits are one of the quickest breads to prepare. The buttery, tender and flaky morsels are so satisfying.

Even though Cheddar Biscuits are SO easy to make, but you can't mess with it too much. The issues that most cooks run into when making biscuits is that they don't know when to leave well enough alone. The secret to flaky and tender biscuits is to have little bits of cold butter distributed throughout the dough that will melt and puff up the biscuits when they bake at a high temperature. If you melt the butter with your warm hands or well-intentioned kneading when mixing up the batter, what you end up with are no flakes, no tenderness, just hard, dense biscuits.

Another reason why this recipe is one of the best, is because it's a drop biscuit recipe, meaning you don't have to roll it out. You just mix up the batter, then scoop it out with a portion scoop and place it on the baking sheet. Biscuits are not only great to enjoy on their own, you can make sandwiches with them with deli or try chicken salad. I especially love them as breakfast sandwiches. Top a biscuit with a poached egg and it makes your breakfast so much more indulgent and satisfying.

[Read more...]

Homemade Kefir

Creamy, tangy and packed with probiotics, homemade kefir is amazing. It's so simple to make and can be enjoyed as a drink or used in countless recipes.

How to make homemade kefir 
homemade milk kefir poured into jar

Making homemade kefir is one of the easiest things you can make that is SO healthy and good for you. It literally takes just a few minutes of hands on work and the results are amazing. Every since I started making homemade kefir, I can't get enough and my whole family loves it too.

Kefir is incredibly rich in probiotics and tastes so creamy, tangy and delicious. All you need is some milk and kefir grains. My wonderful aunt shared some of her kefir grains with me after I tried the kefir at her house and we have been hooked ever since.

The delicious kefir can be enjoyed as a drink on its own or used in smoothies and countless other recipes in place of buttermilk. I use it in pancakes, waffles, salad dressing, biscuits and so much more.

[Read more...]

Homemade Brown Sugar

Learn to make your own homemade brown sugar using just two simple ingredients. The result is superior quality - wonderfully fresh, fluffy, and with the perfect texture.

Homemade Brown Sugar 
DIY brown sugar

Making your own homemade brown sugar is a wonderfully simple process that yields a far superior result compared to store-bought varieties. All it takes is two basic ingredients - granulated white sugar and molasses. I like using molasses in some baking recipes as well as for sauces, like homemade barbecue sauce, so I always have both in my pantry.

Combined in just the right proportions, it will give you a rich, moist brown sugar with an unbeatable depth of flavor. When the two are mixed together, a remarkable transformation occurs - the granulated sugar softens and takes on a beautifully fluffy, pillow-like texture, while the molasses infuses every granule with its signature robust, slightly smoky taste. The end result is a brown sugar that is worlds apart from the dense, clumpy store-bought kind, with a delightfully light and airy quality that makes it an absolute joy to bake and cook with.

With just a few minutes of hands-on time, you can craft your own custom blend, tailoring the ratio of sugar to molasses to suit your personal flavor preferences. You can easily make dark brown sugar by adding more molasses, depending on the recipe that you need it for. The process is so simple, yet the payoff is immense - homemade brown sugar offers an unparalleled depth of flavor and an irresistibly soft, creamy texture. Making your own brown sugar gives you the option to mix up what you need anytime. You'll never run out of brown sugar again ☺️.

[Read more...]

Mint Lemonade

Homemade Lemonade is one of the most refreshing beverages and Mint Lemonade brings it up a notch by adding extra flavor. It's a summer staple that you can make and keep in your refrigerator to enjoy anytime.

Homemade Mint Lemonade

In our household, we adore citrus-based drinks, and Mint Lemonade is a timeless favorite that never fails to delight us.

Since I really like the smell and taste of citrus, it's no surprise that Lemonade is at the top of my list of beverages. It also doesn't involve any cooking, which is why it's a great everyday option. However, everywhere I've tried it, it's way too sweet. One of the biggest advantages of making things at home is that you have complete control over what goes in there. You can add more or less sugar or lemons. Make the lemonade exactly how you like by adjust the sweetness and tartness.

The addition of mint is absolutely divine. It transforms the Lemonade from ordinary to something incredible. The taste is so refreshing and bright, just like a beverage should be. You can also add some basil. The basil, mint and lemons go together so well.

[Read more...]

How To Clean an Electric Kettle

This simple, cheap and effective method will quickly remove buildup and restore your electric kettle to a sparkling clean condition in just a few easy steps.

How to clean an electric kettle

If you use an electric kettle or a stove-top kettle for boiling water, you may have noticed some white, chalky residue building up inside over time. It's totally normal and happens because of the minerals in the water that are left behind when you boil it. The frequency and amount of buildup depend on how often you use the kettle and the hardness of your water.

The good news is that cleaning the kettle is super easy! My mom taught me this method years ago, and it's been my go-to ever since. All you need is some cheap distilled white vinegar and water. This method works like a charm not only for electric kettles but also for stovetop kettles and coffee makers.

Vinegar is an awesome natural cleaner for many household items. You can also use lemon juice instead of vinegar, but I'd rather save my lemons for some Homemade Lemonade or countless other delicious recipes.

I love this method because it’s so easy and you don’t need to do any scrubbing or use harsh chemicals.

[Read more...]

Easy Baked Chicken Wings

Golden, crisp and delicious, this recipe for easy baked chicken wings is so simple to prepare, fantastic for meal prep and loved by both adults and kids.

Easy baked chicken wings

I often make these Easy Baked Chicken wings when I need a really easy meal. It's perfect for weeknights. It is comforting, tasty and pretty simple to prepare. What I especially love about this dinner is that you can prep it completely in advance, the night before or in the morning before you are planning to cook it. It really frees up your time during the hectic dinnertime.

Since I do the prep work and the cleanup ahead of time, all that's left is to take out the chicken from the refrigerator and get it in the oven. With minimum fuss, the house is perfumed with the smell of roasting chicken, bringing the nostalgia of a family gathering around the table, enveloped in the warm feeling of home.

Marinating chicken tenderizes it and infuses it with flavor. As the wings bake, they baste in their own juices, creating really juicy meat. Towards the end of baking, the chicken roasts just a bit more to crisp up the skin. You can also toss the wings in a buffalo or barbecue sauce.

What a filling and satisfying meal for a Wednesday night after work or on a weekend when you don't feel like spending hours in the kitchen. Toss these wings together, and whenever hunger strikes, you can start preheating the oven, since dinner is coming right up!

[Read more...]

Raspberry Vinaigrette Salad

Get out of a salad rut and make this creative Raspberry Vinaigrette Salad. The sweet and tart homemade vinaigrette takes center stage and pairs so well with the greens and toppings.

Raspberry Vinaigrette Salad made with a homemade vinaigrette , lettuce greens, pepitas, feta cheese, avocados and dried cranberries.

Ever since I started making this Raspberry Vinaigrette, it has been requested over and over by my family for every party. The combination of all the ingredients is such a wonderful pairing. The raspberry vinaigrette is very easy to make and the results are incredible. It is so refreshing and delicious.

As the base, I use a spring mix or a combination of baby arugula and baby spinach, then top it with pepitas, shallots, dry cranberries, pepitas, feta cheese and avocados. They all go together perfectly. There are sweet, tart, crunchy and creamy elements. Drizzled with the raspberry vinaigrette, it ties everything together in the most amazing salad.

[feast_advanced_jump_to]

Why You'll Love This Recipe

Frozen Raspberries = Smart & Delicious: No need to splurge on fresh berries for the vinaigrette—frozen raspberries work just as well and are way more budget-friendly. Plus, using frozen means you can enjoy this vibrant, fruity salad dressing all year long, not just during berry season.

Party-Perfect & Crowd-Pleasing: This salad is always a hit at gatherings! The sweet-tart raspberry vinaigrette adds a pop of color and flavor that makes it feel extra special, without a lot of fuss.

Great for Meal Prep
Make the vinaigrette once, and keep it in the fridge to toss together fresh, flavorful salads throughout the week. It’s an easy way to level up your lunches or dinners with minimal effort.

Raspberry Vinaigrette Salad Video

Ingredients

The complete list of ingredients and their exact measurements can be found in the recipe card below.

Raspberry Vinaigrette

Ingredients for homemade Raspberry Vinaigrette.
  • Frozen raspberries: Of course, you can use fresh raspberries. I recommend using frozen berries, since they are so much more budget friendly and taste just as great in the vinaigrette.
  • Olive oil or avocado oil: The base of the dressing
  • Red wine vinegar: balsamic vinegar or sherry vinegar will work here too
  • Shallot: shallots are much more mild in flavor and are perfect for salads. Red onion can be used instead.
  • Garlic
  • Sugar: instead of the sugar, you can use other sweeteners, like honey, maple syrup, agave syrup, etc.
    • you can omit the sugar also
  • salt, ground black pepper, to taste

Salad

Ingredients for Homemade Vinaigrette 
Salad.
  • spring mix or a combination of baby arugula and baby spinach
    • These are my favorite combination for this salad. The greens are tender and sweet.
  • pepitas/pumpkin seeds
    • You can also use other nuts or seeds, such as almonds, walnuts, pine nuts, etc.
  • shallot/red onion
  • dry cranberries
    • the sweet, dry berries are so lovely in this salad.
    • You can also use other dry fruit or berries, such as chopped apricots, dried blueberries or cherries
  • feta cheese
    • the creamy, briny cheese is perfect
  • avocados
    • they are a "cherry on top". Creamy, delicious and contrasting the crunchy nuts. It's also nice to have another fresh topping.
  • optional - fresh raspberries or strawberries

How To Make the Raspberry Vinaigrette Salad

  1. First, make the Raspberry Vinaigrette.
  2. Place the frozen raspberries in a saucepan and heat it up, just enough to thaw the berries.
    • You don't have to cook the raspberries at all. You don't even have to heat them up much.
    • As soon as the berries thaw, turn off the heat.
    • You can also thaw the raspberries a few hours in advance, or place them into the refrigerator overnight. (Cooking them is much faster.)
  3. Strain the raspberries through a fine mesh sieve to remove all the seeds.
  4. Place the seedless raspberry puree in a blender. Add the oil, red wine vinegar, shallot, garlic, salt, pepper and sugar, if using. Blend until smooth.
  5. Next, assemble the salad.
  6. Place the spring mix in a salad bowl and add all the toppings - pepitas, shallot, dry cranberries, feta cheese and avocados.
    • Fresh raspberries or strawberries are another delicious option.
  7. Drizzle the salad with the Raspberry Vinaigrette.
How to make Raspberry Vinaigrette Salad

Homemade Raspberry Vinaigrette

The fresh raspberry flavor is so prevalent in this vinaigrette. With the sweet, tart flavors, it also has acidity and brightness from the red wine vinegar, sweetness and bite from the shallot and the garlic adds additional savory flavor. the olive oil is the perfect base along with the raspberry puree.

It's truly unique without being weird 😊.

Homemade Raspberry Vinaigrette a spoonful held above a glass mason jar.

Meal Prep and How To Store Raspberry Vinaigrette

You can make the vinaigrette ahead of time and store it in the refrigerator for up to 5 days.

I usually store it in a glass mason jar with an airtight lid.

This makes it really great for meal prep. It's really convenient to have it done ahead of time.

You should get at least 2 cups of vinaigrette. This is more than enough for a big party, or for you to enjoy multiple times a week. You can also halve the recipe.

How to store Raspberry Vinaigrette

The Best Way To Cut and Store Watermelon

Here's the best way to cut watermelon. It's simple to do, mess free to eat and is so fun for kids and adults. I'll also show you the best way to store cut watermelon so it stays fresh as long as possible.

The best way to cut watermelon and the best way to store watermelon

When watermelon is in season, we can't get enough of it. There's nothing quite like a a juicy, sweet bite of watermelon that has been chilling in the refrigerator on a hot summer day.

Watermelon isn't hard to cut, but it can be difficult to maneuver if you have a really large melon and a big knife. After cutting watermelon for decades for many family gatherings, this is our favorite way to do it in our family - cut it into convenient and super cute watermelon sticks. They kind of look like popsicles!

They are so easy to cut this way and best of all, really easy to eat. The watermelon rind is handy to have something to hold on to without any utensils. Since the watermelon is in the shape of a narrow rectangle just wide enough to put in your mouth, you won't have watermelon juice dripping all over your cheeks, like you would with watermelon triangles or half moons.

I also love to cut up watermelon ahead of time when meal prepping. In that case, I cut it up into cubes and we are so much more likely to have a healthy snack more often when it's already prepped and ready to enjoy. I'll show you the best way to store cut watermelon so it stays fresh as long as possible.

[Read more...]

Nectarine Galette

This simple recipe for Nectarine Galette has a really flaky and tender crust, holding juicy fruit. It's the easiest way to make a pie and has a beautiful presentation.

Easy Nectarine Galette

This Nectarine Galette is one of the easiest ways to make a spectacular dessert with a stunning presentation and minimal effort. If you make the pie crust in advance, it takes less than 15 minutes to put this dessert together.

In most galette and pie recipes, you need to use cornstarch or flour to thicken the filling and to absorb some of the excess moisture. I love this Cherry and Apple Galette. Since many berries and fruit are really juicy, this is really important. In this recipe, I use jam instead of cornstarch. The jam is a barrier between the crust and the fruit and it helps to thicken some of the filling. I also didn't add any additional sugar to the nectarines, since the jam is already sweet. Omitting the cornstarch and flour keeps the filling really clean, without that chalky, starchy taste.

Most fruit and berries are really juicy, especially after baking them. Using nectarines or peaches is my favorite for galettes, because they keep their shape really well and don't end up with a pool of fruit juice after baking. The flaky, tender crust is golden brown on the edges and the bottom of the galette. It pairs so well with the juicy nectarines. Serve it warm with a scoop of vanilla ice cream for the perfect summer treat.

[Read more...]

Italian Dressing Chicken Marinade

This is a wonderful staple recipe for chicken, using homemade Italian dressing to marinate the chicken. You can use this recipe for endless varieties of chicken preparation - stovetop, roasting in the oven, grilling or cooking it in the slow cooker or Instant Pot.

Italian Dressing Chicken
This is a perfect chicken marinade that you can use for many different recipes, using homemade Italian dressing to marinate the chicken.

Did you know that Italian dressing works really well as a marinade for chicken? It has everything you need to add so much flavor to the chicken - oil, acidity, fresh herbs, garlic and more. You can certainly use your favorite store bought dressing and it makes it so quick and easy. (It's a great shortcut to have in your cooking repertoire.)

Making a homemade Italian dressing is really easy too and really makes the flavors pop. It's so much fresher and is made with pantry staples, so you can whip it up anytime. Using fresh shallots, garlic and a combination of fresh and dry herbs will really elevate the flavors. Not only can you use this as a chicken marinade, you can use part of the dressing for your salad too.

This recipe is very versatile too. It works for just about any type of chicken you want to make - chicken thighs or chicken breast, chicken drumsticks or wings and even kabobs. You can also cook the chicken any way you want - on the stovetop, in the oven, put it on the grill and it even works for the slow cooker and Instant Pot. It's perfect for meal prep too. Make a big batch and freeze half of it for an easy meal later.

[Read more...]

Ice Cream Cake With Strawberries

An ice cream cake with strawberries is the ultimate cake for summer days. It's just perfect with a crunchy pretzel crust, swirls of strawberry jam in the vanilla ice cream and topped with whipped cream and fresh strawberries.

This ice cream cake with strawberries needs to be on the menu every summer. With a combination of vanilla ice cream, strawberries and whipped cream, this means an EPIC summer dessert. The buttery, salty and sweet pretzel crust has the perfect crunch to offset the creamy ice cream. I recently made a batch of my favorite homemade strawberry jam, and it's just a little bit tart and not too sweet.

The swirls of jam in the ice cream are so fun to find in each spoonful. The fresh strawberries and whipped cream are the absolutely ideal bow on top of this incredible dessert. I wanted this to be a nod to one of my other favorite refreshing summer desserts, Strawberry Pretzel Jello.

We tend to get together A LOT with family and friends during the summer. The menu is simple, fresh and with lots of seasonal produce, so this cake is the perfect addition. I love that it is so easy to put together but ends up being a complete showstopper. 

[Read more...]

Layered Tuna Salad (Mimosa Salad)

This beautiful layered tuna salad makes a real statement and is perfect for special occasions. It's called the Mimosa Salad and is made with potatoes, carrots and eggs. All these ingredients are so simple, but the presentation makes it really special.

Mimosa Salad, a Layered Tuna Salad with potatoes, carrots and eggs

Mimosa salad was a staple for holiday meals in the former USSR. Growing up in Belarus, hearty salads like Olivie or Shuba (Fur Coat Salad) were a must to make for birthdays, holidays and weddings. Mimosa or Mimoza salad, has nothing to do with the mimosa drink, but was named this way in honor of the yellow flowers on a mimosa tree.

A layered salad takes very simple ingredients and transforms them into something so much more special. It looks so much more elevated and upscale, but is really quite easy to create. Even though these ingredients are hearty, grating most of the ingredients on the small holes of a box grater gives them a really cloud-like and much more fluffier texture. This salad would look and taste very different if you just chop everything up and mix them with mayonnaise.

Layered salads are great because you can make them in advance, but they also look stunning too. Garnish them with some fresh herbs and I even made some cute carrot flowers to make it every prettier. Not only is the Mimosa salad a statement piece for special occasions, but it tastes great, so I often make it for meal prep to enjoy for lunches throughout the week.

[Read more...]

How to Grill Lamb Chops (Chimichurri Sauce)

Learn how to grill lamb chops in a chimichurri sauce. This simple method will give you really juicy meat with a sauce that is so fresh and flavorful. It's a perfect recipe for special occasions.

Grilled Lamb Chops are such a special treat, especially marinated in a Chimichurri Sauce, which gives them a really terrific garlic and herb flavor. It's so easy and quick to prepare and is perfect to serve for special occasions when you don't want to spend too much time in the kitchen. Lamb is most definitely a great option when you want to serve something special for company or for holidays and special occasions. It's delicious, impressive and couldn't be easier to make. Lamb chops are so tender, as long as you don't overcook them, and I will show you a few tricks how to get a great sear on the outside without overcooking the meat in the center too.

I think it's especially wonderful for the days when you just can't commit to anything that requires time consuming prep work. It literally takes a few minutes to make the sauce - just mix everything up in the blender. The sauce is used both to marinate the lamb and then to serve alongside the grilled meat as an extra boost of flavor.

[Read more...]

How To Freeze Bread

Learn how to freeze bread so you can reduce food waste and have bread on hand at all times. Bread freezes so well! Once you start freezing bread, you'll be doing it with lots of baked goods.

How to freeze bread, sliced or a whole loaf.

Freezing bread is a game-changer. Whether you're a baking enthusiast with too many loaves on your hands or someone who loves having bread on hand ready to go, freezing bread is so convenient. Whenever I bake more than 1 loaf at a time, like my Multigrain Bread, I like to put one in the freezer for later.

Freezing bread not only helps reduce food waste (which is my favorite part) but also ensures you have delicious, almost-fresh bread at your fingertips whenever you need it.

[feast_advanced_jump_to]

Why Freezing Bread Works So Well

Keep it fresh longer: Freezing an entire loaf of bread helps it stay fresh for months, letting you enjoy it at your convenience without worrying about it going stale.

Perfect for sliced bread: Freezing slices individually means you can grab just what you need, whether it’s one slice or several, and pop them right in the toaster straight from the freezer.

No waste: Freeze leftover bread from your baking spree or store-bought loaves to prevent them from going to waste. You can enjoy it whenever you need it. (Freeze all kinds of bread! Sweet breads are perfect for the freezer, like Cranberry Walnut Bread or even Pistachio Bread.)

Convenient & ready when you are: Always have your favorite bread on hand without having to make frequent trips to the bakery or grocery store. Just grab a slice (or a whole loaf) from the freezer when you need it.

Thaw or toast, your choice: Thaw bread at room temperature or pop slices straight into the toaster for a quick, crispy treat.

How to Freeze Bread

Let’s talk about the best ways to freeze bread so it stays fresh and full of flavor!

  1. Place the bread in the freezer while it is still fresh.
    • If you know that you aren't likely to eat the entire loaf of bread in the next few days, place half of it in the freezer right away, whether you're bringing it from the store or baking it yourself.
  2. You can freeze a whole loaf of bread or freeze sliced bread.
  3. Store the bread in the original packaging or a freezer ziplock bag or vacuum seal it for longer storage.
    • If you plan on eating the bread within a month, you can just keep it in a plastic bag, but if you want to store it longer than that, use a freezer ziplock bag or vacuum seal it.
  4. The bread will stay fresh for 1-3 months in a freezer ziplock bag or 6 months - 1 year if vacuum sealed.
Frozen sliced bread in a storage bag.

How to Thaw Bread

Thawing a Whole Loaf of Bread

  • Remove the bread from the freezer.
  • Defrost at room temperature or in the refrigerator. I like to take the bread out of the package and wrap it in a clean kitchen towel. It will protect the bread from drying out AND absorb any condensation from the bread as it is thawing. If you leave it in the bag, the bread will sometimes get soggy from the condensation.
  • Store bread that you thawed in the refrigerator.

Thawing Sliced Bread

I love the convenience of frozen sliced bread. You can take out just one slice of bread as needed or take out the whole loaf, depending on what you want that day. If you're just taking out a slice of bread, it thaws really quickly. If you want to thaw the whole loaf, do the same as above.

How to thaw and reheat frozen bread tutorial.

How To Freeze Bread Video

Reheating Frozen Bread

If you want warm bread, you can place it into the oven right out of the freezer, but it will take longer to reheat (obviously) but it may also reheat unevenly.

Reheating a Whole Loaf of Frozen Bread:

I recommend thawing it at least half way and then reheating.

  • Preheat the oven to 400 degrees Fahrenheit.
  • Place the bread on a rack on a rimmed baking sheet.
  • Reheat for 10-20 minutes, depending on the size of your bread.

Reheating Sliced Frozen Bread:

  • This is the easiest for sure! Just pop the bread in a toaster or a toaster oven until heated through or toasted to your preference.
Reheating frozen bread
toasting frozen sliced bread.

Best Bread Recipes

  • Easy Homemade Bread
  • Crusty No-Knead Bread
  • Multigrain Bread
  • Pumpernickel Bread

Frequently Asked Questions


Can I freeze any type of bread?

Yep! You can freeze almost any type of bread, whether it’s homemade or store-bought. Just make sure it’s properly wrapped to prevent freezer burn.

Can I freeze bread more than once?

It’s not recommended to freeze bread more than once, as the process can degrade the texture and flavor.

How can I make my bread crunchy when reheating it?

To get that crispy, crunchy texture, lightly spray the outside of the loaf with water, then bake it at 400°F (200°C) until it’s warmed through. The water helps bring back the crispiness, making your bread taste freshly baked. This method is especially great for whole loaves!

Can I freeze bread sliced or should I freeze the whole loaf?

You can do both! Freezing slices makes it easy to grab just what you need, while freezing the whole loaf will keep it fresh the longest. Keep in mind that if you freeze a whole loaf, you'll need to thaw it first before slicing—it’s not easy to slice when frozen, but it will stay fresh longer in the freezer!

Borscht - Борщ

Borscht is one of the most well-known Soviet recipes, a Ukrainian beet soup made with many other vegetables. This version is made with beef, potatoes, cabbage, lots of aromatic vegetables. I share all my tips for a vibrantly bright red Borscht that has so much incredible flavor.

A bowl of Beet Borsch - made with beef, potatoes, beets, carrots, onions and served with sour cream and fresh herbs.

There are so many variations of Borscht recipes, because everyone likes to add their special touch. I grew up eating it regularly and have always loved it. This soup is so hearty and full of nutrients; you can just feel the vitamins as you eat each delicious spoonful.

This amazing soup is just brimming with so many vegetables - onions, carrots, celery, potatoes, cabbage, beets, tomatoes, garlic and fresh herbs. You can add meat to the soup or keep it vegetarian and add beans or dry mushrooms. Both variations are so delicious.

Borscht always brings me back to my childhood and it's one of the most special meals to share with my family today. My boys have loved it since they were babies. It makes me so happy to be filling them up with something so nutritious. Not only is it fantastic during the summer when all the produce is amazingly fresh, but it's such a comforting dish to enjoy in the cold winter months, whether you live in snowy New York or sunny Florida.

[Read more...]

How To Bake a Spiral Ham (Glazed)

Learn how to bake a spiral sliced ham, perfect for any special occasion. A smoky, juicy ham with a sweet and salty fig glaze is a beautiful main course that is impressive but easy to prepare.

How to bake a spiral sliced ham (fig glaze)

A beautiful baked ham is a perfect main course for Easter, Thanksgiving or Christmas. With a minimal amount of effort, you can have a main course that is perfect to take center stage. A spiral sliced ham is a great option. Most of the prep work is done for you. It's so easy to just heat it through and add a few finishing touches. 

If you've never tried fig preserves, I highly recommend giving it a try. It is so delicious, not too sweet and pairs so well with savory flavors. The sautéed shallot and garlic gives the glaze a more dimensional flavor. The balsamic vinegar is also sweet but balances everything else out with some acidity too. It really is a winning combination with the salty, smoky ham.

[feast_advanced_jump_to]

Ingredients

Ingredients for spiral sliced ham with a fig glaze
  • spiral sliced ham (shank end)
  • butter or oil (for sauteing the shallots and garlic)
  • shallot (you can use an onion instead)
  • garlic
  • fig preserves (you can also use orange marmalade, apricot jam, etc.)
  • thyme (rosemary is another great option)
  • balsamic vinegar (red wine vinegar or sherry vinegar are also good options)

The complete list of ingredients and their exact measurements can be found in the recipe card below.

What type of ham should you buy? 

For this recipe, I am using a bone in, spiral cut ham. There is very little extra fat, so you don’t need to do much prep work to the ham before getting it into the oven.

The shank end of the ham has the bone that goes straight through the center of the ham, making it easier to slice. The sirloin/butt portion of the ham has two bones instead of one, making it a bit more challenging to slice. 

You can also use a bone-in, uncut cured ham, also the shank end, for this recipe. In that case, trim the excess fat, leaving only about ¼ inch thickness and score the remaining fat in 1 inch intervals, in a crosshatch pattern, or spiral slice it yourself.

Spiral Sliced Ham

Add More Slices to the Ham

Most spiral sliced hams are not sliced at the very top. As the ham bakes, the cut portion of the man will separated from the uncut top portion of the ham, creating huge gaps.

There's nothing wrong with it, it will just look a little homely. To prevent this, use a sharp knife to create 3-5 more slices parallel to the other slices on the ham across the top. (If you forget this step and the ham starts to separate, just create a few slices and as soon as you notice it and it should fix the problem.)

adding additional slices to the top of ham

Spiral Glazed Ham Video

How to Bake a Spiral Sliced Ham

  1. Preheat the oven to 325 degrees Fahrenheit. 
  2. Prep the ham.
    • Place the ham in a deep roasting pan on top of a rack. Pour in about 1 ½ cups water into the bottom of the roasting pan. Cover the top of the ham and the roasting pan first with parchment paper, then with another layer of aluminum. 
  3. Bake the ham in the preheated oven for 45 minutes - 1 ½ hours, depending on the size of your ham.
    • The internal temperature of the ham should reach about 100 degrees Fahrenheit.
  4. Meanwhile, prepare the glaze for the ham. 
    • In a small-medium saucepan, saute the shallot and garlic in the butter, until the shallots are tender.
    • Add the fig preserves, the balsamic vinegar, thyme and water. Mix to combine and simmer for another 5 minutes.  Discard the thyme springs. 
    • I like to blend all of this in a blender or use an immersion blender to get a smooth consistency. This way, when you brush the glaze over the ham, you won’t have bits of shallot all over it. If the glaze is too thick, thin it out with a bit more water. 
  5. Glaze the ham.
    • When the ham has reached an internal temperature of 100 degrees Fahrenheit, remove it from the oven. Uncover it, and brush it evenly with the glaze. 
  6. Increase the temperature of the oven to 400 degrees Fahrenheit. Return the glazed ham to the oven and bake for another 10-15 minutes, until the glaze has caramelized a bit.
  7. Remove from the oven, let it rest for 15 minutes before serving. Serve with the remaining Fig and Balsamic Glaze.  
How to bake a spiral sliced ham

Helpful Tips and Frequently Asked Questions To Bake a Spiral Ham

Where can you buy fig preserves? Is there a substitute?

Fig preserves are sold in the aisle with all the other jams, jellies and preserves. It is fairly easy to find.
If you can’t find it, Plum Preserves, Black or Red Currant Preserves will work instead too. Orange marmalade, apricot jam or apple jelly are also good choices.  

Bake the ham in a moist environment on a lower temperature.

Adding water to the bottom of the roasting pan and then covering the ham with parchment paper/aluminum foil will create steam on the inside and cook the ham in a moist low heat.
This will help a lot to keep the ham from drying out and overcooking.

Why use parchment paper and aluminum foil?

I use both parchment paper and aluminum foil to create a steamy/moist environment for the ham. This will not only help the ham bake through faster, but will keep it from drying out too. I also like to avoid aluminum foil touching food. The parchment paper alone will not crimp around the roasting pan. The aluminum foil is more durable and malleable. If you have a really large roasting pan with a lid, you can just use the lid.

Don't overcook the ham.

The ham is already cooked. In this recipe, we are only  heating it through. If you bake it too long, it will dry out and won’t be juicy and delicious. Hams are ready to eat right out of the package - just like the ham you buy at the deli for your sandwiches.
Use an instant read thermometer to check the temperature and just get it hot all the way through.

Add the glaze at the end.

When the ham is warmed through, add the glaze and finish baking it uncovered.

Close up of a spiral baked ham with a fig glaze

What to Serve with Ham

  • Scalloped Potatoes
  • Garlic Green Beans
  • Perfectly Fluffy Mashed Potatoes
  • Sauteed Carrots

Multigrain Bread

Soft and tender, this multigrain bread is so delicious, full of many different grains that is perfect for sandwiches and toast.

Multigrain Bread

This multigrain bread has so many different grains and two different flours, honey and butter, so it has extra flavor and texture. The process is quite simple and results in a tender loaf, not dense at all. If you have a stand mixer, there's hardly any work involved at all.

I have my standard recipe for regular white bread, and I love it. It's so simple to make and always comes out so well. I've also wanted to find a good recipe for a whole wheat multigrain bread as well. The problem with most whole wheat recipes is that the bread is so dense and hard, and that's not what I was going for. I also didn't want to be perusing many aisles in several specialty stores looking for all the different grains that the recipe would need. As soon as I gave this recipe from American's Test Kitchen a try, my husband and I were both very pleased with the results and I've been making it for several years now. It's so rewarding to take out a warm and fragrant loaf of bread from the oven, and the smell that wafts throughout the house is amazing.

The bread has whole wheat, rye, barley, oats, triticale and flaxseed grain and additional all purpose flour to make it soft. It's perfect to enjoy with a bowl of soup and sandwiches. My favorite is to use it for all kinds of toast - simply with butter or avocado toast, smoked salmon toast, cream cheese and arugula and so much more. The options are endless.

[Read more...]
Next Page »
Olga in the kitchen

Welcome!

Hello. I’m Olga, the creator and photographer of the recipes that you see here. Welcome to my online kitchen, where I share step by step recipes and kitchen tips, to make homemade cooking easier, practical, and of course, more flavorful.

More about me

Get Weekly Menu Ideas, Recipes, Kitchen Hacks:

Join thousands of others to get my best cooking and meal prep tips plus handpicked seasonal menu ideas in your email.

Olga's Flavor Factory ebooks bundle
Olga's Ebooks
Olga's Flavor Factory family 2024
Life/Family

Popular

  • Honey Garlic Glazed Meatballs
  • Limoncello Cake
  • Easy Homemade Bread Recipe
  • Ultimate Steelhead Trout Recipe (VIDEO)

Seasonal

  • Healthy Cabbage Salad
  • Fish and Vegetables En Papillote (Fish in Parchment)
  • Borscht - Борщ
  • Orange Salad

Footer

↑ back to top

The Home Cook's Handbook

A Practical Kitchen Resource Guide

Learn more
Buy now

Get Weekly Menu Ideas, Recipes, Kitchen Hacks:

Join thousands of others to get my best cooking and meal prep tips plus handpicked seasonal menu ideas in your email.

About

  • About
  • Starting A Blog
  • FAQ
  • Olga’s Tips
  • Shop

Social Links

  • Instagram
  • Mail
  • Pinterest
  • YouTube

Quick Links

  • Home
  • Privacy Policy

© 2024 Olga's Flavor Factory